1. Introdución
This manual provides detailed instructions for the safe and effective operation, maintenance, and troubleshooting of your Nitecore MH40S rechargeable flashlight and NB10000 power bank. Please read this manual thoroughly before use to ensure optimal performance and longevity of your devices.
2. Contido do paquete
Verifique que todos os elementos que se indican a continuación estean presentes no seu paquete:
- Nitecore MH40S Flashlight
- 2 x Nitecore NL2150 5,000mAh Li-ion Batteries
- Nitecore NB10000 10,000mAh Power Bank
- Interruptor remoto sen fíos
- Adaptador QC
- Cable de carga USB-C
- Junta tórica de reposto
- Acollador
- Peche de gancho e bucle
- 2 x Hook-and-loop Straps
- Funda

3. Características do produto
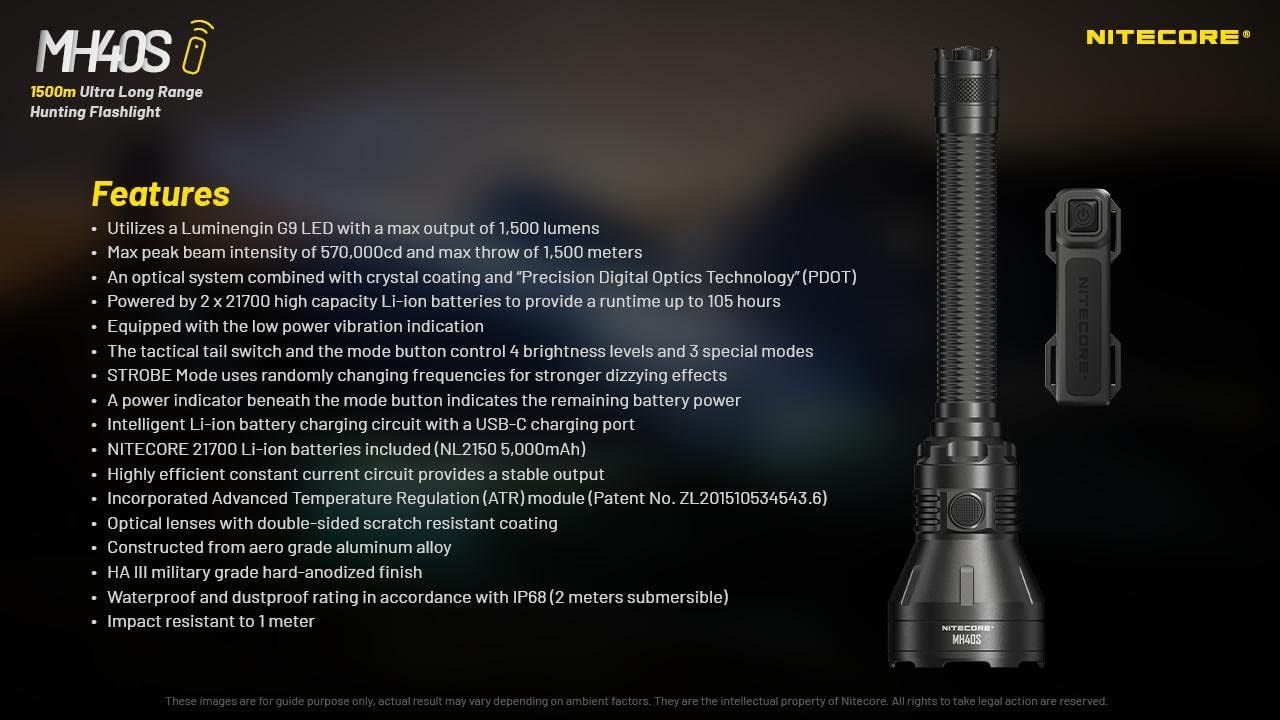
- Utilizes a Luminengin G9 LED with a maximum output of 1,500 lumens.
- Maximum peak beam intensity of 570,000cd and a maximum throw of 1,500 meters.
- Optical system combines crystal coating and "Precis Digital Optics Technology" (PDOT).
- Powered by 2x high-capacity Li-ion batteries, providing a runtime of up to 105 hours.
- Equipped with a low power vibration indicator.
- Tactical tail switch and mode button control 4 brightness levels and 3 special modes.
- STROBE mode uses randomly changing frequencies for enhanced disorienting effects.
- Power indicator beneath the mode button displays remaining battery power.
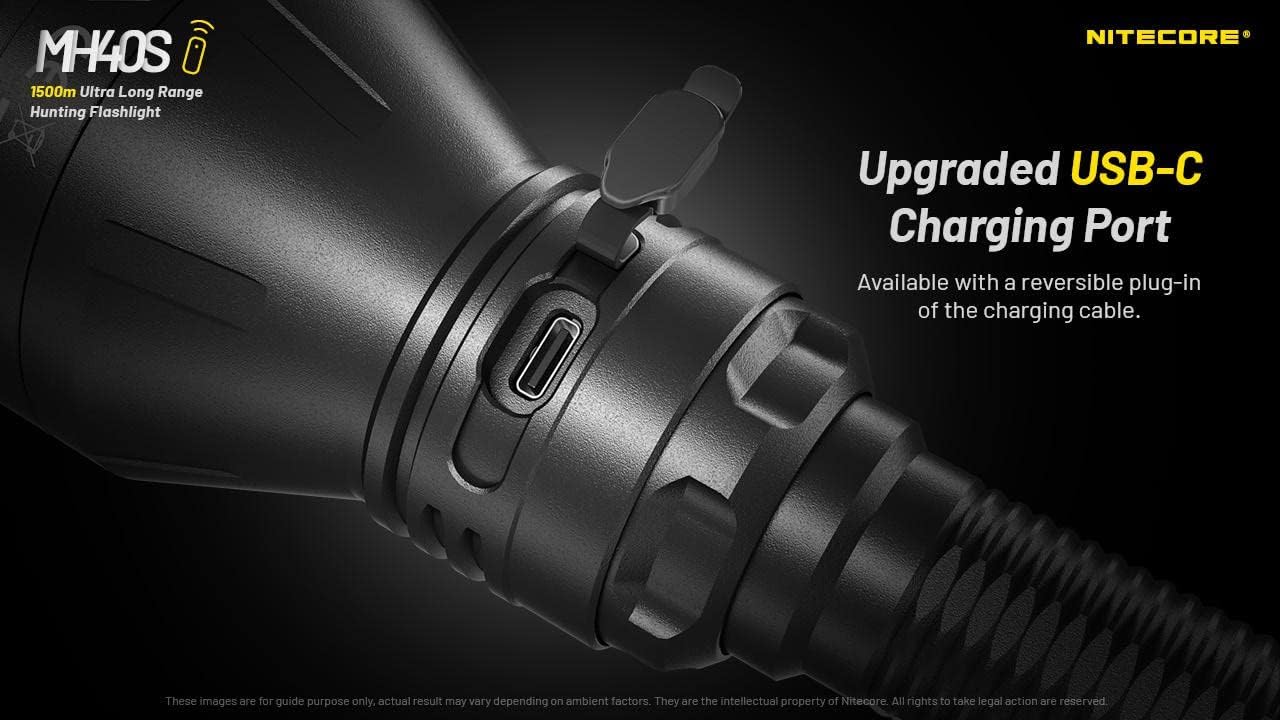
- Intelligent Li-ion battery charging circuit with a USB-C charging port.
- Includes Nitecore NL2150 5,000mAh Li-ion batteries.
- Highly efficient constant current circuit ensures stable output.
- Incorporates Advanced Temperature Regulation (ATR) module.
- Optical lenses feature double-sided scratch-resistant coating.
- Construído en aliaxe de aluminio de grao aerodinámico con acabado anodizado duro de grao militar HA III.
- Waterproof and dustproof rating in accordance with IP68 (2 meters submersible).
- Resistente ao impacto ata 1 metro.

4. Especificacións
4.1 MH40S Flashlight Technical Data
| Estándar FL1 | TURBO | ALTO | MID | BAIXO | ESTROBA | BALIZA | SOS |
|---|---|---|---|---|---|---|---|
| Saída | 1,500 lúmenes | 500 lúmenes | 150 lúmenes | 18 lúmenes | 1,500 lúmenes | 1,500 lúmenes | 1,500 lúmenes |
| Tempo de execución | 3h 15min | 7h 15min | 25 h | 105 h | — | — | — |
| Distancia do feixe | 1,500 m | 860 m | 450 m | 150 m | — | — | — |
| Intensidade do feixe | 570,000 cd | 186,000 cd | 51,000 cd | 5,800 cd | — | — | — |
Note: The stated data is measured in accordance with international flashlight testing standards ANSI/PLATO FL 1-2019, using 2x 21700 Li-ion batteries (5,000mAh) under laboratory conditions. Actual data may vary due to different battery types or environmental conditions.

4.2 Especificacións xerais
- LED: Luminengin G9 LED
- Reflector: SMO
- Batería: 2 x 21700 Li-ion (NL2150 5,000mAh included)
- Modos especiais: Location Beacon, SOS, Strobe
- Beam Color: Luz branca
- Lonxitude: 256 mm (10.08 polgadas)
- Tamaño da cabeza: 65 mm (2.56 polgadas)
- Peso: 245.8 g (8.67 oz) (sen pilas)
- Material: Aliaxe de aluminio de grao aerodinámico
- Remate: HA III military-grade hard-anodized
- Clasificación impermeable: IP68 (2 metros sumerxible)
- Resistencia ao impacto: 1 metro
4.3 NB10000 Power Bank Specifications
- Capacidade: 10,000mAh 3.85V
- Enerxía nominal: 6,400mAh 5V
- Entrada (USB-C): 5V - 2.4A / 9V - 2A
- Saída (USB-C): 5V - 3A / 9V - 2A / 12V - 1.5A
- Dual Ports Output: 5V - 3A (MAX)
- Material: Carbon fiber frame and panels
- Dimensións: 4.8" x 2.32" x 0.42"
- Peso: 5.29 oz
- Características: Dual output channels (USB and USB-C), LED remaining power level indicator, one-touch low current mode.
5. Configuración
5.1 Instalación da batería
- Unscrew the tail cap of the MH40S flashlight.
- Insert the two Nitecore NL2150 21700 Li-ion batteries with the positive (+) terminals facing the head of the flashlight.
- Aperta a tapa traseira firmemente para garantir un contacto axeitado e resistencia á auga.
Aviso: Ensure batteries are inserted with correct polarity. Incorrect insertion can damage the device.
5.2 Carga inicial
Before first use, fully charge the MH40S flashlight and the NB10000 power bank.
5.2.1 Charging the MH40S Flashlight
- Localiza o porto de carga USB-C no corpo da lanterna.
- Open the rubber cover protecting the port.
- Connect the USB-C charging cable to the flashlight and the QC Adapter.
- Plug the QC Adapter into a power outlet.
- The power indicator beneath the mode button will flash during charging and remain solid when fully charged.
- Close the rubber cover after charging to maintain water and dust resistance.
5.2.2 Charging the NB10000 Power Bank
- Connect the USB-C charging cable to the USB-C input port on the NB10000.
- Connect the other end of the cable to a USB power source (e.g., QC Adapter, computer USB port).
- The LED indicators on the power bank will show the charging status.
6. Instrucións de funcionamento
6.1 Basic Flashlight Operation
The MH40S features a tactical tail switch and a mode button for control.

6.1.1 Activar/Desactivar
- Momentaneamente activado: Half-press and hold the tactical tail switch. Release to turn off.
- Constante aceso/apagado: Fully press the tactical tail switch until a click is heard to turn on. Fully press again to turn off.
6.1.2 Brightness Level Adjustment
- With the flashlight on, press the mode button to cycle through brightness levels: LOW - MID - HIGH - TURBO.
- The flashlight will memorize the last used brightness level (except for special modes) when turned off and on again.
6.1.3 Special Modes (STROBE, BEACON, SOS)
- With the flashlight on, press and hold the mode button to activate STROBE mode.
- While in STROBE mode, press the mode button again to cycle through BEACON and SOS modes.
- To exit special modes, short press the mode button or turn off the flashlight.
6.2 Wireless Remote Switch Operation
The included wireless remote switch allows for convenient control of the MH40S from a distance of up to 1 meter (3.28 feet).

- Momentaneamente activado: Press and hold the designated button on the remote switch. Release to turn off.
- Constante aceso/apagado: Press the designated button on the remote switch to turn on. Press again to turn off.
- ESTROBA: Press the designated STROBE button on the remote switch to activate. Press again to turn off.
The remote switch is powered by a 3V CR1632 button cell battery and features advanced power cut-off (APC) technology for extended standby time.
6.3 NB10000 Power Bank Usage
- Dispositivos de carga: Connect your device to the USB-A or USB-C output port of the NB10000 using an appropriate charging cable.
- Indicador de nivel de potencia: Press the power button on the NB10000 to check the remaining battery level via the LED indicators.
- Modo de baixa corrente: For charging delicate electronics (e.g., Bluetooth earphones, smartwatches), activate the low current mode by pressing and holding the power button until a specific indicator lights up.
7. Mantemento
- Limpeza: Limpar o corpo da lanterna cun pano suave eamp pano. Non use produtos de limpeza ou disolventes abrasivos.
- Roscas e xuntas tóricas: Lubricate the threads and O-rings regularly with silicone grease to maintain water resistance. Replace worn O-rings as needed.
- Coidado da batería: Remove batteries if the flashlight will not be used for an extended period. Store batteries in a cool, dry place.
- Porto de carga: Keep the USB-C charging port clean and free of debris. Ensure the rubber cover is securely closed when not charging.
8 Solución de problemas
- A lanterna non se acende:
- Comprobe a polaridade da batería.
- Asegúrese de que as baterías estean completamente cargadas.
- Aperte ben a tapa da cola.
- Clean battery contacts with an alcohol swab.
- Brillo reducido ou tempo de funcionamento curto:
- Batteries may be low; recharge them.
- Batteries may be aging; consider replacement.
- Ensure the flashlight head and tail cap are tightly screwed on.
- Remote switch not responding:
- Check the distance between the remote and the flashlight (max 1 meter).
- Replace the CR1632 battery in the remote switch.
- Asegúrese de que non hai obstáculos que bloqueen o sinal.
- Problemas de carga:
- Verify the USB-C cable is properly connected.
- Ensure the power source (QC Adapter) is functioning.
- Clean the charging port for any debris.
9. Información de seguridade
- Non faga brillar a lanterna directamente nos ollos.
- Manter fóra do alcance dos nenos.
- Do not disassemble or modify the flashlight or power bank, as this voids the warranty and may cause damage.
- Avoid exposing the devices to extreme temperatures or direct sunlight for prolonged periods.
- Use só baterías e accesorios de carga recomendados.
- Elimina as baterías segundo a normativa local.
10. Garantía e soporte
Nitecore products are covered by a warranty. For detailed warranty information and support, please refer to the official Nitecore websitio web ou póñase en contacto co seu distribuidor local. Garde o recibo de compra para reclamacións de garantía.
Para obter máis asistencia, visite o Nitecore Store on Amazon or the official Nitecore websitio.


