Introdución
This manual provides comprehensive instructions for the installation, operation, and maintenance of your Tecmojo 1U 4-Post Vented Server Rack Mount Shelf. This shelf is designed to provide a stable and ventilated platform for various IT, AV, and network equipment within a standard 19-inch server rack.
Constructed from durable cold-rolled steel, this shelf offers a robust solution for organizing and supporting your equipment. Its adjustable depth feature ensures compatibility with a wide range of rack configurations.

Imaxe: Máis deview of the Tecmojo 1U 4-Post Vented Server Rack Mount Shelf, showing its black finish and perforated surface.
Especificacións do produto
| Característica | Detalle |
|---|---|
| Dimensións do produto | 13.8" de profundidade x 19" de ancho x 1.7" de alto (350 mm de profundidade x 482.6 mm de ancho x 44.45 mm de alto) |
| Peso do elemento | 6.53 libras |
| Material | Alloy Steel (SPCC Commercial Cold Rolled Steel) |
| Dispositivos compatibles | Servers, UPS, NAS, Amplifiers, AV/Network Equipment |
| Rack Unit (U) | 1U |
| Ancho de rack | 19 polgadas |
| Profundidade de montaxe axustable | 13.8 to 23.6 inches (350mm to 600mm) |
| Capacidade de peso | Ata 242 libras (110 kg) |
| Cumprimento | EIA/ECA-310-E |

Image: Detailed diagram showing the dimensions (depth, width, height) and key specifications of the 1U rack shelf.

Image: Illustration demonstrating the adjustable depth range of the shelf, from a minimum of 13.8 inches to a maximum of 23.6 inches.
O produto inclúe
The following items are included with your Tecmojo 1U 4-Post Vented Server Rack Mount Shelf:
- 1U Vented 4-Post Shelf (main unit)
- 12-24 Screw x 8
- 12-24 Cage nut x 8
- Parafuso M6 x 8
- Porca de brida M6 x 8
- 10-32 Screw x 8
- Anti-slip stop x 2
- Velcro cable tie x 2
- Manual de instrucións
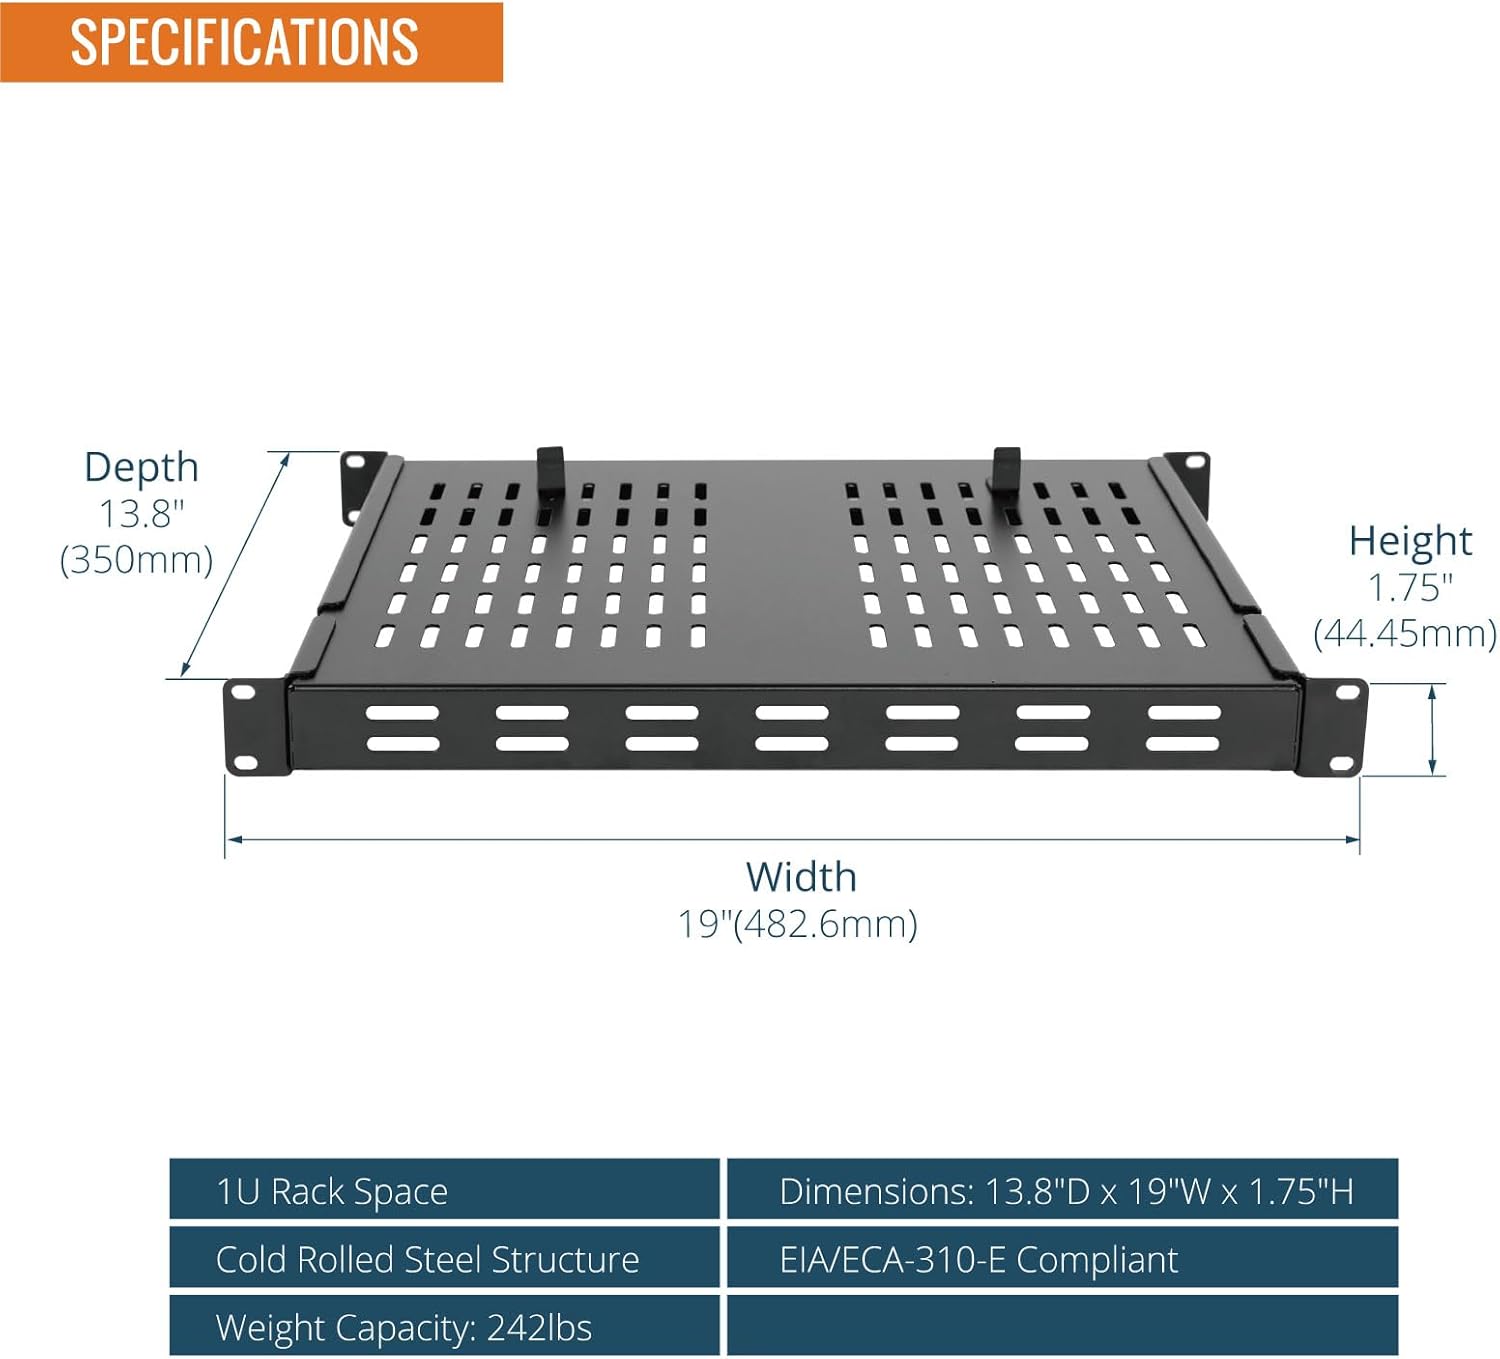
Image: All components included in the package, such as the shelf, various screws, cage nuts, anti-slip stops, and cable ties.
Instrucións de configuración
- Prepare Your Rack: Ensure your server rack is a standard 19-inch, 4-post rack. Identify the desired mounting location (1U space) and the front and rear mounting rails.
- Adjust Shelf Depth: Loosen the screws on the side rails of the shelf that allow for depth adjustment. Extend or retract the shelf to match the depth of your rack's front and rear mounting rails. Ensure both sides are adjusted equally. Tighten the screws once the desired depth is achieved.
- Coloque os soportes de montaxe: The shelf comes with integrated mounting ears. Align these ears with the square or tapped holes on your rack's front and rear posts.
- Fixar ao bastidor: Use the appropriate screws and cage nuts (12-24, M6, or 10-32, depending on your rack type) to secure the shelf to the front and rear mounting rails. It is recommended to secure at least two screws on each of the four mounting points for stability.
- Install Anti-Slip Stops: Place the two anti-slip stops into the designated slots on the shelf surface. These stops help prevent equipment from sliding off the shelf.

Image: The 1U rack shelf securely installed within a 19-inch server rack, demonstrating proper fitment.
Instrucións de funcionamento
Once the Tecmojo 1U 4-Post Vented Server Rack Mount Shelf is securely installed, it is ready to support your equipment.
- Placing Equipment: Carefully place your server, UPS, NAS, or other compatible equipment onto the shelf. Distribute the weight as evenly as possible across the shelf surface.
- Utilizing Anti-Slip Stops: Ensure the anti-slip stops are positioned to prevent your equipment from moving or sliding, especially during rack maintenance or movement.
- Airflow Management: The vented design of the shelf promotes consistent airflow, which is crucial for dissipating heat from your equipment. Ensure that the vents are not obstructed by equipment or cables to maintain optimal cooling.
- Xestión de cables Use the included Velcro cable ties to organize and secure cables, preventing them from interfering with airflow or becoming tangled.

Imaxe: Primeiro plano view highlighting the perforated design for heat dissipation, the adjustable structure, and the anti-slip shelf stops.
Mantemento
Regular maintenance helps ensure the longevity and optimal performance of your rack shelf.
- Limpeza: Periodically wipe down the shelf with a dry or slightly damp cloth to remove dust and debris. Avoid using harsh chemicals that could damage the finish.
- Comprobación de fixación: Annually, inspect all mounting screws and nuts to ensure they remain tight. Re-tighten if necessary to maintain stability.
- Load Inspection: Regularly verify that the total weight of equipment on the shelf does not exceed the maximum capacity of 242 lbs (110 kg). Ensure weight is distributed evenly to prevent stress on any single point.
- Comprobación da ventilación: Confirm that the ventilation holes are clear of obstructions to allow for proper airflow and heat dissipation.
Resolución de problemas
- Issue: Shelf does not fit in the rack.
Solución: Verify that your rack is a standard 19-inch, 4-post rack. Check the adjustable depth of the shelf and ensure it is set correctly to match your rack's mounting depth (13.8 to 23.6 inches). - Issue: Shelf appears to bend or sag under load.
Solución: Ensure the total weight of the equipment placed on the shelf does not exceed the maximum weight capacity of 242 lbs (110 kg). Distribute the weight evenly across the shelf surface. Confirm all mounting screws are securely tightened. - Issue: Equipment slides on the shelf.
Solución: Ensure the anti-slip stops are correctly installed in the designated slots on the shelf surface. - Issue: Equipment is overheating.
Solución: Check that the vented holes on the shelf are not obstructed by equipment, cables, or dust. Ensure adequate airflow within the rack environment.
Garantía e Soporte
For information regarding product warranty, technical support, or replacement parts, please contact Tecmojo customer service. Refer to the contact information provided on the product packaging or the official Tecmojo websitio.
When contacting support, please have your product model number (B0DKSX61S3) and purchase date available.


