1. Introdución
Thank you for choosing the Yard Force 60V Cordless Self-Propelled Electric Lawn Mower. This manual provides essential information for the safe and efficient operation, maintenance, and troubleshooting of your new lawn mower. Please read this manual thoroughly before initial use and keep it for future reference.
2. Información de seguridade
Priorice sempre a seguridade ao operar equipos eléctricos. O incumprimento das instrucións de seguridade pode provocar lesións graves ou danos materiais.
Normas xerais de seguridade:
- Read all instructions carefully before operating the mower.
- Usar equipos de protección individual (EPI) axeitados, incluíndo protección ocular, protección auditiva e calzado resistente.
- Manteña os nenos e os transeúntes lonxe da zona de operación.
- Do not operate the mower in wet conditions or on excessively steep slopes.
- Asegúrese de que a batería estea completamente cargada antes do uso e retírea cando non estea en funcionamento ou durante o mantemento.
- Inspect the mower for damage before each use. Do not operate if damaged.
- Empregue só pezas de reposto e accesorios aprobados polo fabricante.
3. Compoñentes Overview
Familiarize yourself with the main components of your Yard Force 60V Cordless Self-Propelled Electric Lawn Mower.

Figure 3.1: Complete Lawn Mower Assembly with Battery and Charger.
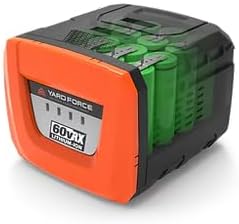
Figure 3.2: Yard Force 60V Lithium-Ion Battery.
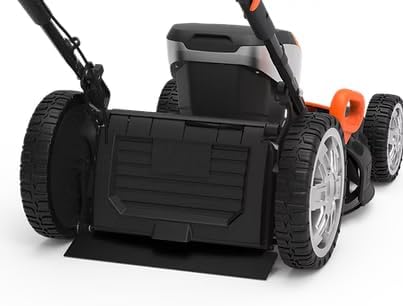
Figure 3.3: Battery Compartment on the Mower Deck.

Figure 3.4: Mower Wheel and Height Adjustment Mechanism.
4. Configuración
4.1. Montaxe
Your lawn mower may require minor assembly upon unboxing. This typically involves unfolding and securing the handle, and attaching the grass collection bag if applicable. Refer to the quick start guide included in the packaging for detailed visual instructions.
4.2. Carga da batería
Before first use, fully charge the 60V 4Ah Lithium-Ion battery. Connect the charger to a standard power outlet and insert the battery. The charger's indicator lights will show the charging status. A full charge typically takes approximately 60 minutes with the 4A rapid charger.
4.3. Instalación da batería
Open the battery compartment cover on the mower deck (refer to Figure 3.3). Slide the fully charged battery into the compartment until it clicks securely into place. Close the cover firmly.
5. Instrucións de funcionamento
5.1. Axuste da altura de corte
The mower features a 7-position one-touch height adjustment. Locate the height adjustment lever near the wheels (refer to Figure 3.4). Pull the lever outwards and move it to the desired cutting height, ranging from 1 1/4" to 3 3/4". Ensure all wheels are set to the same height for an even cut.
5.2. Arranque da cortadora
To start the mower, ensure the battery is installed. Press and hold the safety button, then pull the bail lever towards the handle. The motor will start. Release the safety button once the motor is running.
5.3. Self-Propelled Function
This model is equipped with self-propelled technology and variable speed control. To engage the self-propelled function, activate the separate self-propel lever (if present, consult your quick start guide for exact location). Adjust the speed as needed for comfortable operation.
5.4. Técnicas de sega
For optimal results, mow when the grass is dry. Overlap cutting swaths slightly to ensure complete coverage. Avoid cutting more than one-third of the grass blade length at a time. The 3-in-1 functionality allows for mulching, bagging, or side discharge. Attach the grass bag for collection or the side discharge chute for dispersal.

Figure 5.1: Operating the Lawn Mower.

Figure 5.2: Mowing a Residential Lawn.
6. Mantemento
Un mantemento regular garante a lonxevidade e o rendemento óptimo do seu cortacésped.
6.1. Limpeza
After each use, disconnect the battery and clean the mower deck, blades, and grass bag. Use a damp cloth to wipe down exterior surfaces. Do not use water jets or immerse the mower in water.
6.2. Coidado da lámina
Periodically inspect the cutting blade for sharpness and damage. A dull or damaged blade can lead to poor cutting performance and strain the motor. If necessary, have the blade sharpened or replaced by a qualified service technician. Always wear heavy-duty gloves when handling the blade.
6.3. Almacenamento
Store the mower in a dry, secure location, away from direct sunlight and extreme temperatures. The foldable handle allows for compact storage. Remove the battery before storing for extended periods.
7 Solución de problemas
Esta sección aborda problemas comúns que podes atopar co teu cortacésped.
Mower Does Not Start:
- Asegúrese de que a batería estea completamente cargada e inserida correctamente.
- Check that the safety button is pressed before pulling the bail lever.
- Verify that the bail lever is fully engaged.
- Inspect the battery terminals and mower contacts for debris or corrosion.
Baixo rendemento de corte:
- The cutting blade may be dull or damaged. Refer to Section 6.2 for blade care.
- Grass may be too wet or too long. Mow when grass is dry and consider raising the cutting height.
- The mower deck may be clogged with grass clippings. Disconnect battery and clean thoroughly.
Vibración excesiva:
- The cutting blade may be unbalanced or bent. Have it inspected and replaced if necessary.
- Check for loose fasteners on the mower deck or handle.
8. Especificacións
| Característica | Especificación |
|---|---|
| Marca | Forza de iarda |
| Número de modelo | YF60VRX21-SP |
| Fonte de enerxía | DC 60 V (batería) |
| Tipo de motor | Sen escobillas |
| Ancho de corte | 20 polgadas |
| Tamaño da plataforma | 21 polgadas |
| Axuste da altura de corte | 7-Position (1 1/4" to 3 3/4") |
| Capacidade da batería | 1 x 4 Ah |
| Cargador | 4A Rapid Charger |
| Tempo de funcionamento sen carga | Ata 60 minutos |
| Capacidade da bolsa de herba | 2 bushel / 65L |
| Tamaño da roda dianteira | 8 polgadas |
| Tamaño da roda traseira | 12 polgadas |
| Peso do elemento | 86 libras |
| Dimensións do produto | 36" D x 17" W x 24" H |
| UPC | 846325004084 |
9. Garantía e soporte
Yard Force products are designed for durability and performance. For warranty information, product registration, or technical support, please refer to the warranty card included with your product or visit the official Yard Force websitio. Garda o comprobante de compra para calquera reclamación de garantía.