1. Información importante de seguridade
Please read this entire manual before installation and assembly. If you have any questions regarding any of the instructions or warnings, please contact your local distributor for assistance.
- We accept no responsibility for incorrect or faulty installation.
- Follow the enclosed installation instructions carefully.
- Check the condition and completeness of all items before beginning.
- The fastening materials supplied for wall mounting are intended exclusively for fastening to solid masonry or concrete. For other wall types, such as hollow bricks, plasterboard, or lightweight construction, please contact a specialist retailer for information on suitable fastening elements.
- Under no circumstances should you exceed the limit values specified for the product.
2. Contido do paquete
Verify that all components are present and undamaged before installation. If any parts are missing or damaged, do not attempt to install. Contact customer support for replacement parts.

Figure 2.1: XTRARM TiTon Double TV Wall Mount and included hardware components, including various screws, anchors, washers, and a drilling template.
O paquete normalmente inclúe:
- XTRARM TiTon Double TV Wall Mount assembly
- Standard mounting hardware for TV and wall (various screws, anchors, washers)
- Modelo de perforación
- Small spirit level
- Multiple hook-and-loop straps for cable management
3. Especificacións
| Característica | Especificación |
|---|---|
| Tipo de montaxe | Soporte de parede |
| Tipo de movemento | Articulated, Swivel, Tilt, Rotate |
| Material | Metal |
| Cor | Negro |
| Distancia da parede | 12.9 cm (retracted) to 120 cm (extended) |
| Rotación | Up to 90° (portrait/landscape) |
| Xiratorio | Up to 180° (90° left/right) |
| Inclinación | -5° a +12° |
| Tamaño de TV recomendado | Approximately 52 – 110 inches |
| Capacidade de peso | Máximo 80 kg |
| Compatibilidade VESA | 100x100mm, 100x200mm, 200x100mm, 200x200mm, 200x300mm, 300x200mm, 300x300mm, 400x200mm, 400x300mm, 400x400mm, 500x300mm, 600x200mm, 600x400mm |

Figure 3.1: VESA compatibility and maximum weight capacity.

Figure 3.2: Key dimensions and movement capabilities of the mount.
Figure 3.3: Comprehensive technical drawing with detailed dimensions and adjustment ranges.
4. Configuración e instalación
Proper installation is crucial for the safety and stability of your TV. Ensure you have the necessary tools and assistance before proceeding.
4.1 Ferramentas necesarias (non incluídas)
- Broca
- Stud finder (if mounting to wood studs)
- Lapis
- Cinta métrica
- Chave de tubo ou chave inglesa axustable
- Destornillador de cabeza Phillips
4.2 Escolla un lugar de montaxe
Select a wall location that can safely support the weight of the mount and your TV. For solid concrete or masonry walls, use the provided anchors. For wood stud walls, ensure the mount is centered on a stud. Avoid mounting to drywall alone.
4.3 Attaching the Wall Plate
- Position the drilling template at the desired height on the wall and mark the drill holes with a pencil. Use the included spirit level to ensure it is perfectly horizontal.
- Drill pilot holes at the marked locations. The drill bit size will depend on your wall type and the chosen anchors/screws.
- Insert wall anchors (if required for your wall type) into the pilot holes.
- Align the wall plate with the drilled holes and secure it to the wall using the appropriate screws and washers. Ensure it is firmly attached.
4.4 Fixación de soportes de TV ao televisor
- Coloca con coidado o televisor boca abaixo sobre unha superficie suave e limpa para evitar danar a pantalla.
- Identifique os orificios de montaxe VESA na parte traseira do televisor.
- Select the correct size screws and spacers (if needed) from the provided hardware that fit your TV's VESA pattern.
- Attach the two vertical TV brackets to the back of your TV, ensuring they are level and securely fastened. Do not overtighten.
4.5 Montaxe do televisor na placa de parede
- With assistance, carefully lift the TV and hook the attached TV brackets onto the wall plate.
- Asegúrese de que o televisor estea firmemente colocado na placa de parede.
- Active calquera mecanismo de bloqueo de seguridade nos soportes para evitar o desprazamento accidental.

Figura 4.1: Example of the XTRARM TiTon Double TV Wall Mount installed with a television.
5. Instrucións de funcionamento
The XTRARM TiTon Double mount offers full motion capabilities for optimal viewángulos de inflexión.
5.1 Adjusting Wall Distance
Gently pull or push the TV to extend or retract the mount. The mount allows for a wall distance ranging from 12.9 cm to 120 cm.

Figure 5.1: Adjustable wall distance of the mount.
5.2 Axuste do xiro
The mount can swivel up to 180 degrees (90 degrees left or right) to direct the screen towards different viewing áreas.

Figure 5.2: Swivel capability of the mount.
5.3 Axuste da inclinación
Adjust the vertical tilt of your TV from -5 degrees to +12 degrees to reduce glare and optimize viewing comfort. Loosen the tilt adjustment knobs, set the desired angle, and then retighten the knobs.
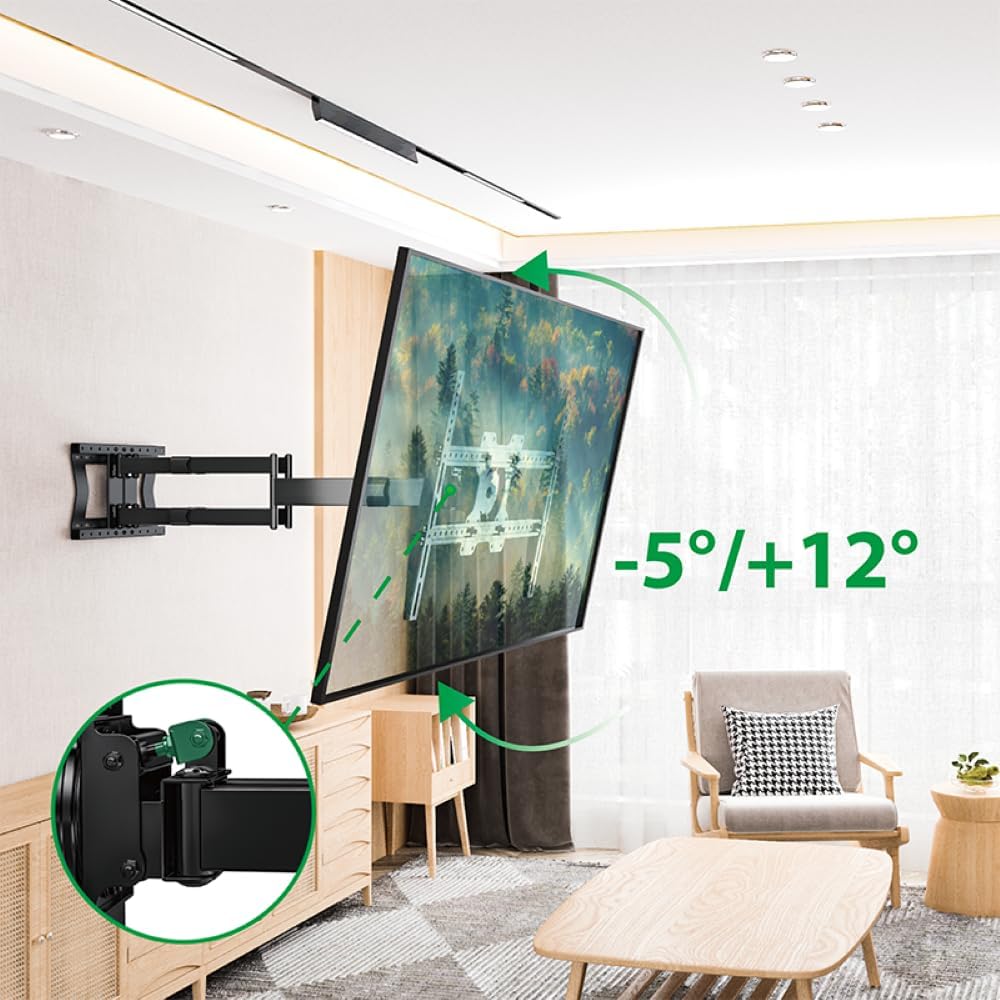
Figure 5.3: Tilt adjustment range and mechanism.
5.4 Axuste da rotación
The mount allows for a 90-degree rotation, enabling you to switch between landscape and portrait orientation for your TV.

Figure 5.4: 90-degree rotation capability.
5.5 Xestión de cables
Use the provided hook-and-loop straps to bundle and organize cables along the mount arms for a tidy appearance and to prevent snagging during adjustments.
6. Mantemento
Un mantemento regular garante a lonxevidade e o funcionamento seguro do soporte de parede para TV.
- Limpeza: Limpa o soporte cun pano suave e seco. Evita produtos de limpeza abrasivos ou solventes que poidan danar o acabado.
- Comproba as conexións: Comprobe periodicamente todos os parafusos e bulóns para asegurarse de que seguen axustados. Aperte de novo se é necesario, pero non os aperte demasiado.
- Inspeccionar o desgaste: Regularly inspect the mount for any signs of wear, damage, or corrosion. If any issues are found, discontinue use and contact customer support.
7 Solución de problemas
If you encounter any issues with your XTRARM TiTon Double TV Wall Mount, refer to the following common problems and solutions:
| Problema | Causa posible | Solución |
|---|---|---|
| A televisión non está nivelada | Wall plate or TV brackets not level during installation. | Carefully remove the TV, adjust the wall plate or TV brackets using a spirit level, and re-mount. |
| Dificultade para mover a montura | As unións poden estar demasiado apertadas ou precisar lubricación. | Check for any overtightened bolts. Apply a small amount of silicone-based lubricant to moving joints if necessary. |
| A montaxe parece inestable | Loose wall plate, incorrect anchors, or exceeding weight capacity. | Immediately remove the TV. Re-check all wall plate fasteners. Ensure correct anchors were used for your wall type. Verify TV weight does not exceed 80 kg. If issues persist, consult a professional installer. |
8. Garantía e soporte
For information regarding warranty coverage, technical support, or replacement parts, please refer to the documentation provided at the time of purchase or visit the official XTRARM websitio. Garde o recibo da compra como xustificante da mesma.


