1. Introdución
This manual provides essential instructions for the safe and efficient operation, setup, and maintenance of your Happybuy 60 Gallon Sandblasting Cabinet, Model SBC200. This heavy-duty steel cabinet is designed for various surface treatment tasks, including paint, stain, and rust removal, utilizing abrasive media with a working pressure of 40-120 PSI.
Key features include a durable cold-rolled steel construction with a powder-coated finish for corrosion resistance, a large observation window with LED lighting for clear visibility, and a pre-installed sealing strip to minimize dust leakage. The cabinet has a 60-gallon capacity, accommodating up to 203.4 lbs of blasting media.
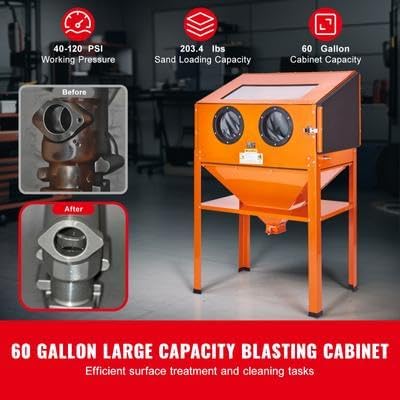
Figure 1: Happybuy 60 Gallon Sandblasting Cabinet, Model SBC200. This image shows the overall view of the sandblasting cabinet, highlighting its robust construction and design for efficient surface treatment.
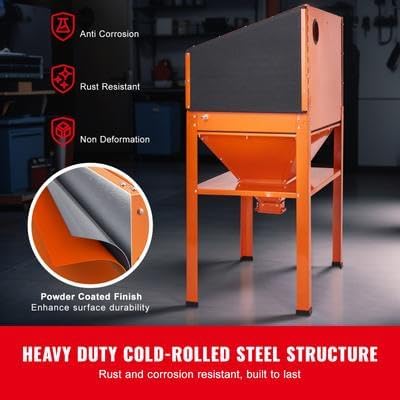
Figure 2: Heavy-duty cold-rolled steel structure. This image emphasizes the cabinet's durable construction with a powder-coated finish, providing anti-corrosion and rust-resistant properties for long-term use.
2. Instrucións de seguridade
Always prioritize safety when operating the sandblasting cabinet. Failure to follow these instructions may result in serious injury or damage to the equipment.
- Le o Manual: Before assembly or operation, thoroughly read and understand all instructions in this manual.
- Equipos de protección individual (EPI): Always wear appropriate PPE, including safety glasses, gloves, and a respirator, to protect against abrasive media and dust. The cabinet includes integrated gloves for hand protection during operation.
- Ventilación: Ensure adequate ventilation in the work area to prevent accumulation of dust and fumes.
- Compresor de aire: Use an air compressor that meets the specified working pressure (40-120 PSI) and CFM requirements. Ensure the air supply is clean and dry.
- Seguridade eléctrica: If the unit includes electrical components (e.g., LED lighting), ensure proper electrical connections and grounding. Disconnect power before maintenance.
- Abrasive Media: Use only recommended abrasive media. Never use silica sand, as it can cause severe respiratory issues.
- Estabilidade: Ensure the cabinet is placed on a stable, level surface before operation to prevent tipping.
- Nenos e espectadores: Manter os nenos e o persoal non autorizado lonxe da zona de traballo.
- Mantemento: Realice o mantemento regular segundo o descrito neste manual para garantir un funcionamento seguro e eficiente.
3. Contido do paquete
Verify that all components are present and undamaged upon unpacking. If any parts are missing or damaged, contact Happybuy customer support.
- 1 x Blasting Gun
- 1 x 50g Sealant
- 1 x Set of Assembly Accessories
- 4 x Ceramic Nozzles (4.5, 5, 6, 7mm)
- 1 x Manual de usuario (este documento)
- 1 cinta adhesiva
- 1 x Pair of Gloves (integrated into cabinet)
- 4 x Cabinet Inner Lens Protector
4. Configuración e montaxe
Follow these steps to assemble and set up your sandblasting cabinet. It is recommended to have assistance during assembly due to the unit's size and weight.
- Desempaquetar compoñentes: Carefully remove all parts from the packaging and lay them out. Refer to the parts list in the assembly accessories set.
- Montar o soporte: Attach the legs and support beams to form the cabinet stand. Ensure all bolts are securely tightened.
- Gabinete de montaxe: Carefully lift the main cabinet body and place it onto the assembled stand. Secure it using the provided hardware.
- Instalar a tolva: Attach the abrasive media hopper to the bottom of the cabinet, ensuring a tight seal to prevent leakage. Use the provided sealant and seal tape as necessary.
- Conectar a subministración de aire: Connect your air compressor hose to the cabinet's air inlet. Ensure all connections are secure and leak-free. The working pressure range is 40-120 PSI.
- Install Blasting Gun and Nozzles: Connect the blasting gun to the internal hose. Select the appropriate ceramic nozzle (4.5, 5, 6, or 7mm) for your application and install it onto the blasting gun.
- Install Lens Protectors: Place the inner lens protectors over the observation window to prevent scratching during operation.
- Conexión eléctrica (se procede): If your model includes LED lighting, connect the power cord to a suitable grounded electrical outlet.
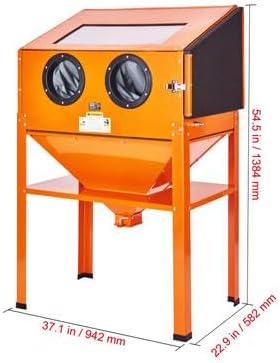
Figure 3: Assembled Happybuy Sandblasting Cabinet. This image illustrates the fully assembled unit, including its dimensions, which are crucial for planning placement and ensuring proper setup.
5. Instrucións de funcionamento
Antes de operar, asegúrese de que comprenda e siga todas as precaucións de seguridade.
- Load Abrasive Media: Open the top lid of the cabinet and carefully pour the desired abrasive media (e.g., glass beads, aluminum oxide) into the hopper. The cabinet has a capacity of 60 gallons, holding up to 203.4 lbs of media. Close the lid securely.
- Conectar o compresor de aire: Ensure your air compressor is connected and set to the desired working pressure, between 40-120 PSI.
- Insert Workpiece: Place the item to be blasted inside the cabinet through the side access door. Ensure the door is securely latched before beginning operation.
- Use luvas: Insert your hands into the integrated gloves provided on the front of the cabinet.
- Activar a iluminación: If equipped, turn on the internal LED lighting for clear visibility of the workpiece.
- Comezar a voladura: Aim the blasting gun at the workpiece and press the trigger to begin abrasive flow. Move the gun steadily across the surface to achieve an even finish.
- Monitor de progreso: Observe the blasting process through the observation window. Adjust air pressure or nozzle size as needed for optimal results.
- Finish Blasting: Release the trigger to stop the abrasive flow. Allow any airborne dust to settle before opening the cabinet door.
- Remove Workpiece: Open the side access door and carefully remove the treated item.
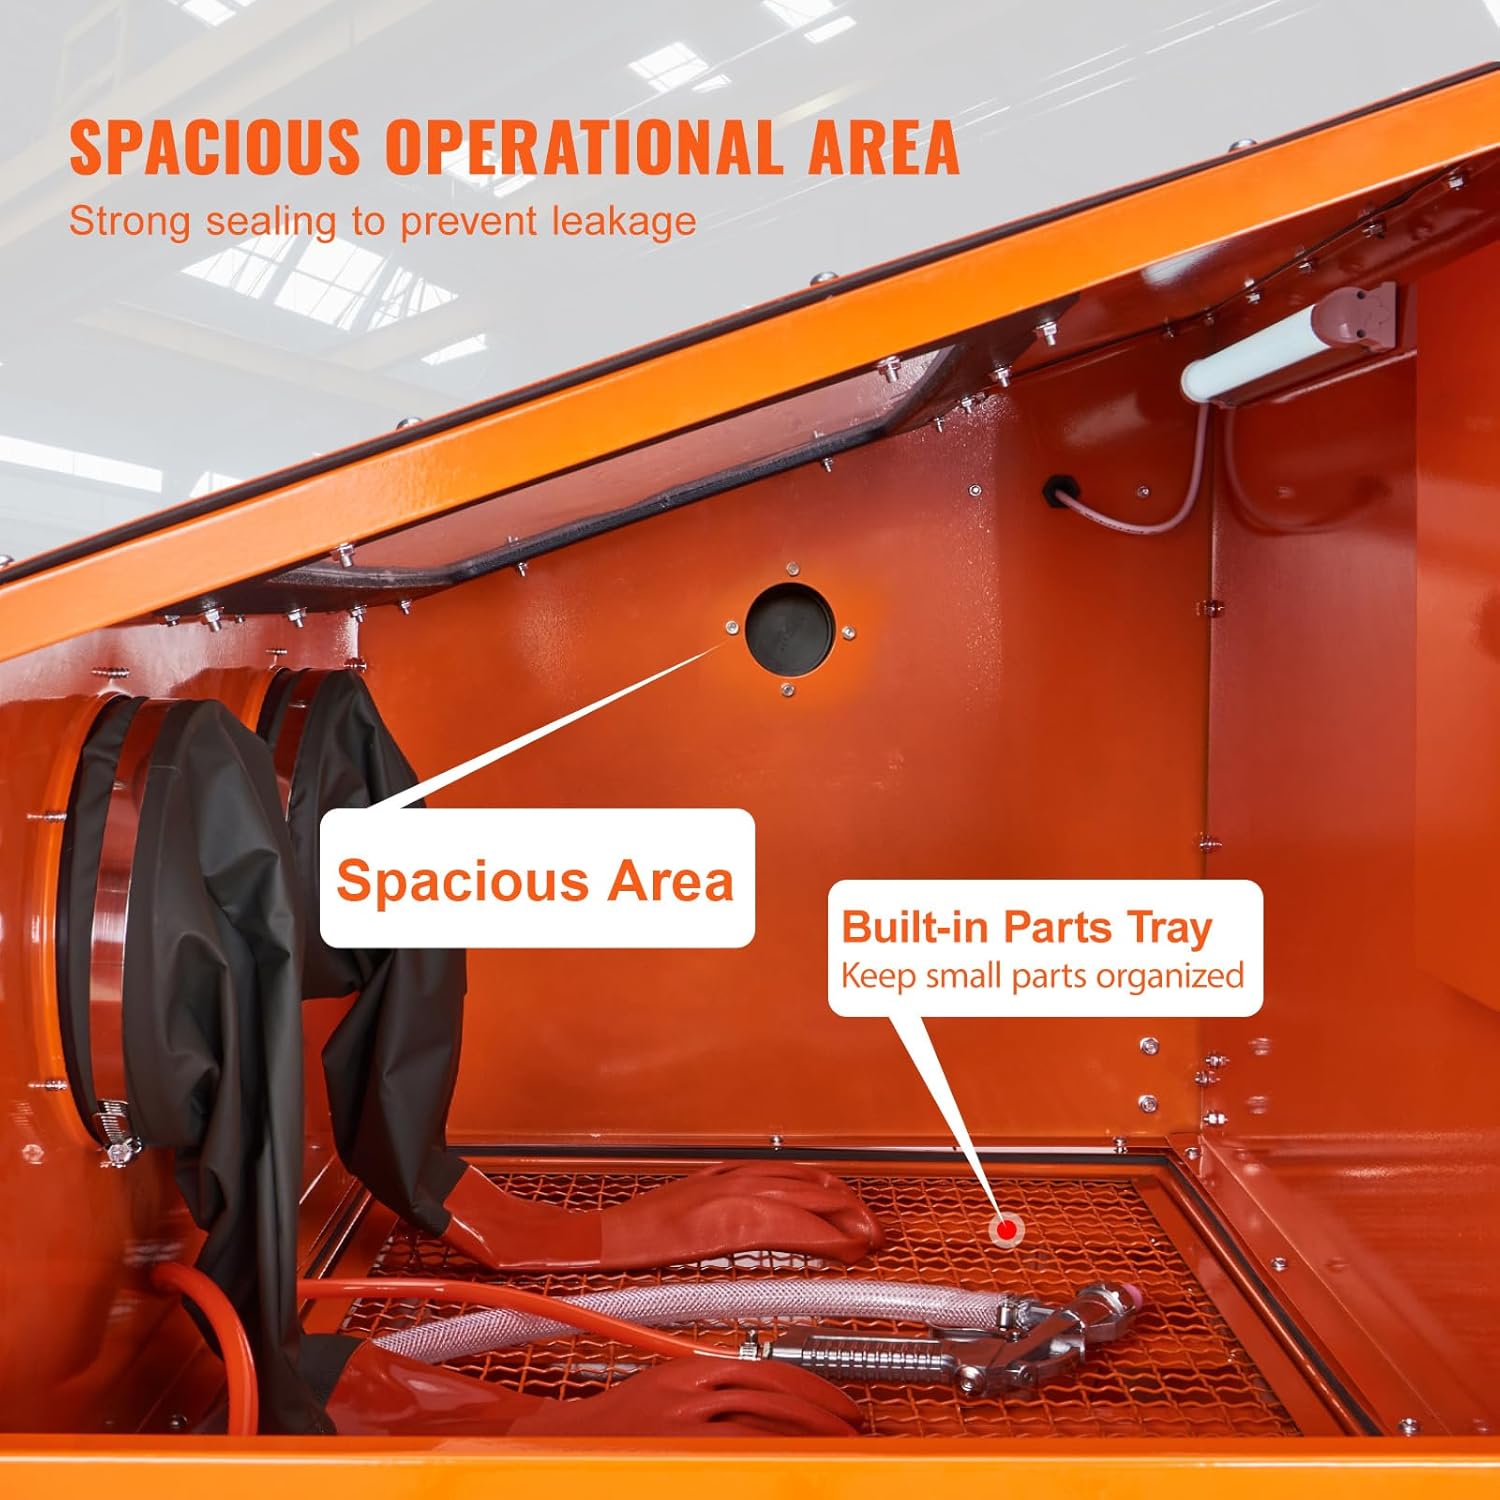
Figura 4: Interior view of the sandblasting cabinet. This image highlights the spacious operational area and built-in parts tray, designed for efficient and organized blasting tasks.

Figure 5: Included ceramic nozzles. This image displays the four ceramic nozzles (4.5mm, 5mm, 6mm, 7mm) and the blasting gun, illustrating the versatility for different precision requirements.
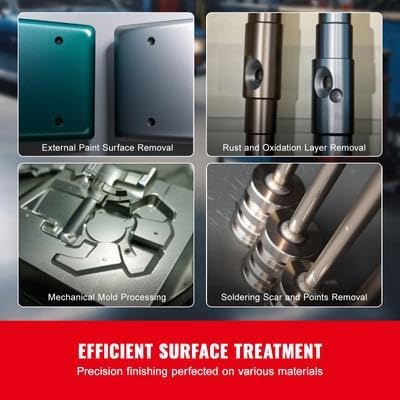
Figura 6: Examples of surface treatment. This image demonstrates the cabinet's effectiveness in removing paint, rust, oxidation layers, and processing mechanical molds, showcasing its versatile applications.
6. Mantemento
Regular maintenance ensures the longevity and optimal performance of your sandblasting cabinet.
- Empty Used Media: After each use or when the media becomes contaminated, empty the used abrasive media from the hopper. Dispose of media according to local regulations.
- Clean Cabinet Interior: Periodically clean the interior of the cabinet to remove dust and debris. Use a shop vacuum for best results.
- Inspeccionar boquillas: Regularly inspect the ceramic nozzles for wear. Replace worn nozzles to maintain blasting efficiency.
- Check Seals and Hoses: Examine all seals, gaskets, and air hoses for signs of wear, cracks, or leaks. Replace any damaged components to prevent dust leakage and maintain air pressure.
- Replace Lens Protectors: Replace the inner lens protectors when they become scratched or opaque to maintain clear visibility.
- Mantemento do filtro de aire: If your air compressor has an air filter, ensure it is regularly cleaned or replaced to provide clean, dry air to the cabinet.
7 Solución de problemas
| Problema | Causa posible | Solución |
|---|---|---|
| No abrasive flow or weak blasting. |
|
|
| Excessive dust leakage from cabinet. |
|
|
| Poor visibility inside cabinet. |
|
|
8. Especificacións
| Característica | Detalle |
|---|---|
| Número de modelo do artigo | SBC200 |
| Dimensións do produto (L x W x H) | 942 x 582 x 1384 mm / 37.1 x 22.9 x 54.5 polgadas |
| Cabinet Capacity | 227 liters / 60 Gallon |
| Sand Loading Capacity (60 Grit) | 92.24 kg / 203.4 lb |
| Peso neto | 35.7 kg / 78.7 lb |
| Presión de traballo | 276-827 kPa / 40-120 PSI |
| Material principal | Cold-Rolled Steel |
| Included Nozzle Sizes | 4.5 mm, 5 mm, 6 mm, 7 mm |

Figure 7: Detailed specifications and dimensions. This image provides a visual summary of the key product specifications and overall dimensions of the sandblasting cabinet.
9. Garantía e soporte
For warranty information, technical support, or to order replacement parts, please contact Happybuy customer service. Keep your purchase receipt and model number (SBC200) handy for faster service.
Visit the official Happybuy websitio para obter a información de contacto e os recursos de asistencia máis actualizados.


