1. Introdución
This manual provides detailed instructions for the setup, operation, maintenance, and troubleshooting of your EvoFox Elite X2 Wireless Gaming Controller. Please read this manual thoroughly before using the product to ensure optimal performance and longevity.

Image: The EvoFox Elite X2 Wireless Gaming Controller in blue, showcasino seu deseño ergonómico e a disposición dos botóns.
2. Contido do paquete
Verifique que todos os elementos estean presentes na embalaxe do produto:
- EvoFox Elite X2 Wireless Gaming Controller
- Receptor USB de 2.4 GHz
- Cable de carga USB-C
- Manual de usuario (este documento)
3. Produto rematadoview
Familiarize yourself with the various components of your EvoFox Elite X2 controller:

Imaxe: Unha vez máisview of the EvoFox Elite X2 controller, highlighting its design for precision, speed, and comfort.
Compoñentes clave:
- HallSense™ 3D Magnetic Joysticks: Provide drift-free, precise control.
- HallSense™ Magnetic Analog Triggers: Pressure-sensitive for nuanced input.
- EZ Click Macro Buttons: Two programmable back buttons for custom commands.
- Motores de vibración dual: Deliver immersive haptic feedback.
- Botón de modo Turbo: Enables rapid-fire functionality.
- Precision Mode Button: Reduces joystick sensitivity for fine adjustments.
- Conectividade dual: Supports 2.4GHz wireless and wired USB-C connections.

Imaxe: Primeiro plano view of the controller's joystick, featuring vibrant RGB lighting around its base.
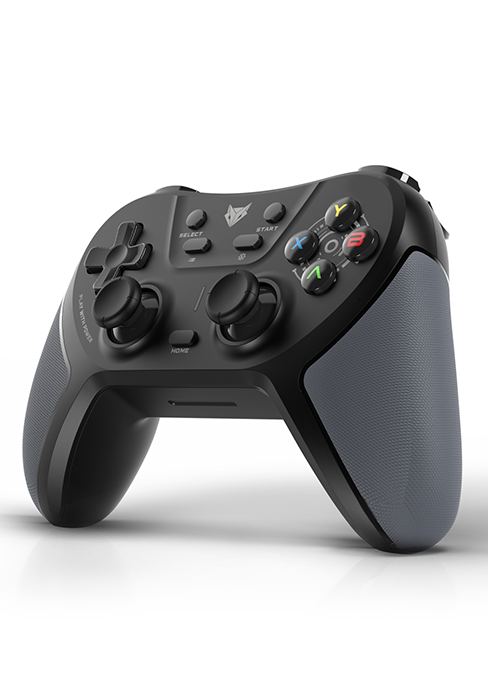
Image: A detailed shot of one of the controller's triggers, highlighting its design and texture.
4. Configuración
The EvoFox Elite X2 offers both 2.4GHz wireless and wired connectivity options.

Image: The controller demonstrating its seamless dual connectivity, supporting both wired and 2.4GHz wireless modes.
4.1. Modo sen fíos de 2.4 GHz
- Inserir o receptor USB: Plug the 2.4GHz USB receiver into an available USB port on your PC.
- Controlador de acendido: Press the HOME button on the controller to turn it on.
- Emparejamento: The controller should automatically pair with the receiver. The LED indicators on the controller will show connection status.
- PC X-Input Mode: For optimal compatibility with PC games, long press the BACK + HOME buttons simultaneously to switch to X-Input mode.
4.2. Modo con cable
- Cable de conexión: Connect one end of the provided USB-C cable to the controller's USB-C port and the other end to a USB port on your PC.
- Recoñecemento automático: The PC will automatically detect the controller.
- PC X-Input Mode: For optimal compatibility with PC games, long press the BACK + HOME buttons simultaneously to switch to X-Input mode.
- USB Extender: If needed, use a USB extender for better cable management or reach.
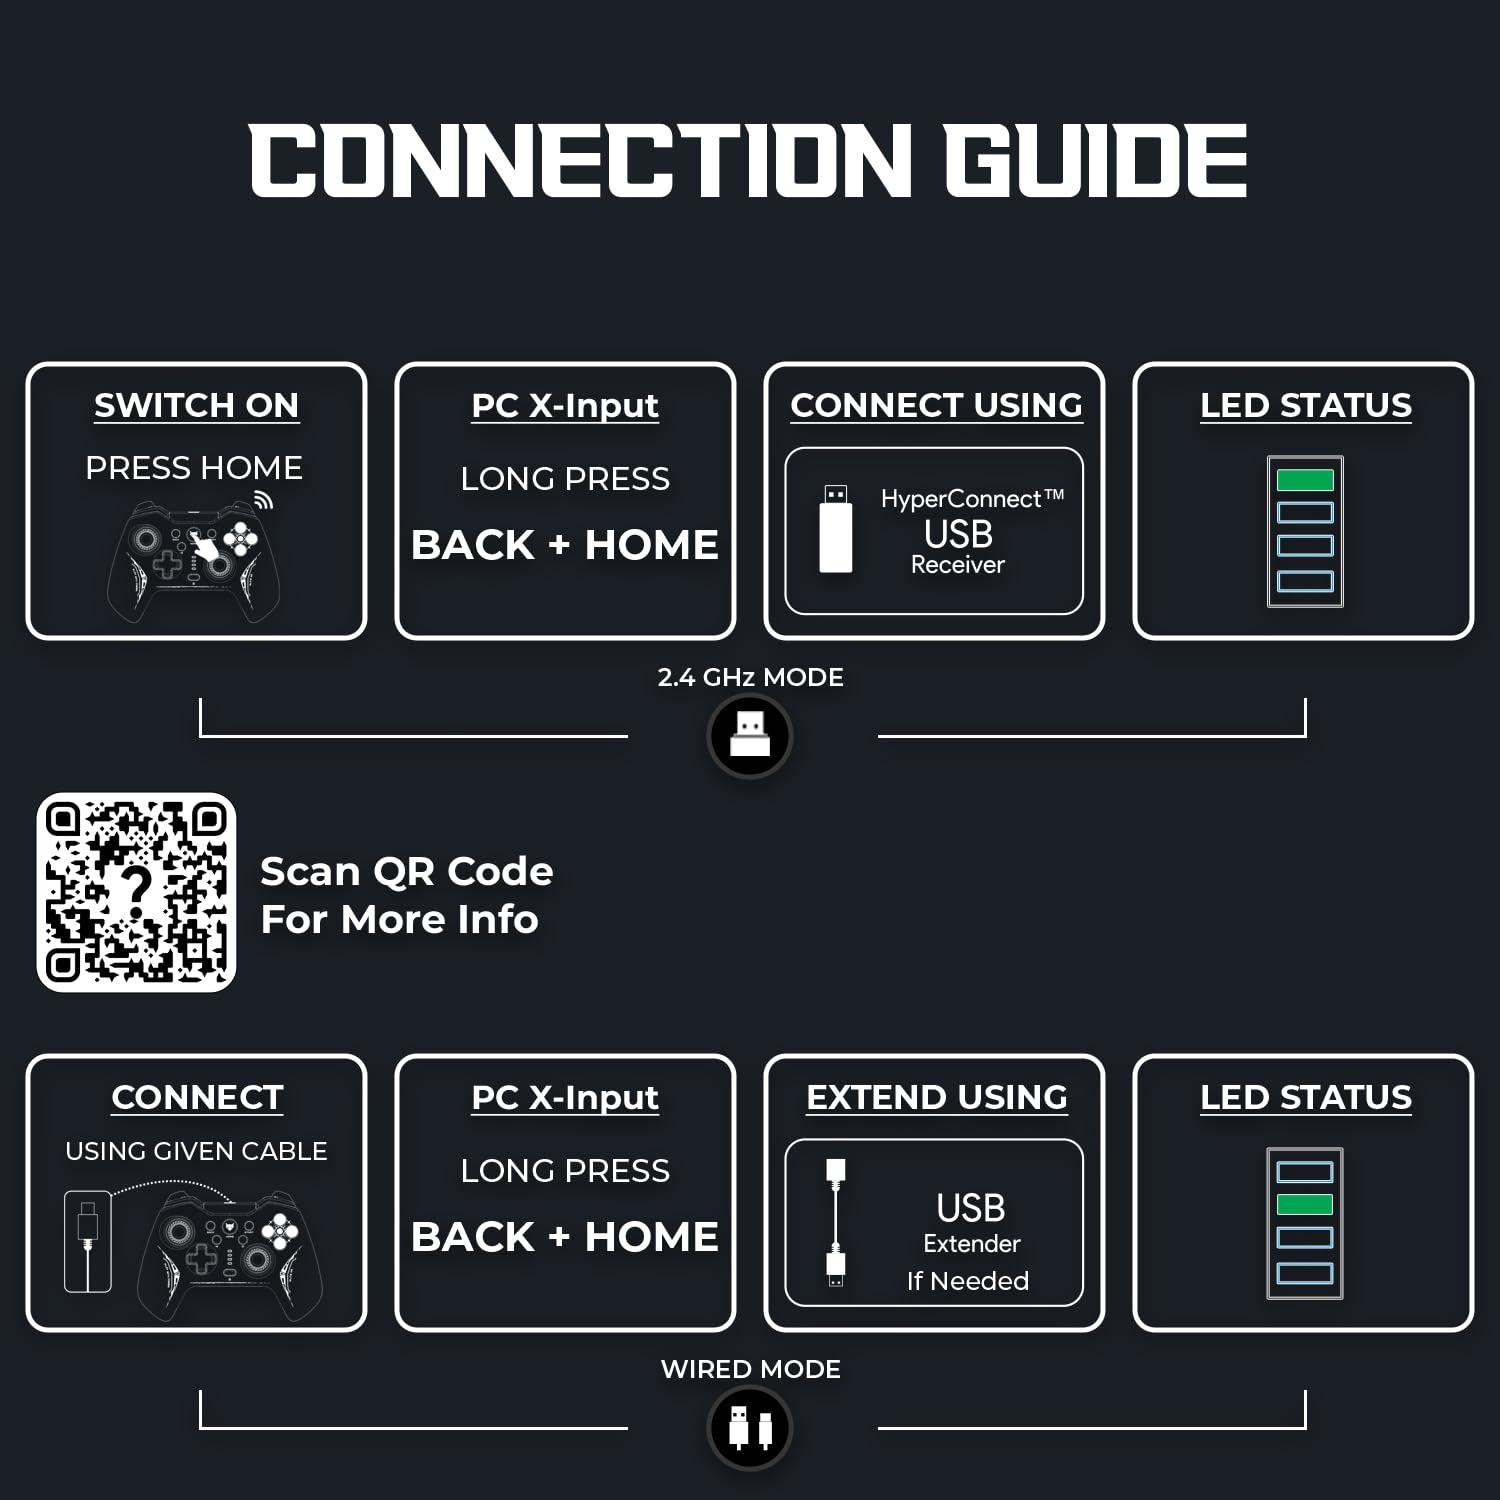
Image: A visual guide detailing the steps for connecting the EvoFox Elite X2 controller in both 2.4GHz wireless and wired modes, including LED status indicators.
For more information and troubleshooting, scan the QR code in the image or visit the official support page: https://www.amkette.com/qr/elite-x2-help
5. Instrucións de funcionamento
5.1. HallSense™ Magnetic Hall 3D Joysticks & Triggers
The HallSense™ technology utilizes magnetic sensors to provide precise, drift-free joystick movement and pressure-sensitive trigger input. This ensures accurate control in all game genres, from racing to first-person shooters.

Image: The controller highlighting its HallSense 3D Magnetic Analog Joysticks and Triggers, designed for enhanced precision and durability.
5.2. EZ Click Macros
The two programmable back buttons (M1, M2) allow you to assign complex commands or sequences for quick execution during gameplay. This feature provides a tactical advantage by enabling on-the-fly customization.
- Programación: Refer to the detailed programming instructions in the full digital manual (accessible via the QR code) for specific steps on how to assign macros.

Imaxe: A parte traseira view of the controller, pointing out the EZ Click Macro programmable buttons and the reset button.
5.3. Turbo Mode & Precision Mode
These modes offer enhanced control options:
- Modo Turbo: Press the Turbo button to activate rapid-fire for assigned buttons, useful in games requiring quick, repeated inputs.
- Modo de precisión: Press the Precision button to reduce the joystick sensitivity by half (0.5X), allowing for extremely fine and accurate movements, ideal for sniping or delicate maneuvers.
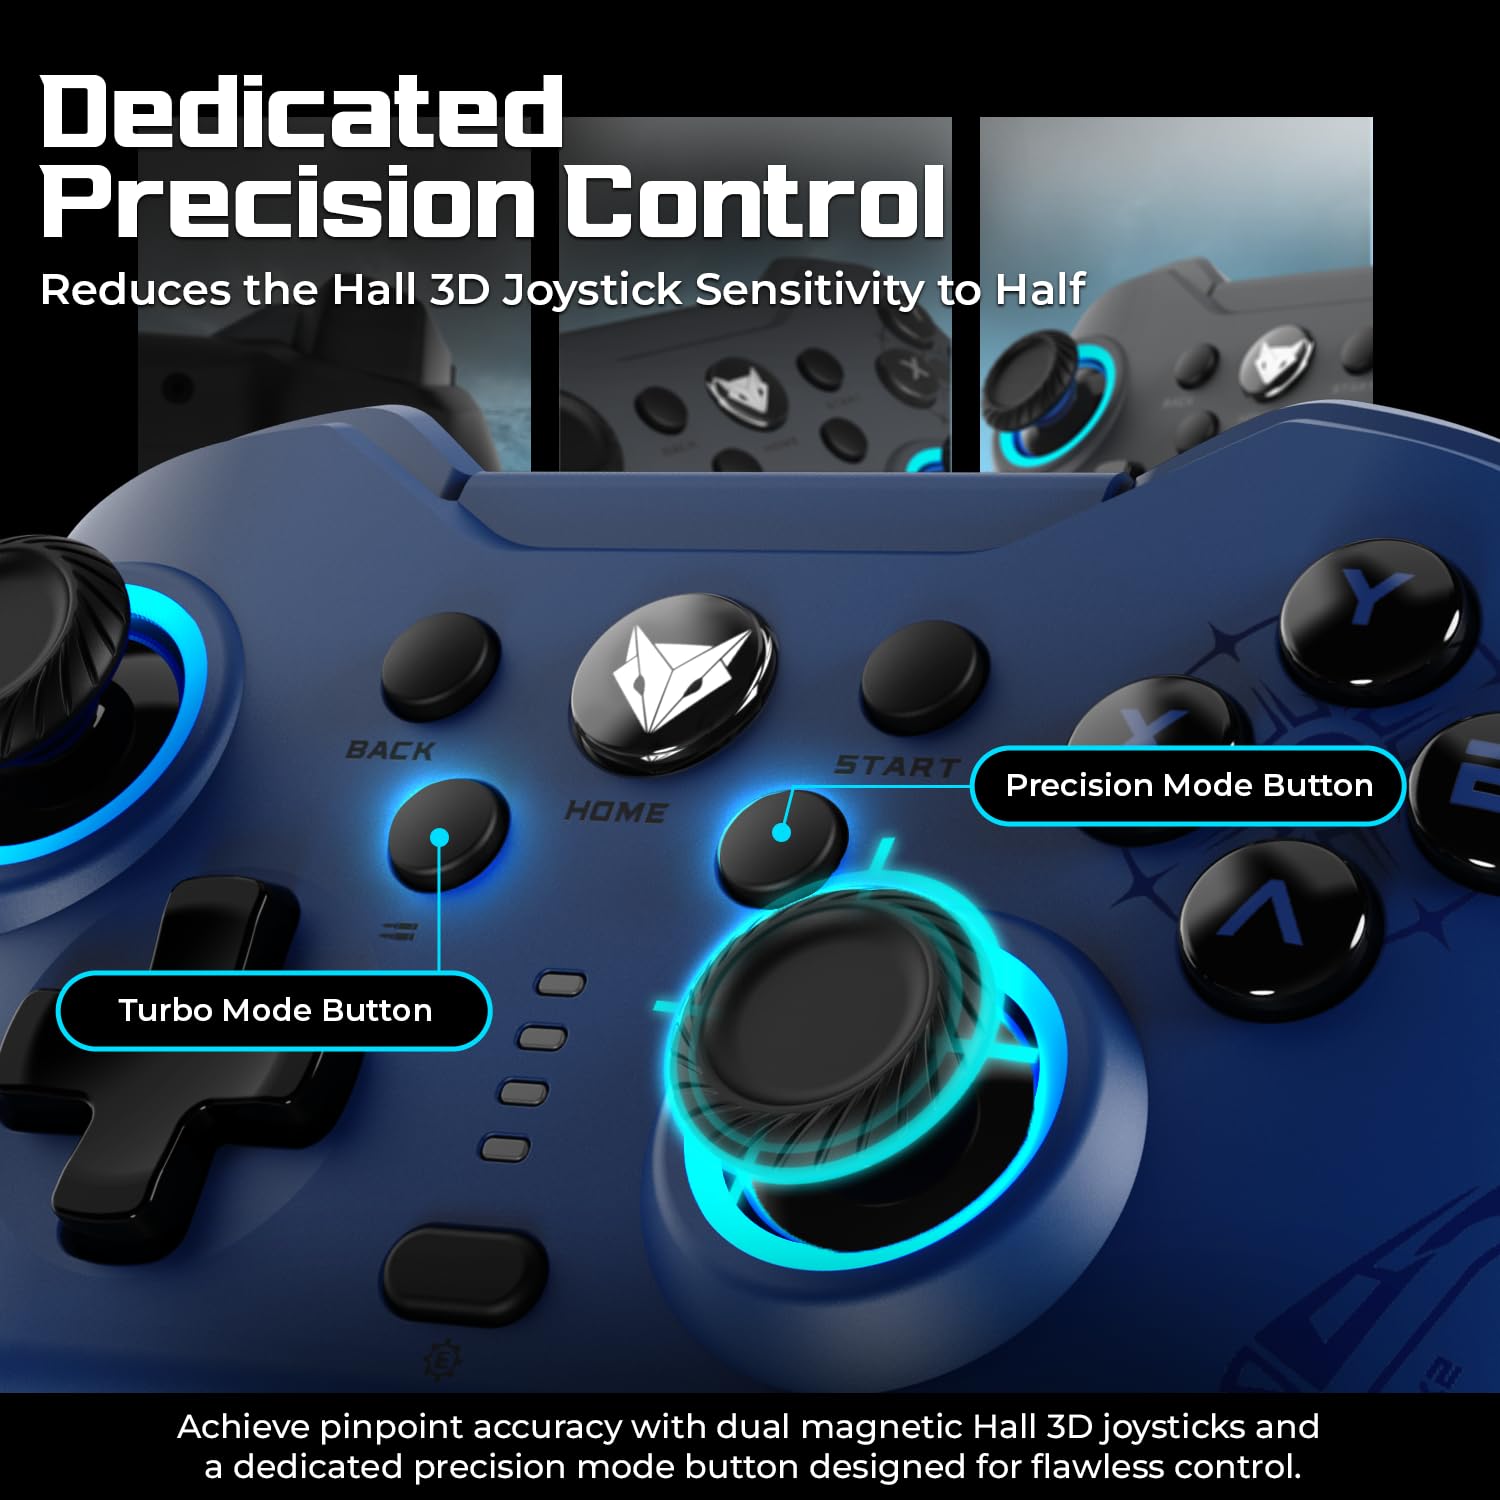
Image: A close-up of the controller's face, indicating the Turbo Mode and Precision Mode buttons for enhanced control.
5.4. Dual Vibration Motors
The integrated dual vibration motors provide realistic haptic feedback, enhancing immersion by simulating in-game events such as impacts, explosions, and recoil. There are up to 3 vibration levels.
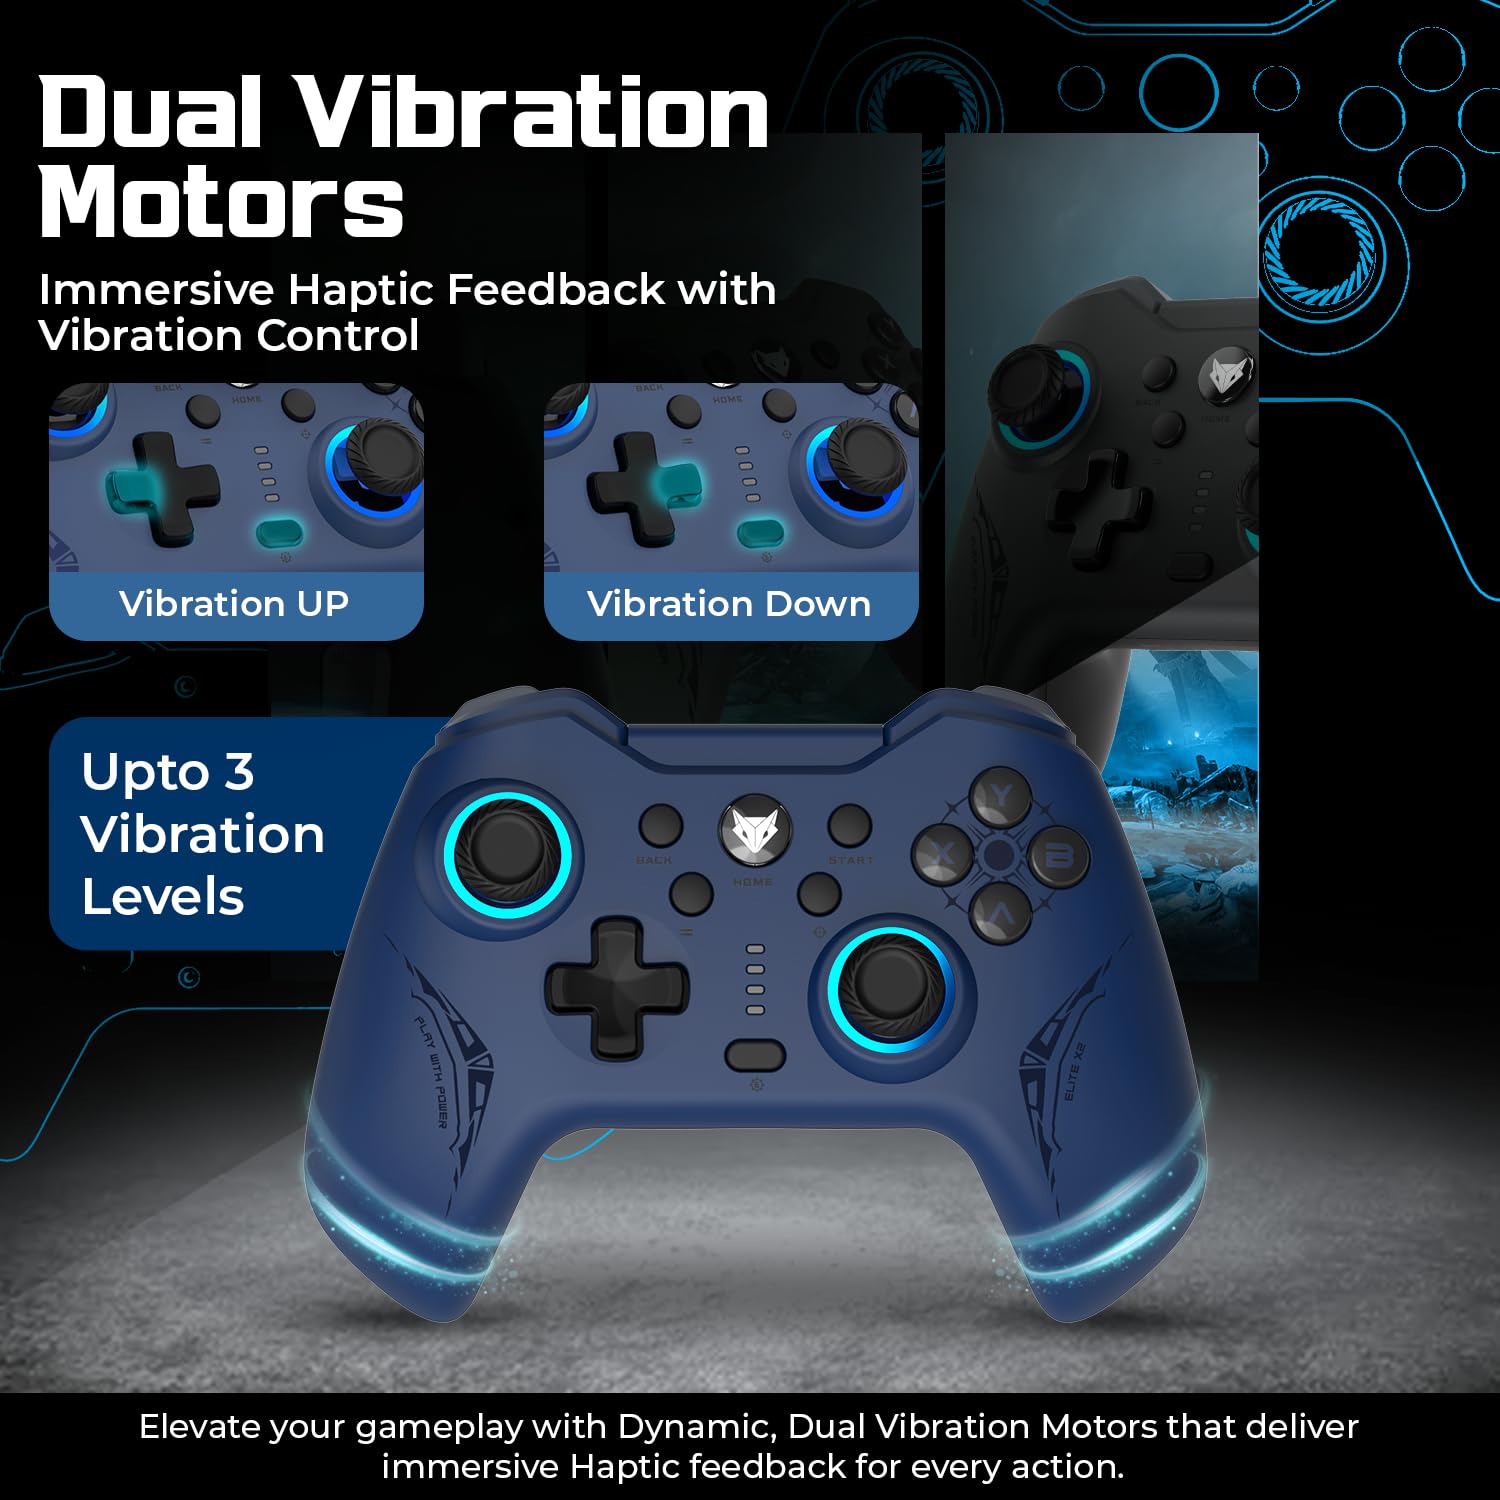
Image: The controller illustrating the effect of its dual vibration motors, providing immersive haptic feedback for various in-game actions.
6. Mantemento e coidados
6.1. Cargando
The controller is equipped with a 400mAh battery, providing up to 10-12 hours of playtime. To charge, connect the provided USB-C cable to the controller and a USB power source. A full charge takes approximately 2 hours.
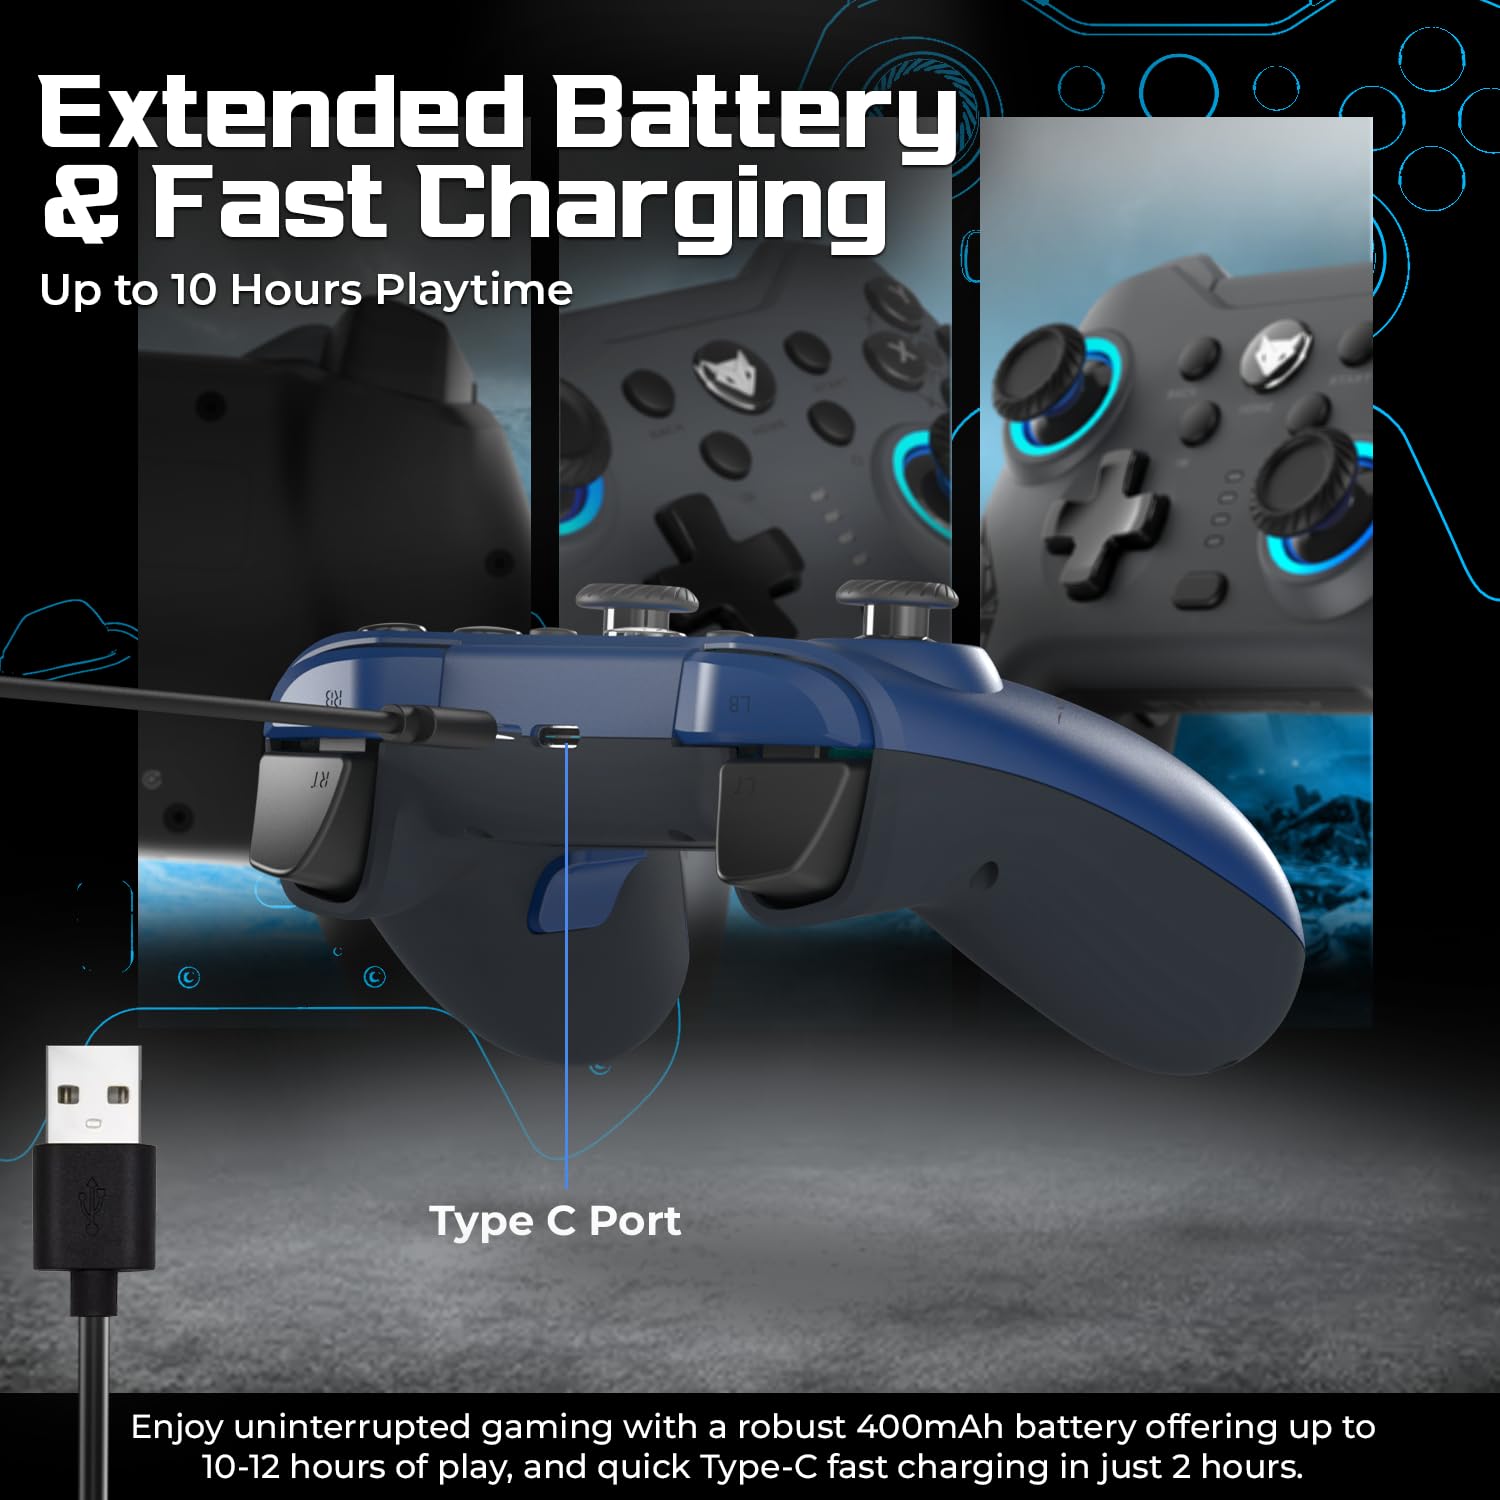
Image: The controller connected via its Type-C port, illustrating the charging process and highlighting its extended battery life.
6.2. Limpeza
To clean your controller, use a soft, dry cloth. For stubborn dirt, a slightly damp cloth can be used, followed by a dry cloth. Avoid using harsh chemicals or abrasive materials, as these can damage the controller's finish.
7 Solución de problemas
If you encounter issues with your EvoFox Elite X2 controller, please refer to the table below for common problems and solutions:
| Problema | Posible Solución |
|---|---|
| O controlador non se acende. | Ensure the controller is charged. Connect it to a power source using the USB-C cable. |
| O controlador non se conecta sen fíos. | Ensure the USB receiver is properly plugged into the PC. Try a different USB port. Ensure the controller is in 2.4GHz wireless mode. |
| Input lag or unresponsive buttons. | Ensure the controller is fully charged. Reduce distance between controller and receiver. Avoid interference from other wireless devices. Try wired mode. |
| Joysticks drifting or inaccurate. | The HallSense joysticks are designed to prevent drift. If issues occur, try resetting the controller using a pin in the reset hole on the back. |
| A vibración non funciona. | Check in-game settings to ensure vibration is enabled. Some games may not support vibration. |
For further assistance, please refer to the online support resources linked in the Setup section.
8. Especificacións
| Característica | Detalle |
|---|---|
| Número de modelo | 491 |
| Conectividade | 2.4GHz Wireless, USB-C Wired |
| Taxa de votación | 1000 Hz |
| Joysticks | HallSense™ Magnetic Hall 3D Joysticks |
| Disparadores | HallSense™ Magnetic Analog Triggers (Pressure-Sensitive) |
| Botóns de macro | 2 Programmable EZ Click Macro Buttons |
| Vibración | Dual Vibration Motors (Up to 3 levels) |
| Batería | 400mAh (Up to 10-12 hours playtime) |
| Tempo de carga | Aprox. 2 horas |
| Dimensións do produto | 16 x 11 x 6.8 cm |
| Peso do elemento | 250 g |
| País de Orixe | China |
9. Garantía e soporte
For information regarding warranty coverage and terms, please refer to the warranty card included with your product packaging or visit the official EvoFox websitio. Garde o recibo da compra como xustificante de compra para reclamacións de garantía.
For technical support, frequently asked questions, and additional resources, please visit the EvoFox support page: https://www.amkette.com/qr/elite-x2-help


