1. Introdución
This manual provides essential information for the safe and efficient use of your Philips B4000 Soundbar. Please read these instructions carefully before using the product and retain them for future reference. The Philips B4000 Soundbar is designed to enhance your television's audio experience with clear 2.0 channel sound and versatile connectivity options.

Image: The Philips B4000 Soundbar, its remote control, and a television displaying colorful content, illustrating the product in use.
2. Contido do paquete
Verifica que todos os elementos estean presentes no teu paquete:
- Philips B4000 Soundbar
- Control remoto
- 2 pilas AAA (para o mando a distancia)
- Soportes de montaxe na parede
- Guía de inicio rápido
- Tarxeta de garantía
3. Produto rematadoview
The Philips B4000 Soundbar features a compact design with integrated speakers and various input options for seamless integration with your home entertainment system.

Image: The Philips B4000 Soundbar positioned below a television in a living room, emphasizing its 2.0 channel audio, 60W maximum output power, and dual full-range speakers.
4. Configuración e instalación
4.1 Opcións de colocación
The soundbar offers flexible placement to suit your setup:
- Colocación do soporte de TV: Place the soundbar on a flat surface directly in front of your TV. Ensure it does not obstruct the TV's remote sensor.
- Montaxe na parede: Use the included wall mount brackets to attach the soundbar to the wall below your TV. Refer to the Quick Start Guide for detailed wall mounting instructions.
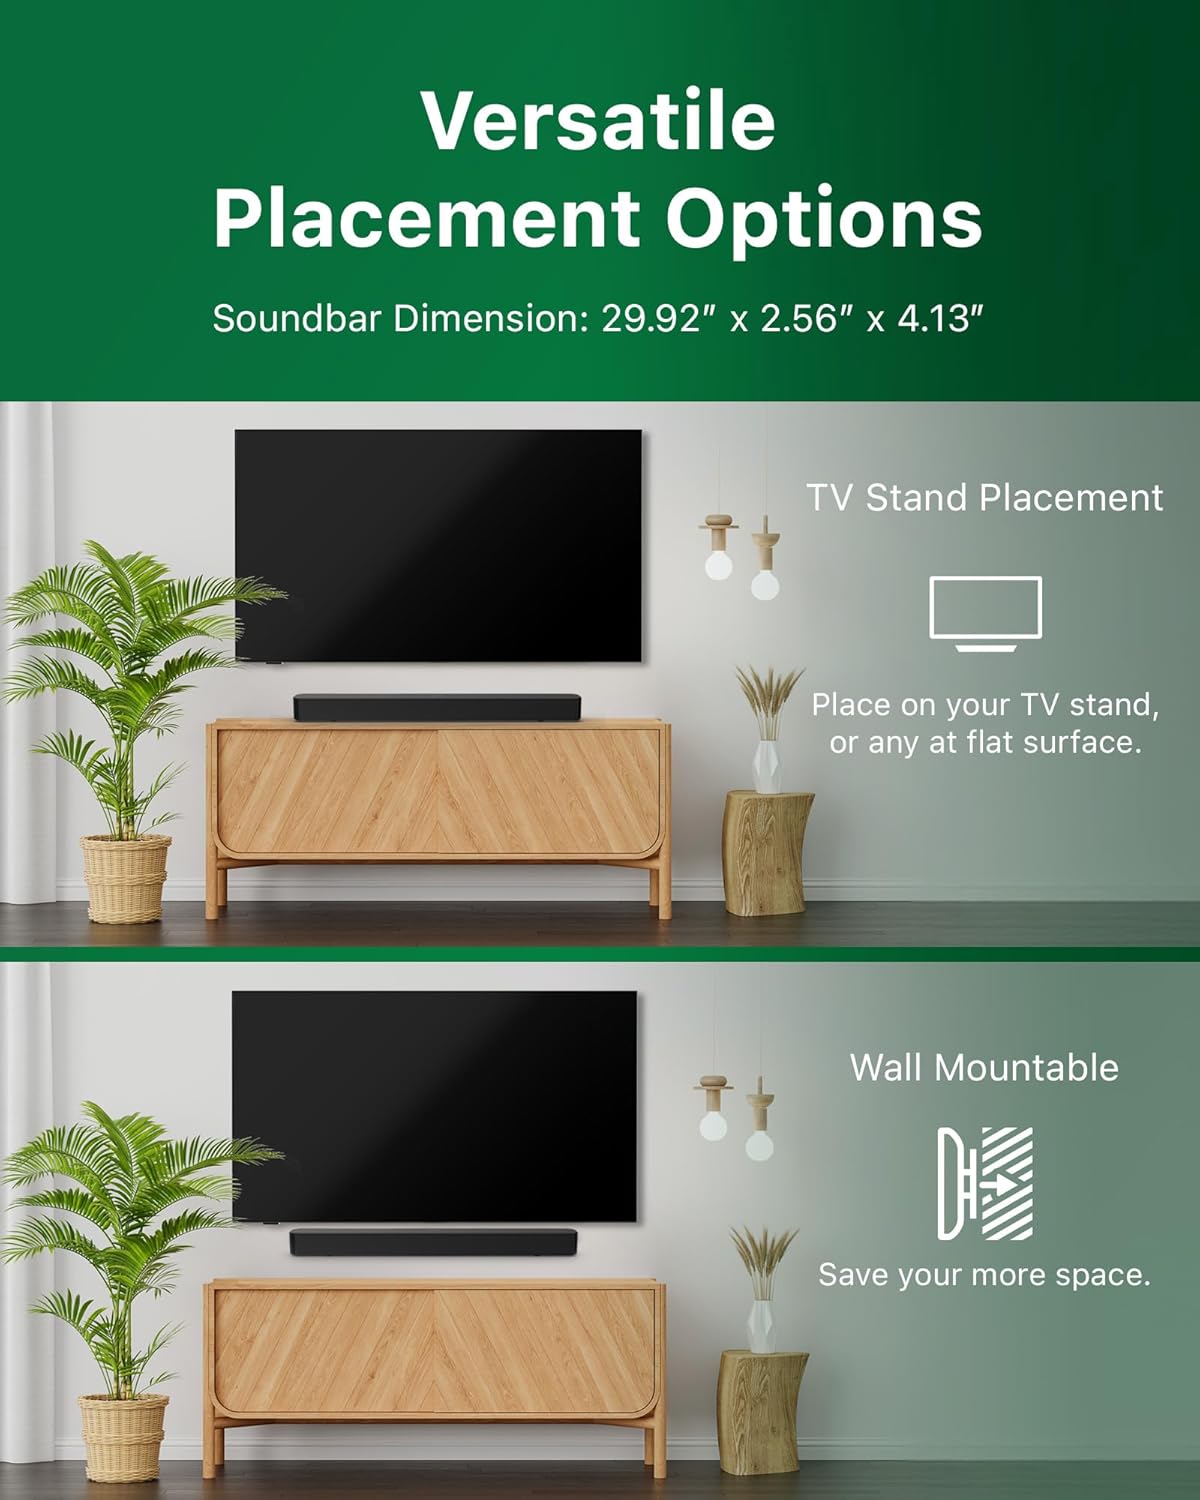
Image: Illustrations demonstrating the two primary placement methods for the soundbar: resting on a TV stand and securely mounted on a wall.
4.2 Conexión ao televisor
A barra de son admite varios tipos de conexión:
- HDMI ARC (recomendado): Connect an HDMI cable (not included) from the HDMI ARC port on your TV to the HDMI ARC port on the soundbar. This allows for audio return and control via your TV remote.
- Bluetooth: For wireless audio streaming, pair your soundbar with a Bluetooth-enabled device.
- USB: Connect a USB device for audio playback.
- DC IN: Conecte o adaptador de corrente ao porto de entrada de CC.

Image: A visual representation of the soundbar's available audio input ports, including HDMI (ARC), USB, Bluetooth, and DC IN for power.
4.3 Roku TV Ready Setup
The Philips B4000 Soundbar is Roku TV Ready certified, simplifying setup and control when paired with a Roku TV.
- Connect the soundbar to your Roku TV via HDMI ARC.
- Your Roku TV should automatically detect and configure the soundbar.
- Use your Roku TV remote to control the soundbar's power and volume.

Image: The Philips B4000 Soundbar seamlessly integrated with a television, illustrating its 'Roku TV Ready' certification for simplified setup and control.
4.4 Configuración do control remoto
Insert the two included AAA batteries into the remote control, ensuring correct polarity.
5. Funcionamento
5.1 Encendido/apagado
Press the power button on the soundbar or the remote control to turn the unit on or off.
5.2 Selección de entrada
Press the 'Source' button on the remote control to cycle through available input sources (HDMI ARC, Bluetooth, USB).
5.3 Control de volume
Use the 'Volume Up' and 'Volume Down' buttons on the remote control to adjust the audio level. If connected via HDMI ARC to a Roku TV, your TV remote may also control the volume.
5.4 Emparejamento Bluetooth
- Press the 'Bluetooth' button on the remote control to enter Bluetooth pairing mode. The indicator light on the soundbar will flash.
- On your mobile device, search for Bluetooth devices and select 'Philips B4000'.
- Unha vez emparellado, a luz indicadora acenderase de forma fixa e poderás transmitir audio sen fíos.
5.5 Sound Modes and Equalizer
The soundbar may offer various sound modes or equalizer settings to optimize audio for different content types (e.g., Movie, Music, News). Use the remote control to access and adjust these settings. While specific equalizer details are not extensively documented, experimentation with available settings is encouraged to find your preferred audio profile.

Image: The Philips soundbar remote control in the foreground, with a television screen in the background displaying the EasyLink 2.0 menu for adjusting sound styles, including Bass, Treble, and Custom Equalize options.
6. Mantemento
Para garantir a lonxevidade e o rendemento óptimo da túa barra de son, segue estas pautas de mantemento:
- Limpeza: Use a soft, dry cloth to clean the surface of the soundbar. Do not use liquid cleaners or abrasive materials, as they may damage the finish.
- Ventilación: Ensure the soundbar's ventilation openings are not blocked. Proper airflow prevents overheating.
- Almacenamento: Se vai gardar a barra de son durante un período prolongado, desconéctea da corrente e gárdea nun lugar fresco e seco.
7 Solución de problemas
If you encounter issues with your Philips B4000 Soundbar, refer to the following common problems and solutions:
| Problema | Causa posible | Solución |
|---|---|---|
| Non hai son da barra de son |
|
|
| Son estático ou distorsionado |
|
|
| Problemas de vinculación Bluetooth |
|
|
| O control remoto non funciona |
|
|
8. Especificacións
| Característica | Detalle |
|---|---|
| Nome do modelo | TAB4000 / 37 |
| Tipo de altofalante | Barra de son |
| Configuración da canle de son envolvente | 2.0 |
| Potencia de saída máxima do altofalante | 60 vatios |
| Tecnoloxía de conectividade | Bluetooth (5.4), HDMI ARC, USB |
| Características especiais | Advanced Bluetooth 5.4 Connectivity, Bass Boost, Roku TV Ready™ Certification, Wall mountable |
| Dimensións do produto | 4.1" D x 30" W x 2.56" H |
| Peso do elemento | 4.89 libras (2.22 quilogramos) |
| Fonte de enerxía | Battery Powered (for remote), AC Power (for soundbar) |
| Vol. De entradatage | 120 voltios |
| Compoñentes incluídos | Battery, Quick Start Guide, Remote, Wall Mount Bracket, Warranty Card |
9. Garantía e soporte
9.1 Información da garantía
The Philips B4000 Soundbar comes with a Limited Warranty. Please refer to the included Warranty Card for specific terms, conditions, and duration of coverage. Retain your proof of purchase for warranty claims.
9.2 Atención ao cliente
For further assistance, technical support, or service inquiries, please visit the official Philips support website or contact their customer service. Contact details can typically be found on the Philips websitio web ou na Guía de inicio rápido.


