1. Introdución
This manual provides detailed instructions for the setup, operation, and maintenance of your Thundeal TD93 Pro Mini Projector. Please read this manual thoroughly before using the product to ensure proper functionality and to extend its lifespan.

Image 1.1: Thundeal TD93 Pro Mini Projector overview.
2. Que hai na caixa
Verifique que todos os elementos que se indican a continuación estean incluídos no seu paquete:
- Thundeal TD93 Pro Projector
- Control remoto
- Cable de alimentación
- Manual de usuario (este documento)
- Cabo AV
- Cable HDMI
- Cuberta da lente do proxector

Image 2.1: Package contents of the TD93 Pro Projector.
3. Product Specifications and Features
3.1. Especificacións técnicas
| Número de modelo | TD93 Pro (Item Model Number: TD97) |
| Resolución nativa | 1920 x 1080 (Full HD) |
| Soporte de resolución máxima | 2K 4K UHD (from HD Signal) |
| Brillo | 12000 lúmenes |
| Relación de contraste | 15000:1 |
| Relación de aspecto | 4:3 / 16:9 / Auto |
| Sistema Operativo | OS Android 9.0 |
| Conectividade sen fíos | 2.4G / 5G WiFi, Bluetooth-compatible |
| Memoria | Memoria RAM 1 GB DDR3 + ROM 8 GB |
| Corrección Keystone | 6D Keystone (4-point corner +/- 60°, Vertical +/- 60°) |
| Función de zoom | 50-100% Proportional Reduction |
| Tamaño de proxección | 49 to 300 inches (recommended 93-150 inches) |
| Distancia de proxección | 1.6 to 6.5 meters (recommended 3-5 meters) |
| Lamp De por vida | 50,000 horas |
| Audio | Built-in 5W stereo speakers with SRS sound system |
| Características especiais | 3D-Ready (Red-Blue 3D), Auto Horizontal Keystone, Built-In Wi-Fi, Portable, Dust Removal Net |
3.2. Características clave
- High Definition Visuals: Native 1080P resolution with support for 2K/4K UHD signals, delivering clear and vibrant images.
- Sistema operativo intelixente Android: Integrated Android 9.0 operating system allows direct app downloads and streaming.
- WiFi de banda dual: 2.4G and 5G WiFi connectivity for stable and fast wireless streaming and screen mirroring.
- Conectividade Bluetooth: Conecta altofalantes ou auriculares Bluetooth externos para mellorar o son.
- Advanced Image Correction: 6D Keystone correction (4-point and vertical) for flexible placement and precise image alignment.
- Proxección flexible: Adjustable zoom from 50% to 100% and support for screen sizes up to 300 inches.
- Larga duración Lamp: LED lamp designed for up to 50,000 hours of operation.
- Multi-Media Compatibility: Supports various input sources including HDMI, USB, AV, and direct office file reprodución por USB.

Image 3.1: Visual comparison of projector brightness and resolution.
4. Guía de configuración
4.1. Colocación do proxector
The projector can be placed in various positions to suit your viewambiente de traballo:
- Nun escritorio: Coloque o proxector sobre unha superficie estable e plana.
- Nun trípode: Utilize the 6mm screw hole on the bottom for tripod mounting.
- Ceiling Hoisting: Mount the projector to the ceiling using a compatible hanger.
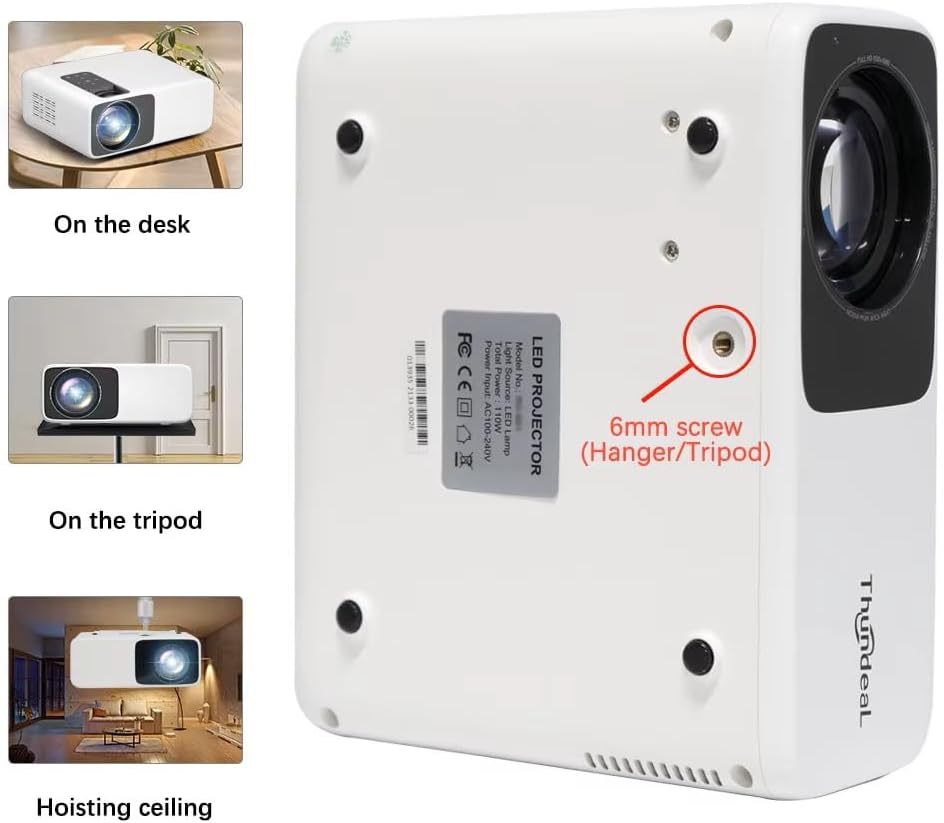
Image 4.1: Projector placement options and mounting point.
Para óptimo viewing, ensure the projector is positioned perpendicular to the screen or wall. Adjust the projection distance (1.6 to 6.5 meters) to achieve your desired screen size (49 to 300 inches). A distance of 3-5 meters for a 93-150 inch screen is recommended for eye comfort.
4.2. Conexión de alimentación
- Conecte o cable de alimentación ao porto de entrada de alimentación do proxector.
- Conecte o outro extremo do cable de alimentación a unha toma de corrente estándar.
- Prema o botón de acendido do proxector ou do mando a distancia para acendelo.
5. Instrucións de funcionamento
5.1. Multi-Media Connections
The TD93 Pro projector offers various ports for connecting external devices:

Image 5.1: Available multimedia connection ports.
- HDMI Ports (HDMI1, HDMI2): Connect devices such as TV boxes, gaming consoles (PS5, Xbox), laptops, or Blu-ray players.
- USB Ports (USB1, USB2): Connect USB flash drives for direct media playback (photos, videos, office documents).
- Porto AV: Conecta dispositivos antigos usando o cable AV fornecido.
- Conector para auriculares (3.5 mm): Conecta auriculares ou altofalantes externos.
To switch input sources, use the "Source" button on the remote control or the projector's control panel and select the desired input (HDMI1, HDMI2, AV, USB).
5.2. Conectividade sen fíos
5.2.1. Conexión WiFi (2.4G/5G)
The projector supports dual-band WiFi for internet access and network features:
- Navigate to the "Settings" menu on the projector's Android interface.
- Select "Network & Internet" and then "Wi-Fi".
- Activa o Wi-Fi e selecciona a rede desexada da lista.
- Introduza o contrasinal se se lle solicita e conéctese.
5.2.2. Conexión Bluetooth
Connect Bluetooth-compatible audio devices like speakers or headphones:
- Vaia a "Configuración" > "Dispositivos conectados" > "Bluetooth".
- Activa o Bluetooth.
- Pon o dispositivo Bluetooth no modo de sincronización.
- Selecciona o teu dispositivo da lista de dispositivos dispoñibles para emparellalo.
5.3. Screen Mirroring (Airplay/WiFi-Display)
Wirelessly display content from your Android or iOS phone:

Image 5.2: Screen mirroring from iOS and Android devices.
- Ensure both your projector and mobile device are connected to the same Wi-Fi network.
- On the projector's main interface, select the "Screen Mirroring" or "Airplay/WiFi-Display" application.
- For iOS devices: Open Control Center, tap "Screen Mirroring" or "AirPlay Mirroring", and select the projector from the list.
- For Android devices: Open the notification panel, find "Cast", "Smart View", "Wireless Display", or similar function, and select the projector.
5.4. Axuste da imaxe
5.4.1. Keystone Correction (6D)
The projector features 6D keystone correction to adjust image shape:
- Clave trapezoidal vertical: Adjust +/- 60 degrees vertically using the remote control.
- 4-Point Corner Keystone: Adjust each of the four corners independently by +/- 60 degrees for side projection or irregular surfaces. This allows for precise rectangular image alignment.
Access keystone settings via the projector's menu or dedicated buttons on the remote.
5.4.2. Función de zoom
Adjust the display size from 50% to 100% proportionally without moving the projector. This feature is useful for fine-tuning the image size to fit your screen or wall.
Access the zoom function through the projector's menu settings.
5.5. Android OS and App Usage
The integrated Android 9.0 OS allows you to download and install applications directly from the Play Store. Ensure the projector is connected to Wi-Fi to access online services and apps.
- Play Store: Access the Google Play Store to download streaming apps, games, and utilities.
- Reprodución multimedia: Use pre-installed media players or download alternatives (e.g., VLC player for AC3 audio support).
6. Mantemento
6.1. Eliminación de po
The projector is equipped with a built-in dust net for easy cleaning. Regularly clean the dust net to maintain optimal performance and prevent overheating. Press to pop out the dust net for cleaning.
6.2. Sistema de refrixeración
The advanced cooling system is designed to dissipate heat efficiently and extend the lamp's lifespan. Ensure proper ventilation around the projector and avoid blocking air vents during operation.
6.3. Lamp De por vida
O LED lamp has an estimated lifespan of 50,000 hours. No lamp replacement is typically required during the product's operational life under normal usage conditions.
7 Solución de problemas
7.1. No Image Displayed
- Comproba se o proxector está acendido.
- Verify the input source is correctly selected (e.g., HDMI1, USB).
- Asegúrese de que todos os cables estean conectados de forma segura.
- Axusta o foco e a corrección trapezoidal.
7.2. Sen son
- Check the volume level on the projector and the connected source device.
- Ensure external speakers or headphones are properly connected and powered on if used.
- If using an external source, verify its audio output settings.
- For AC3 audio, ensure you are using a compatible player like VLC.
7.3. Connectivity Issues (WiFi/Bluetooth)
- Ensure WiFi is enabled and you are connected to the correct network.
- Restart the projector and your router/Bluetooth device.
- For screen mirroring, confirm both devices are on the same Wi-Fi network.
7.4. Image is Blurry or Distorted
- Axuste o anel de enfoque da lente do proxector.
- Use the keystone correction features to correct any trapezoidal distortion.
- Asegúrate de que a superficie de proxección sexa plana e lisa.
8. Garantía e soporte
Para obter información sobre a garantía e asistencia técnica, consulte a documentación proporcionada no momento da compra ou póñase en contacto co seu vendedor. Garde o recibo da compra como proba de compra.