1. Introdución
Grazas pola compraasing the Supersonic Professional Stereo Amplifier AV-972SA. This amplifier is designed to provide high-fidelity audio for your home entertainment or karaoke system. With its versatile features, including USB/SD card playback, FM radio, and microphone inputs, it offers a powerful and clear sound experience. Please read this manual carefully before operating the unit to ensure proper use and to maximize its performance.
2. Instrucións de seguridade importantes
- Fonte de alimentación: Asegúrese de que a fonte de alimentación voltage matches the requirements specified on the unit (220V~250V/50Hz).
- Ventilación: Non bloquee ningunha abertura de ventilación. Instáleo segundo as instrucións do fabricante.
- Auga e humidade: Non expoña este aparello á choiva nin á humidade. Non coloque obxectos cheos de líquidos, como vasos, enriba do aparello.
- Calor: Non instale preto de fontes de calor como radiadores, rexistros de calor, cociñas ou outros aparellos (incluíndo amplificadores) que producen calor.
- Limpeza: Limpar só cun pano seco.
- Servizo: Non intente atender este produto vostede mesmo. Remita todo o servizo a persoal de servizo cualificado.
- Conexión do altofalante: Ensure correct polarity when connecting speakers to prevent damage to the amplifier e altofalantes.
3. Características clave
- Luxury Color Pointer Screen Display
- High-Fidelity Stereo Dynamic AmpDeseño máis vivo
- Bass-enhancement Technology
- Potente saída de 3000 W
- Professional Karaoke FM Radio Tuner
- USB/SD Card Playback for MP3 files
- Low Leak Magnetic Ring type Voltage
- Optimized for use with 12", 15", and 18" loudspeakers
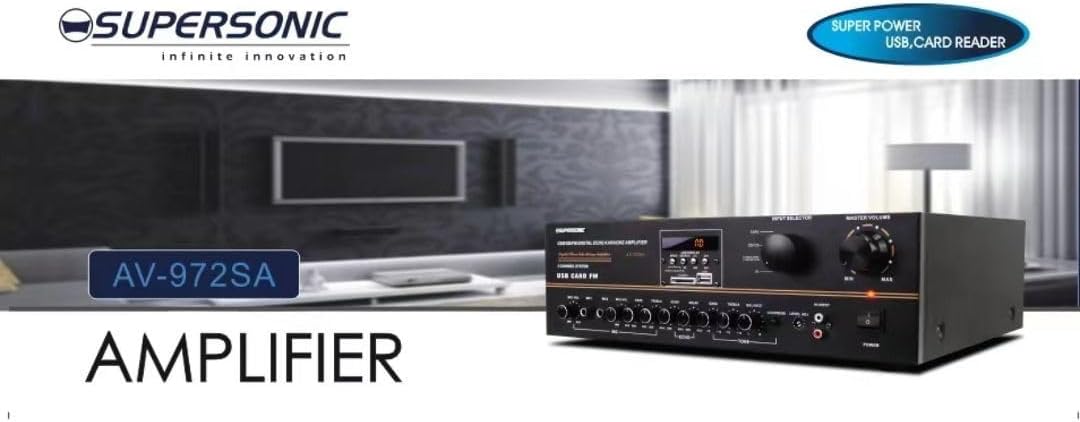
Imaxe 3.1: A visual representation of the key features of the Supersonic AV-972SA amplifier, including its display, power output, and connectivity options.
4. Produto rematadoview
The Supersonic AV-972SA amplifier features a user-friendly front panel for easy control and a rear panel for all necessary connections.
4.1 Panel frontal

Imaxe 4.1: Fronte view of the Supersonic AV-972SA ampvidador, mostrarasing its controls, display, and input ports in a home setting.
O panel frontal inclúe:
- Botón de encendido: Vira o ampmáis vivo encendido ou apagado.
- Control de volume principal: Axusta o volume de saída xeral.
- Controis de graves/agudos: Axusta a resposta de frecuencias baixas e altas.
- Selector de entrada: Switches between different audio sources (e.g., USB, SD, FM, AUX).
- Ranura para tarxetas USB/SD: Para reproducir audio files directly from USB drives or SD cards.
- FM Tuner Controls: For radio station selection and tuning.
- Entradas de micrófono: For connecting microphones for karaoke or public address.
- Pantalla de visualización: Mostra o modo actual, a información da pista ou a frecuencia FM.
4.2 Panel posterior
The rear panel provides all necessary connections for speakers, power, and external audio sources.
- Terminais de altofalantes: Connect your loudspeakers here. Ensure correct polarity (+ to + and - to -).
- Entrada de son (RCA): For connecting external audio devices like CD players, DVD players, or other audio sources.
- Entrada do cable de alimentación: Conecte aquí o cable de alimentación fornecido.
- Entrada de antena FM: Connect the FM antenna for improved radio reception.
5. Guía de configuración
Follow these steps to set up your Supersonic AV-972SA ampmáis vivo:
- Colocación: Coloca o amplifier on a stable, flat surface with adequate ventilation around it. Avoid direct sunlight, heat sources, or areas with high humidity.
- Conexión do altofalante: Connect your loudspeakers to the speaker terminals on the rear panel. Match the positive (+) terminal on the amplifier to the positive (+) terminal on your speaker, and the negative (-) to the negative (-). Ensure all connections are secure. This amplifier is designed to work best with 12", 15", or 18" loudspeakers.
- Conexión de fonte de audio:
- Dispositivos externos: Connect your CD player, DVD player, or other audio sources to the RCA audio input jacks on the rear panel.
- Tarxeta USB/SD: Insert a USB flash drive or SD card into the respective slot on the front panel.
- Antena FM: Connect the FM antenna to the designated input on the rear panel for optimal radio reception.
- Conexión de alimentación: Asegurar o amplifier's power switch is in the OFF position. Connect the power cord to the amplifier's power input and then plug it into a suitable 220V~250V/50Hz AC power outlet.
6. Instrucións de funcionamento
6.1 Acendido/Apagado
Preme o Botón de encendido no panel frontal para activar o amplifier ON. The display will illuminate. Press it again to turn the amplifier apagado.
6.2 Selecting Audio Source
Usa o Selector de entrada button or knob on the front panel to cycle through available audio sources: USB, SD, FM, or AUX (RCA input).
6.3 Control de volume e ton
- Volume principal: Xire o Volume mestre knob to adjust the overall sound level. Start with a low volume and gradually increase it.
- Graves/Agudos: Usa o Baixo e Treble knobs to fine-tune the low and high frequencies of the audio output to your preference.
Reprodución de tarxetas USB/SD de 6.4
Once a USB drive or SD card containing MP3 audio files is inserted, the amplifier will automatically switch to USB/SD mode and begin playback. Use the control buttons (Play/Pause, Next, Previous) on the front panel to manage playback.
6.5 Funcionamento da radio FM
Select the FM input using the Selector de entrada. Use the FM tuner controls to scan for and select radio stations. The display will show the current frequency.
6.6 Uso do micrófono (karaoke)
Connect your microphones to the microphone input jacks on the front panel. Adjust the microphone volume and echo effects (if available) using the dedicated controls. Ensure the main volume is set appropriately to avoid feedback.
7. Mantemento
- Limpeza: Desconecte a alimentación antes de limpar. Use un pano suave e seco para limpar o exterior do ampNon empregue produtos de limpeza líquidos nin aerosois.
- Ventilación: Comprobe regularmente que as aberturas de ventilación estean libres de po e residuos para evitar o sobrequecemento.
- Almacenamento: Se almacena o amplifter durante un período prolongado, asegúrese de que estea nun lugar fresco e seco, lonxe da luz solar directa e de temperaturas extremas.
8 Solución de problemas
| Problema | Causa posible | Solución |
|---|---|---|
| Sen poder | Cable de alimentación non conectado; Toma de corrente avariada; Amplifier power switch off | Check power cord connection; Try a different outlet; Ensure power switch is ON |
| Sen saída de son | Volume too low; Incorrect input selected; Speaker wires loose or incorrectly connected; Faulty audio source | Increase master volume; Select correct input; Check speaker connections and polarity; Test with a different audio source |
| Mala recepción FM | Antenna not connected or poorly positioned; Weak signal | Connect FM antenna securely; Adjust antenna position; Try manual tuning |
| Non se reproduce o USB/SD | Incorrecto file format; USB/SD card faulty or not inserted correctly; Amplifier not in USB/SD mode | Garantir files are MP3 format; Reinsert USB/SD card; Select USB/SD input mode |
9. Especificacións
| Característica | Especificación |
|---|---|
| Marca | Supersónico |
| Número de modelo | AMP-AV972SA |
| Potencia de saídatage | 3000 W |
| Tecnoloxía de conectividade | USB |
| Característica especial | Deseño compacto |
| Cor | Negro |
| Dimensións do produto | 25 D x 45 W x 26 H centímetros |
| Peso do elemento | 1 quilogramos |
| Método de control | Toca |
| Fonte de alimentación | 220V~250V/50Hz |
10. Garantía e soporte
This Supersonic AV-972SA ampo lifier vén con a 6 meses de garantía do fabricante from the date of purchase. This warranty covers manufacturing defects under normal use. It does not cover damage caused by misuse, accidents, unauthorized modifications, or improper installation.
For warranty claims or technical support, please contact your retailer or the Supersonic customer service department. Please have your proof of purchase and product model number (AMP-AV972SA) ready when contacting support.


