1. Introdución
Grazas pola compraasing the DEERC F-16 Style RC Airplane (X-62A Vista). This remote-controlled aircraft is designed for enthusiasts of all skill levels, featuring a 4-channel control system and a 6-axis gyro stabilizer for enhanced flight stability. This manual provides essential information for safe operation, assembly, maintenance, and troubleshooting to ensure an enjoyable flying experience.
2. Pautas de seguridade
- Ambiente de voo: Always operate the aircraft in open, clear areas away from people, buildings, trees, power lines, and water. Avoid flying in strong winds or adverse weather conditions.
- Seguridade da batería: Use only the provided batteries and charger. Do not overcharge or short-circuit batteries. Store batteries in a cool, dry place away from flammable materials. Discontinue use if batteries show signs of damage or swelling.
- Seguridade da hélice: Keep hands, face, and loose clothing away from the rotating propeller. Ensure the propeller is securely attached before flight.
- Supervisión de adultos: For younger users, adult supervision is recommended during assembly, charging, and flight.
- Comprobación previa ao voo: Before each flight, ensure all components are securely attached, batteries are charged, and the remote control is properly paired.
3. Contido do paquete
Verifica que todos os elementos estean presentes no teu paquete:
- DEERC F-16 Style RC Airplane (X-62A Vista)
- Transmisor de control remoto
- LiPo Battery (400mAh) x 2
- Cable de carga USB
- Spare Propeller x 2
- Tren de aterraxe frontal
- Tren de aterraxe traseiro
- Silicone Nose Cone x 2
- Desaparafusador
- Manual de instrucións (este documento)
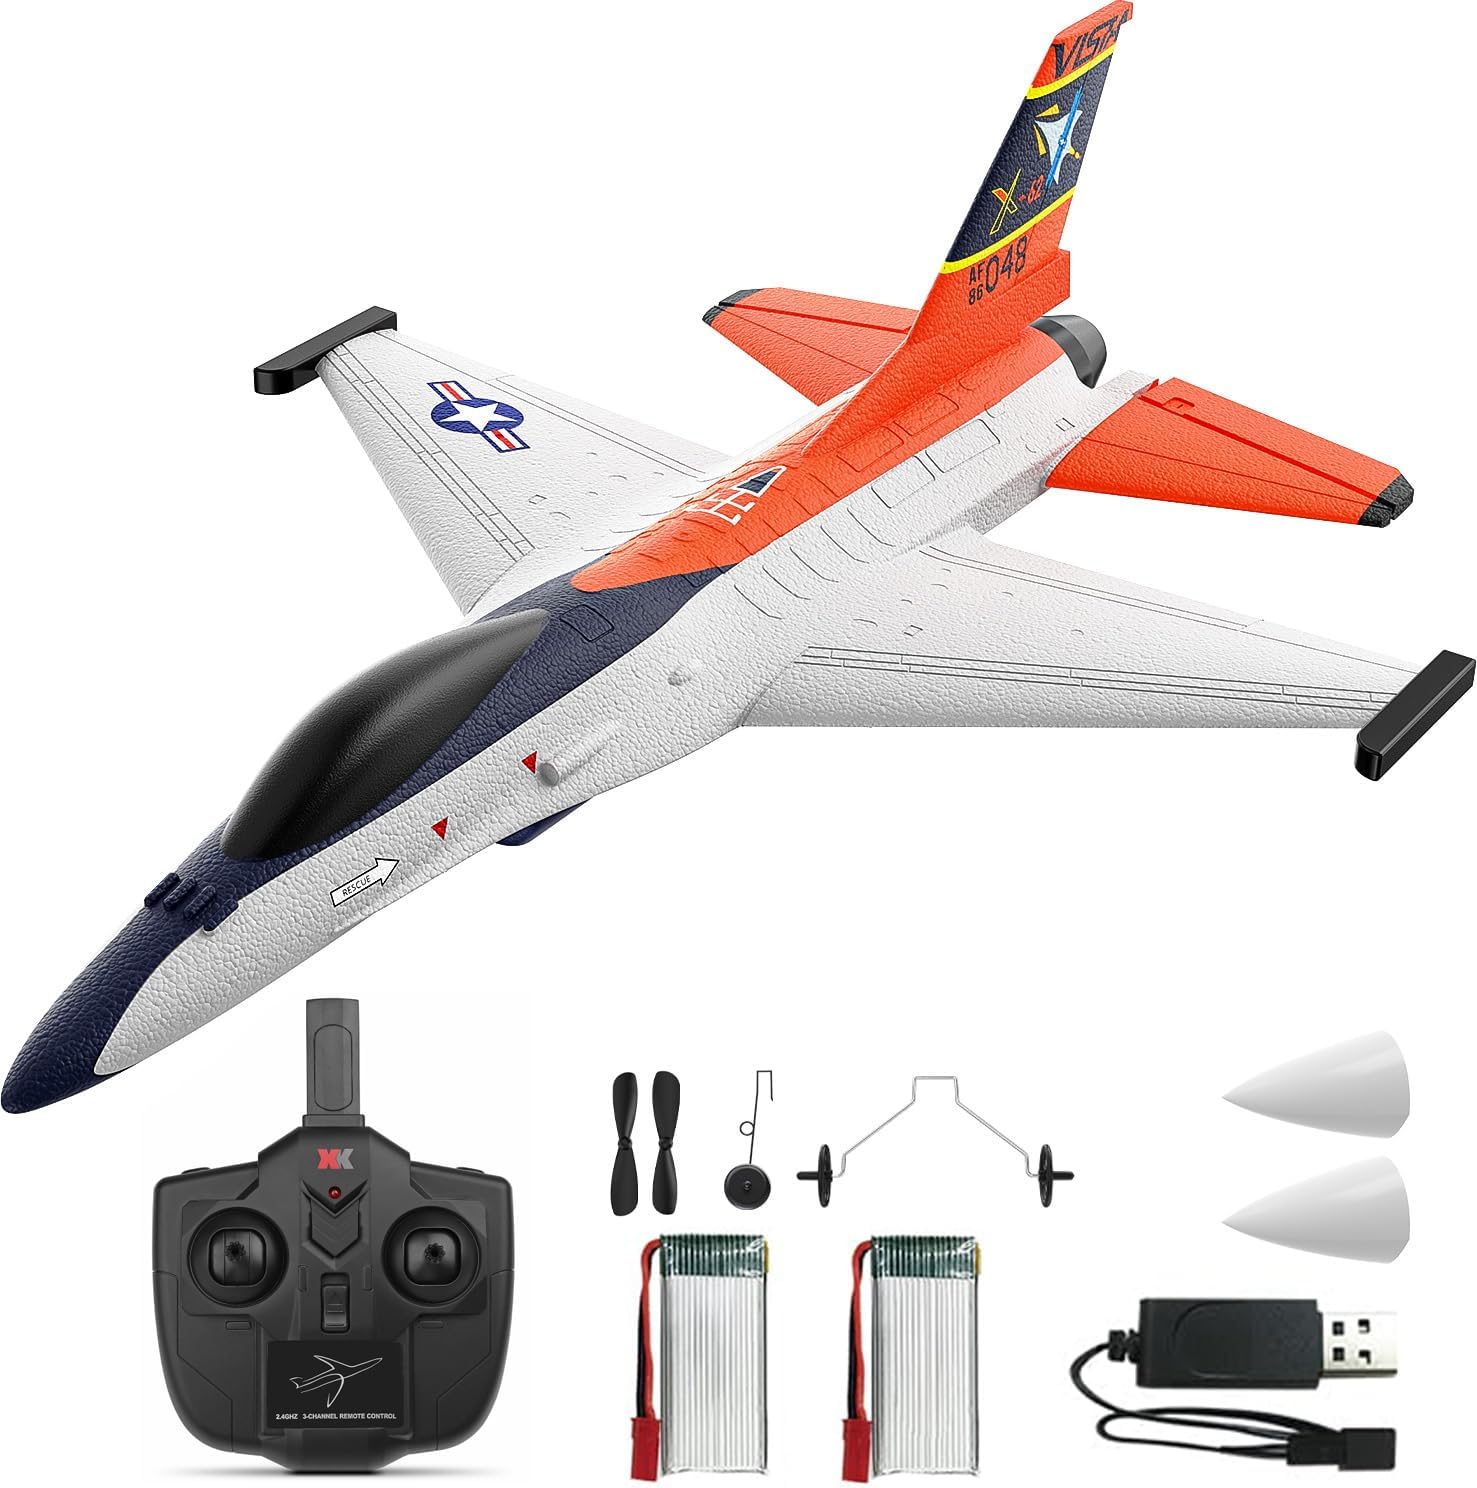
Image: Complete package contents including the DEERC F-16 Style RC Airplane, remote control, batteries, charger, and spare parts.

Image: Visual representation of the package contents, highlighting each component.
4. Montaxe
The DEERC F-16 Style RC Airplane requires minimal assembly. Follow these steps:
- Install Tail Fin: Gently slide the vertical tail fin into the designated slot at the rear of the aircraft body until it is securely in place. Some users may choose to apply a small amount of foam-safe glue for permanent attachment, but it is designed to hold without it.
- Attach Landing Gear: Insert the front landing gear into the slot on the underside of the fuselage near the nose. Push until it clicks into place. Repeat for the rear landing gear, inserting it into the slots under the wings.
- Install Nose Cone: Place one of the silicone nose cones over the front tip of the aircraft. This provides protection during minor impacts.

Image: Close-up of the aircraft's tail fin and nose, showing the areas for component attachment.
5. Carga da batería
The aircraft uses 400mAh LiPo batteries. Follow these charging instructions:
- Connect the LiPo battery to the USB charging cable.
- Plug the USB charging cable into any standard USB port (e.g., computer, USB wall adapter, power bank).
- The indicator light on the USB charger will illuminate during charging and turn off or change color when charging is complete.
- A carga adoita tardar entre 60 e 90 minutos. Non deixes as baterías sen vixilancia mentres se cargan.

Image: Illustration showing the dual battery setup and the low battery alert on the remote control.
6. Configuración do control remoto
- Instalar baterías: Open the battery compartment on the back of the remote control and insert 4 AA batteries (not included), ensuring correct polarity. Close the compartment.
- Encendido: Acenda o mando a distancia. O indicador luminoso parpadeará.
- Connect Aircraft Battery: Insert a charged LiPo battery into the battery compartment of the aircraft and connect it. The aircraft's indicator light will flash.
- Emparejamento: On the remote control, push the throttle stick (left stick) all the way up, then all the way down. The remote control and aircraft indicator lights will become solid, indicating successful pairing.
7. Instrucións de funcionamento
7.1 Comprobacións previas ao voo
- Asegúrese de que todas as pezas estean montadas correctamente e de forma segura.
- Verify batteries are fully charged for both aircraft and remote control.
- Confirm successful pairing between the aircraft and remote control.
- Check control surfaces (ailerons, rudder) respond correctly to remote input.
7.2 Take-Off Modes
The X-62A Vista supports two take-off methods:
- Despegue lanzado á man: Hold the aircraft firmly with one hand, apply full throttle, and gently toss it forward into the wind. The 6-axis gyro will assist in stabilizing the flight.
- Despegue desde terra: Place the aircraft on a smooth, flat surface. Apply full throttle, and the aircraft will accelerate and take off.

Image: Visual guide demonstrating both hand-thrown and ground take-off procedures.
7.3 Controis de voo
The 4-channel remote control allows for precise maneuvers:
- Left Stick (Throttle/Rudder): Up/Down for throttle (speed), Left/Right for rudder (yaw/turning).
- Right Stick (Elevator/Aileron): Up/Down for elevator (pitch/climb/descend), Left/Right for aileron (roll/bank).
The 6-axis gyro stabilizer provides automatic stability correction, making it easier to control, especially for beginners.

Image: Diagram illustrating the aircraft's gyro stabilizer and responsive control surfaces.
7.4 Aerobatics
Perform exciting stunts with ease:
- Xire 360°: Press the dedicated flip button on the remote control, then quickly move the right stick in the desired direction (forward, backward, left, or right) to execute a full flip.
- Aerobatic Roll: With sufficient altitude, move the right stick sharply left or right to perform a smooth barrel roll.

Image: The RC airplane executing various aerial stunts, including 360-degree flips and rolls.

Image: Detailed illustration of the aircraft performing various aerobatic maneuvers.
7.5 Panic/Hover Mode
In situations where you lose orientation or need immediate stabilization, activate the Panic/Hover mode. This mode will automatically level the aircraft and maintain its current altitude, allowing you to regain control. Refer to your remote control's specific button for this function.
7.6 Aterraxe
To land the aircraft, reduce throttle gradually while maintaining a slight nose-up attitude. Guide the aircraft towards a clear, open area. Allow it to gently descend and touch down. For hand-thrown flights, you can also catch the aircraft by hand after reducing throttle.
8. Mantemento
- Limpeza: Wipe the aircraft gently with a soft, dry cloth after each use. Avoid using water or chemical cleaners.
- EPP Foam Repair: The aircraft is constructed from durable EPP foam. In case of minor damage or cracks, use foam-safe glue (not included) to repair. Ensure the glue is fully dry before flying.
- Substitución da hélice: If the propeller is damaged, replace it with a spare using the provided screwdriver. Ensure the new propeller is installed in the correct orientation.
- Almacenamento: When not in use, store the aircraft and remote control in a cool, dry place, away from direct sunlight. Disconnect batteries from the aircraft and remove batteries from the remote control for long-term storage.

Image: Close-up of the aircraft's durable silicone nose, designed to absorb impacts.

Image: Illustration emphasizing the lightweight and crash-resistant EPP foam construction.

Image: Depiction of the aircraft's robust foam body and protective silicone tip.
9 Solución de problemas
| Problema | Causa posible | Solución |
|---|---|---|
| Aircraft does not respond to remote control. | Non emparellado, batería baixa, interferencias. | Re-pair the aircraft and remote. Charge batteries. Move to an area with less interference. |
| O avión voa de forma errática ou é inestable. | Damaged propeller, unbalanced, strong wind, gyro calibration issue. | Check/replace propeller. Fly in calm conditions. Re-calibrate gyro (refer to remote control instructions). |
| Tempo de voo curto. | Batería non cargada completamente, batería vella, voo agresivo. | Ensure battery is fully charged. Consider replacing old batteries. Fly more conservatively. |
| Propeller not spinning. | Motor issue, loose connection, damaged propeller. | Check battery connection. Replace propeller. Contact customer support if motor is faulty. |
10. Especificacións
- Marca: DEERC
- Modelo: X-62A Vista (DEERC-4CH-F16)
- Canles de control: 4 canles
- Estabilización: Estabilizador xiroscópico de 6 eixes
- Motor: 4400KV 1020 Coreless Motor
- Material: Durable EPP Foam
- Batería: 400mAh LiPo (x2 included)
- Tempo de voo: Aproximadamente 10+ minutos por batería (20+ minutos en total)
- Frecuencia de control remoto: 2.4 GHz
- Dimensións do produto: 17.8 x 5.2 x 12.6 polgadas
- Peso do artigo: 1.65 libras
11. Garantía e soporte
For warranty information, technical support, or replacement parts, please contact DEERC customer service. Refer to the contact details provided on the product packaging or the official DEERC websitio.
12. Vídeos oficiais de produtos
DEERC F-16 Style 4CH RC Airplane (X-62A VISTA)
Video: An official product video from DEERC US showcasing the F-16 Style 4CH RC Airplane (X-62A VISTA) in flight, demonstrating its features and capabilities.


