Introdución
Thank you for choosing the Nilight 12V/24V 360A Remote Battery Disconnect Switch. This device is designed to provide a convenient and secure method for disconnecting your vehicle's battery, preventing power drain, and offering an anti-theft solution. It features wireless remote control operation and an integrated LED voltmeter for real-time battery monitoring. Please read this manual thoroughly before installation and operation to ensure proper use and safety.
Produto rematadoview
Características clave
- Clasificación de alta corrente: Rated for 360A starting current and 200A continuous current at 12V/24V, suitable for various automotive vehicles.
- LED Voltmeter Display: Integrated display allows for direct monitoring of battery voltage, enhancing safety and convenience.
- Ultra-Low Power Consumption: Utilizes a magnetic hold relay with a standby current of only 0.005A (5mA) to conserve battery power.
- Control remoto sen fíos: Includes two paired wireless remote controls with an operating range of up to 165 feet (50 meters) for convenient battery disconnection.
- Anti-Theft Functionality: Remotely disconnecting the battery adds an extra layer of security.
- Baixo Voltage Protección: Automatically disconnects if voltage drops below 12V (for 12V systems) or 24V (for 24V systems) to prevent deep discharge.
Contido do paquete
Verifica que todos os elementos estean presentes no paquete:
- 1 x 360 Amp Remote Battery Disconnect Switch Unit
- 2 x Wireless Remote Control Keys
- 1 x bloque de terminales
- 1 x Installation Copper Pillar
- 1 x Black Negative Wire
- 1 x Stud
- 3 x Gravatas

Image: The Nilight Remote Battery Disconnect Switch main unit with its two wireless remote controls.
Especificacións
| Especificación | Valor |
|---|---|
| Voltage | 12 V / 24 V CC |
| Corrente nominal | 200A |
| Corrente de arranque | 360A (<10s) |
| Corrente de espera | 0.005 A (5 mA) |
| Self-locking Voltage | >13.2V (12V system) / >26.4V (24V system) |
| Baixo Voltage Protección | <12V (12V system) / <24V (24V system) |
| Rango de control remoto | Ata 165 pés (50 metros) |
| Material | Nylon flame retardant shell, pure copper inner core and coil |
| Dimensións do produto | 12.7 x 10 x 6 cm (5 x 3.94 x 2.36 polgadas) |
| Peso do elemento | 490 g |
| Número de modelo | 50235A |

Image: Detailed dimensions of the Nilight Remote Battery Disconnect Switch and its associated components.
Información de seguridade
Always prioritize safety when working with automotive electrical systems. Failure to follow these guidelines may result in injury or damage to the product or vehicle.
- Always disconnect the vehicle's battery before beginning any electrical installation or maintenance.
- Usar o equipo de protección individual axeitado, incluíndo lentes e luvas de seguridade.
- Ensure the vehicle is turned off and the ignition key is removed before installation.
- Avoid short circuits. Do not allow tools or metal objects to bridge battery terminals or other electrical components.
- Ensure all connections are secure and properly insulated to prevent arcing or corrosion.
- Do not exceed the specified current and voltage ratings of the device.
- Keep the product away from water, excessive heat, and flammable materials.
Configuración e instalación
Follow these steps for proper installation of the Nilight Remote Battery Disconnect Switch:
- Preparar o vehículo: Turn off the vehicle's engine and remove the ignition key. Disconnect the negative terminal of the vehicle's battery first to prevent accidental short circuits.
- Identificar os terminais da batería: Locate the positive (+) and negative (-) terminals of your vehicle's battery.
- Montar o interruptor: Choose a suitable, secure location near the battery for mounting the disconnect switch. Ensure it is protected from excessive moisture and heat.
- Conectar o terminal positivo: Connect the positive (+) terminal of the battery to the input side of the disconnect switch (marked 'POS'). Use the provided copper pillar and terminal block if necessary.
- Connect Vehicle's Positive Cable: Connect the vehicle's main positive cable to the output side of the disconnect switch.
- Connect Negative Wire: Connect the provided black negative wire from the switch (marked 'NEG') to the vehicle's chassis ground or the battery's negative terminal.
- Volver conectar a batería: Volva conectar o terminal negativo da batería do vehículo.
- Funcionalidade de proba: Use the remote control to turn the power ON and OFF. Verify that the vehicle's electrical system responds correctly.

Image: Wiring diagram illustrating the connection of the remote battery disconnect switch to a vehicle's battery system.
Instrucións de funcionamento
Usando o mando a distancia
The Nilight Remote Battery Disconnect Switch comes with two wireless remote controls for convenient operation.
- To Connect Power (ON): Press the 'ON' button on the remote control. The switch will engage, connecting the battery to the vehicle's electrical system.
- To Disconnect Power (OFF): Press the 'OFF' button on the remote control. The switch will disengage, disconnecting the battery from the vehicle's electrical system. This is recommended when the vehicle is not in use for extended periods to prevent battery drain and for anti-theft purposes.

Image: A hand operating the wireless remote control to activate the battery disconnect switch in a vehicle.
LED Voltmeter Display
The integrated LED display on the switch unit provides real-time battery voltage lecturas.
- Monitor the display to check your battery's charge status.
- The switch features low voltage protection, automatically disconnecting the battery if the voltage drops below a critical level (12V for 12V systems, 24V for 24V systems) to prevent deep discharge and prolong battery life.
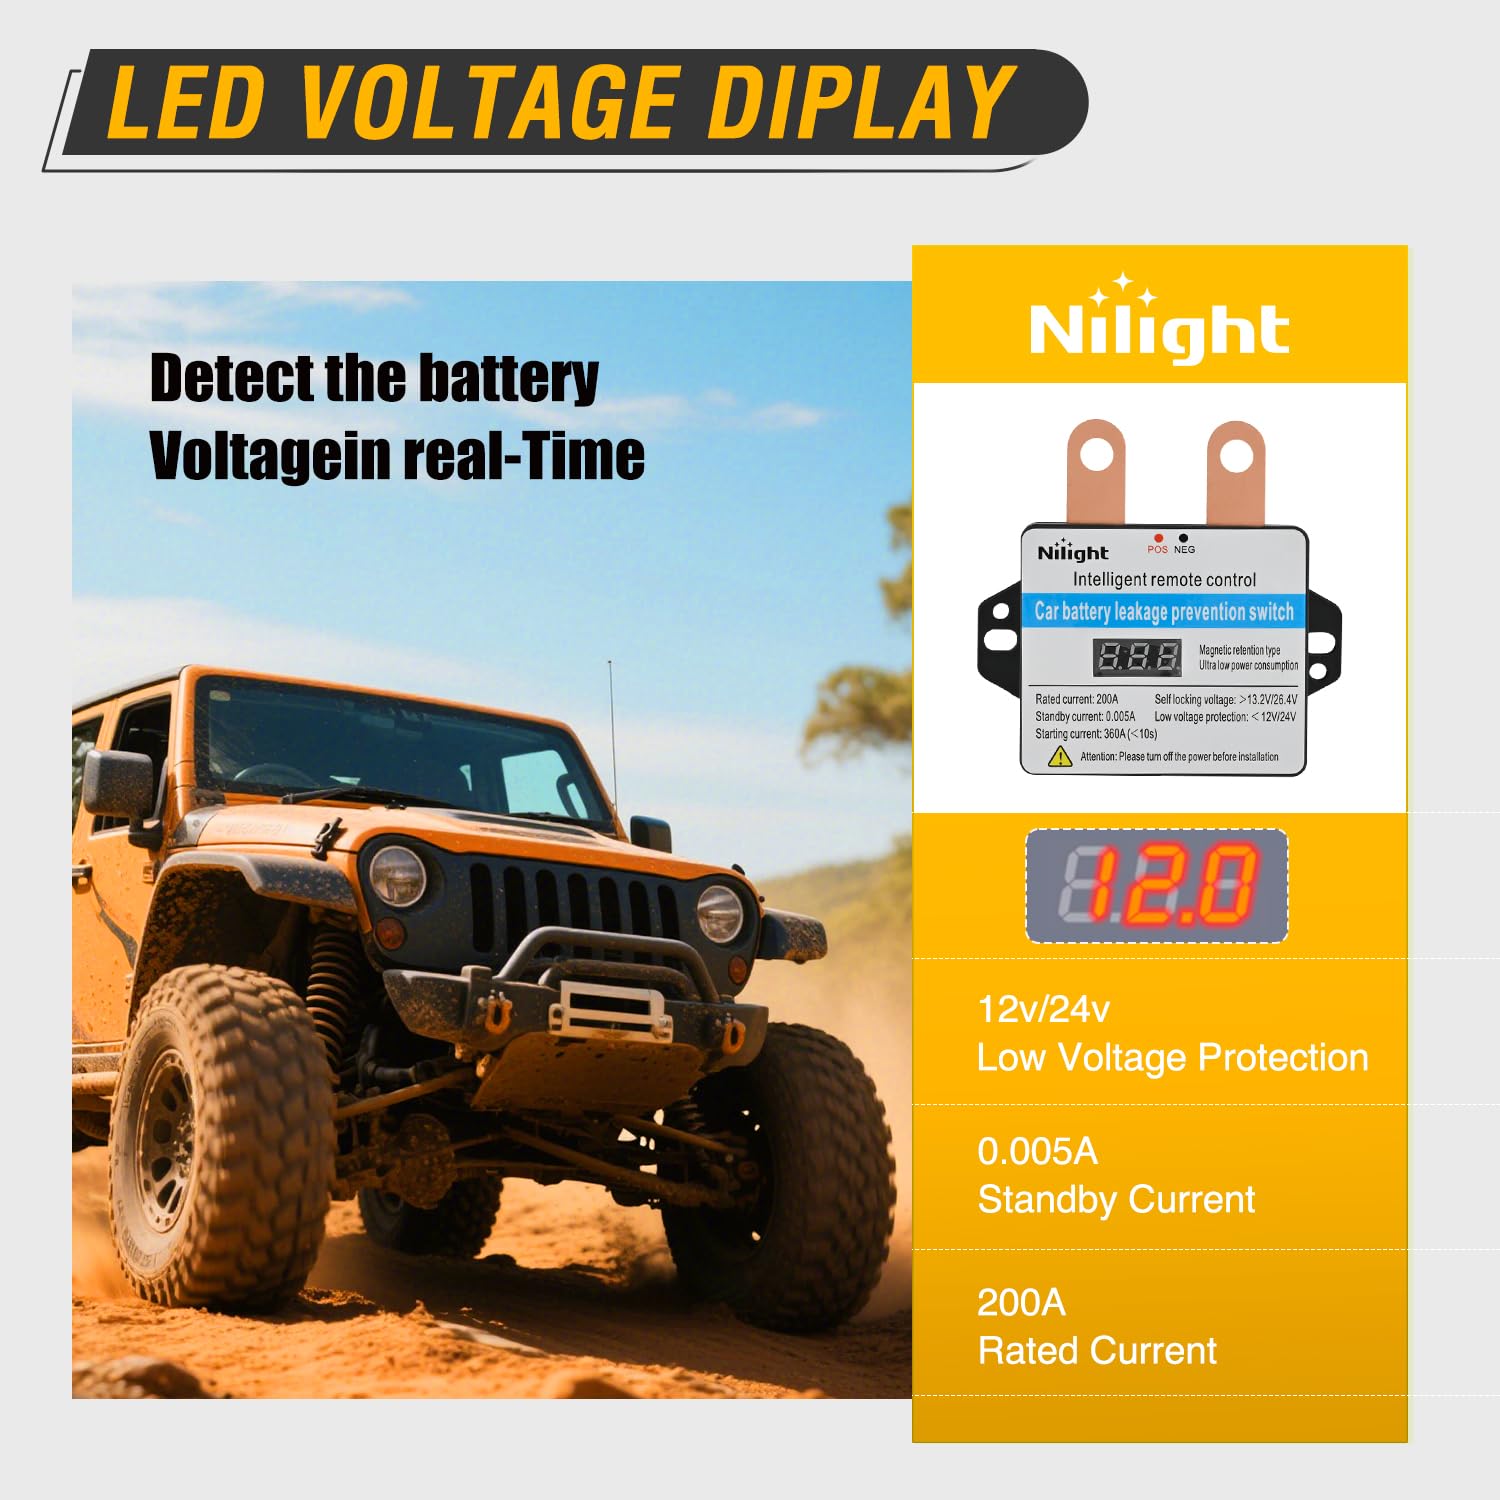
Image: The LED voltmeter display on the Nilight Remote Battery Disconnect Switch showing real-time voltage lecturas.
Mantemento
To ensure optimal performance and longevity of your Nilight Remote Battery Disconnect Switch, follow these simple maintenance guidelines:
- Inspeccionar conexións: Periodically check all electrical connections to ensure they are tight and free from corrosion. Loose connections can lead to poor performance or overheating.
- Terminais limpos: Keep battery terminals and switch connections clean. Use a wire brush and battery terminal cleaner if necessary.
- Comprobar o cableado: Inspect the wiring for any signs of wear, fraying, or damage. Replace damaged wires immediately.
- Manter seco: While the unit is designed for automotive environments, avoid direct exposure to excessive moisture or submersion.
Resolución de problemas
If you encounter issues with your Nilight Remote Battery Disconnect Switch, refer to the following common problems and solutions:
- Switch Does Not Respond to Remote:
- Comprobe a batería do mando a distancia e substitúaa se é necesario.
- Ensure you are within the operating range (up to 165 feet).
- Verify that the switch unit is receiving power and its indicator lights are functioning.
- Battery Still Drains When Disconnected:
- Confirm that the switch is fully disengaged (OFF position).
- Check for any parasitic draws that might be bypassing the disconnect switch. Ensure all accessories are connected through the switch.
- Vehicle Does Not Start After Connecting:
- Ensure the switch is in the 'ON' position.
- Check all battery and switch connections for tightness and corrosion.
- Verifique o vol. da bateríatage using the LED display or a multimeter.
- LED Voltmeter Display Not Working:
- Check power connections to the switch unit.
- If the unit is receiving power but the display is off, contact customer support.
If these steps do not resolve the issue, please contact Nilight customer support for further assistance.
Garantía e Soporte
Nilight products are manufactured to high-quality standards. Specific warranty information is typically provided with your product packaging or can be found on the official Nilight websitio. Garde o comprobante de compra para reclamacións de garantía.
For technical support, troubleshooting assistance, or warranty inquiries, please visit the official Nilight website or contact their customer service department. Contact details are usually available on the product packaging or websitio.
Aplicacións
The Nilight Remote Battery Disconnect Switch is suitable for a wide range of 12V/24V automotive and marine applications, including:
- Coches
- Camións
- RVs
- Barcos
- Other vehicles with 12V or 24V battery systems

Imaxe: Examples of vehicles such as cars, trucks, and boats, demonstrating the wide range of applications for the Nilight Remote Battery Disconnect Switch.


