1. Introdución
Thank you for choosing the Olvy A10 Cordless Stick Vacuum Cleaner with Mop Function. This appliance is designed for efficient cleaning of various floor types, offering both vacuuming and mopping capabilities. Please read this manual thoroughly before use to ensure proper operation, maintenance, and safety.

Image: The Olvy A10 Cordless Stick Vacuum Cleaner in its full assembly, alongside various attachments and the wall mount.
2. Instrucións de seguridade
Para reducir o risco de incendio, descarga eléctrica ou lesións, siga sempre as precaucións de seguridade básicas ao usar un aparello eléctrico.
- Le todas as instrucións antes de usar o aparello.
- Non use ao aire libre nin en superficies húmidas.
- Non permita que se use como xoguete. É necesario prestar moita atención cando o usen ou preto dos nenos.
- Use só como se describe neste manual. Use só os anexos recomendados polo fabricante.
- Non o empregue cun cable ou enchufe danados. Se o aparello non funciona como debería, se deixou caer, se danou, se deixou no exterior ou caeu na auga, devólvao a un centro de servizo.
- Non tire ou transporte co cable, non use o cable como asa, non peche unha porta sobre o cable nin tire do cable por bordos ou esquinas afiadas. Non pase o aparello sobre o cable. Manteña o cable lonxe de superficies quentes.
- Non desconecte tirando do cable. Para desenchufar, agarre o enchufe, non o cable.
- Non manipule o enchufe ou o aparello coas mans molladas.
- Non coloque ningún obxecto nas aberturas. Non use con ningunha abertura bloqueada; manteña libre de po, pelusa, cabelos e calquera cousa que poida reducir o fluxo de aire.
- Manteña o cabelo, a roupa solta, os dedos e todas as partes do corpo lonxe das aberturas e das partes móbiles.
- Desactiva todos os controis antes de desconectar.
- Teña coidado extra ao limpar as escaleiras.
- Non o use para recoller líquidos inflamables ou combustibles, como a gasolina, nin o use en áreas onde poidan estar presentes.
- Non coller nada que arde ou fume, como cigarros, mistos ou cinzas quentes.
- Non o use sen o vaso de po e/ou os filtros colocados.
- Evitar o arranque involuntario. Asegúrese de que o interruptor estea na posición de apagado antes de conectar a batería, coller ou transportar o aparello.
- Recarga só co cargador especificado polo fabricante. Un cargador axeitado para un tipo de batería pode xerar un risco de incendio cando se usa con outro paquete de batería.
- En condicións abusivas, pódese expulsar líquido da batería; evitar o contacto. Se o contacto ocorre accidentalmente, lave con auga. Se o líquido entra en contacto cos ollos, tamén busque axuda médica. O líquido expulsado da batería pode causar irritación ou queimaduras.
3. Contido do paquete
Verifica que todos os compoñentes estean presentes no paquete:
- Unidade principal (aspiradora de man)
- Tubo de extensión axustable
- Cabezal de cepillo para pisos
- Batería extraíble
- Water Tank (for mopping)
- Mopa Pad
- Ferramenta Pincel 2 en 1
- Ferramenta de fendas
- Soporte de montaxe en parede
- Adaptador de alimentación
- Replacement HEPA Filter (2x)
- Manual de usuario

Image: A visual representation of all components included with the Olvy A10 Cordless Stick Vacuum Cleaner.
4. Produto rematadoview
The Olvy A10 features a powerful 350W motor providing up to 35,000 Pa suction, an integrated mop function, and a multi-stage HEPA filtration system. It includes an intelligent LED display for monitoring status and an auto-mode for adaptive cleaning.
Características principais:
- Potente succión: 350W motor with 35,000 Pa for deep cleaning on various surfaces.
- Funcionalidade 2 en 1: Seamlessly switch between vacuuming and mopping.
- Pantalla LED intelixente: Provides real-time information on battery level, suction mode, and dust concentration.
- Modo automático: Automatically adjusts suction power based on detected dirt levels.
- HEPA 13 Filtration: Captures 99.99% of fine particles, suitable for allergy sufferers.
- Duración longa: Up to 60 minutes on a single charge with a 2200 mAh removable battery.
- Lightweight and Versatile: Easy to maneuver and convert into a handheld vacuum for various cleaning tasks.

Image: Close-up of the intelligent LED display showing battery indicator, low power warning, auto mode, dust concentration, and control panel.

Image: The LED display indicating 'Auto-mode' and the current power level during operation.
5. Configuración e montaxe
5.1 Carga inicial
Before first use, fully charge the battery. The battery takes approximately 4-5 hours to fully charge.
- Retire a batería da unidade principal premendo o botón de liberación.
- Connect the power adapter to the charging port on the battery.
- Plug the adapter into a power outlet. The battery indicator on the LED display will show charging status.
- Unha vez cargado completamente, desconecte o adaptador.

Image: The removable battery unit, highlighting its 2200 mAh capacity, 4-5 hour charging time, and up to 60 minutes run time.
5.2 Montaxe do aspirador
- Coloque a batería: Slide the charged battery into the main unit until it clicks into place.
- Conecte o tubo de extensión: Connect the adjustable extension tube to the main unit. Ensure it clicks securely.
- Fixar o cepillo para o chan: Connect the floor brush head to the other end of the extension tube.
- Instalar o soporte de parede (opcional): Choose a suitable location for the wall mount. Secure it to the wall using the provided screws and anchors. This allows for convenient storage and charging.
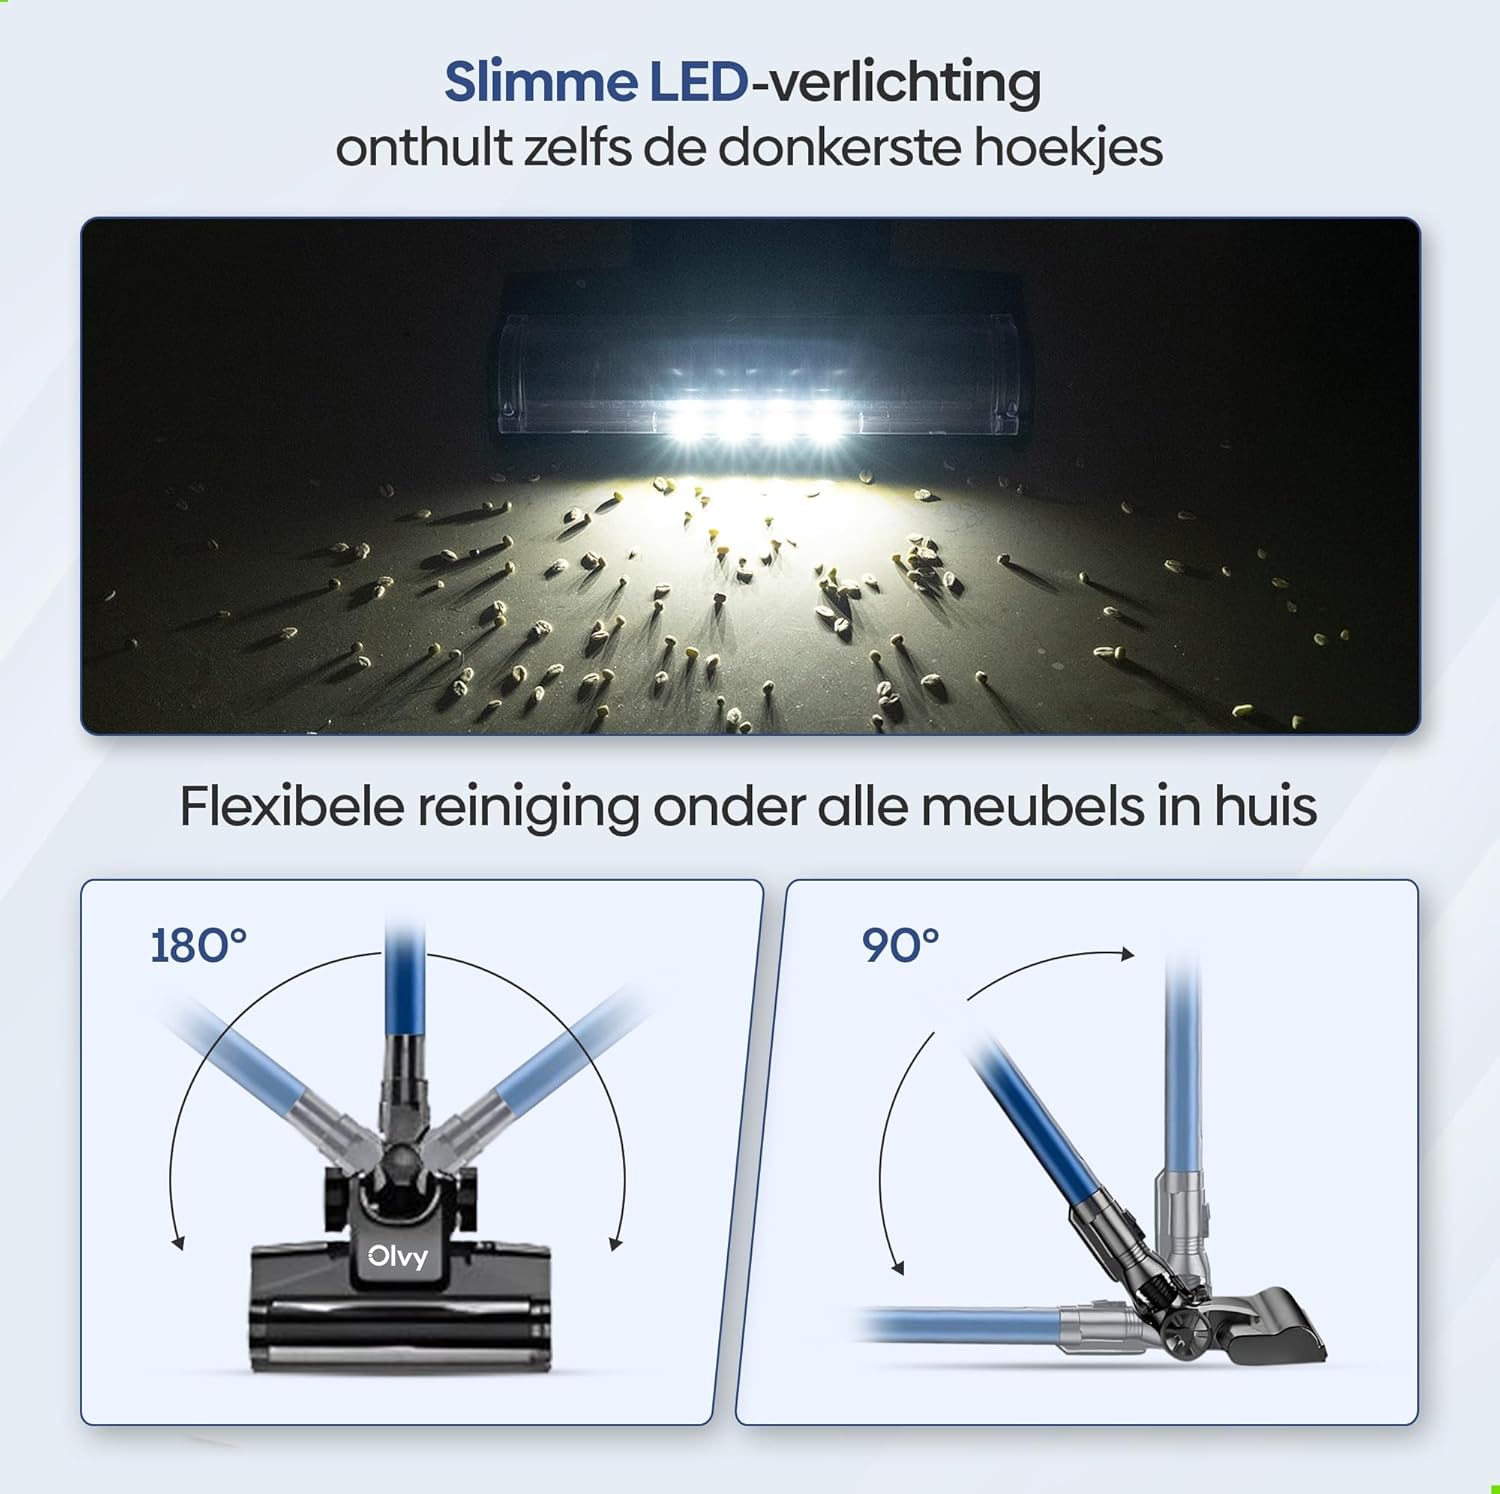
Image: The vacuum cleaner demonstrating both wall-mounted storage and self-standing capability.
6. Instrucións de funcionamento
6.1 Funcionamento básico
- Encendido/apagado: Prema o botón de acendido da unidade principal para acender ou apagar o aspirador.
- Axuste a potencia de succión: The vacuum offers 5 suction levels. Use the control panel on the LED display to cycle through the power modes (Low, Normal, High, Turbo).
- Modo automático: Activate the intelligent auto mode for automatic suction adjustment based on dirt detection. The LED display will show 'Auto' when this mode is active.
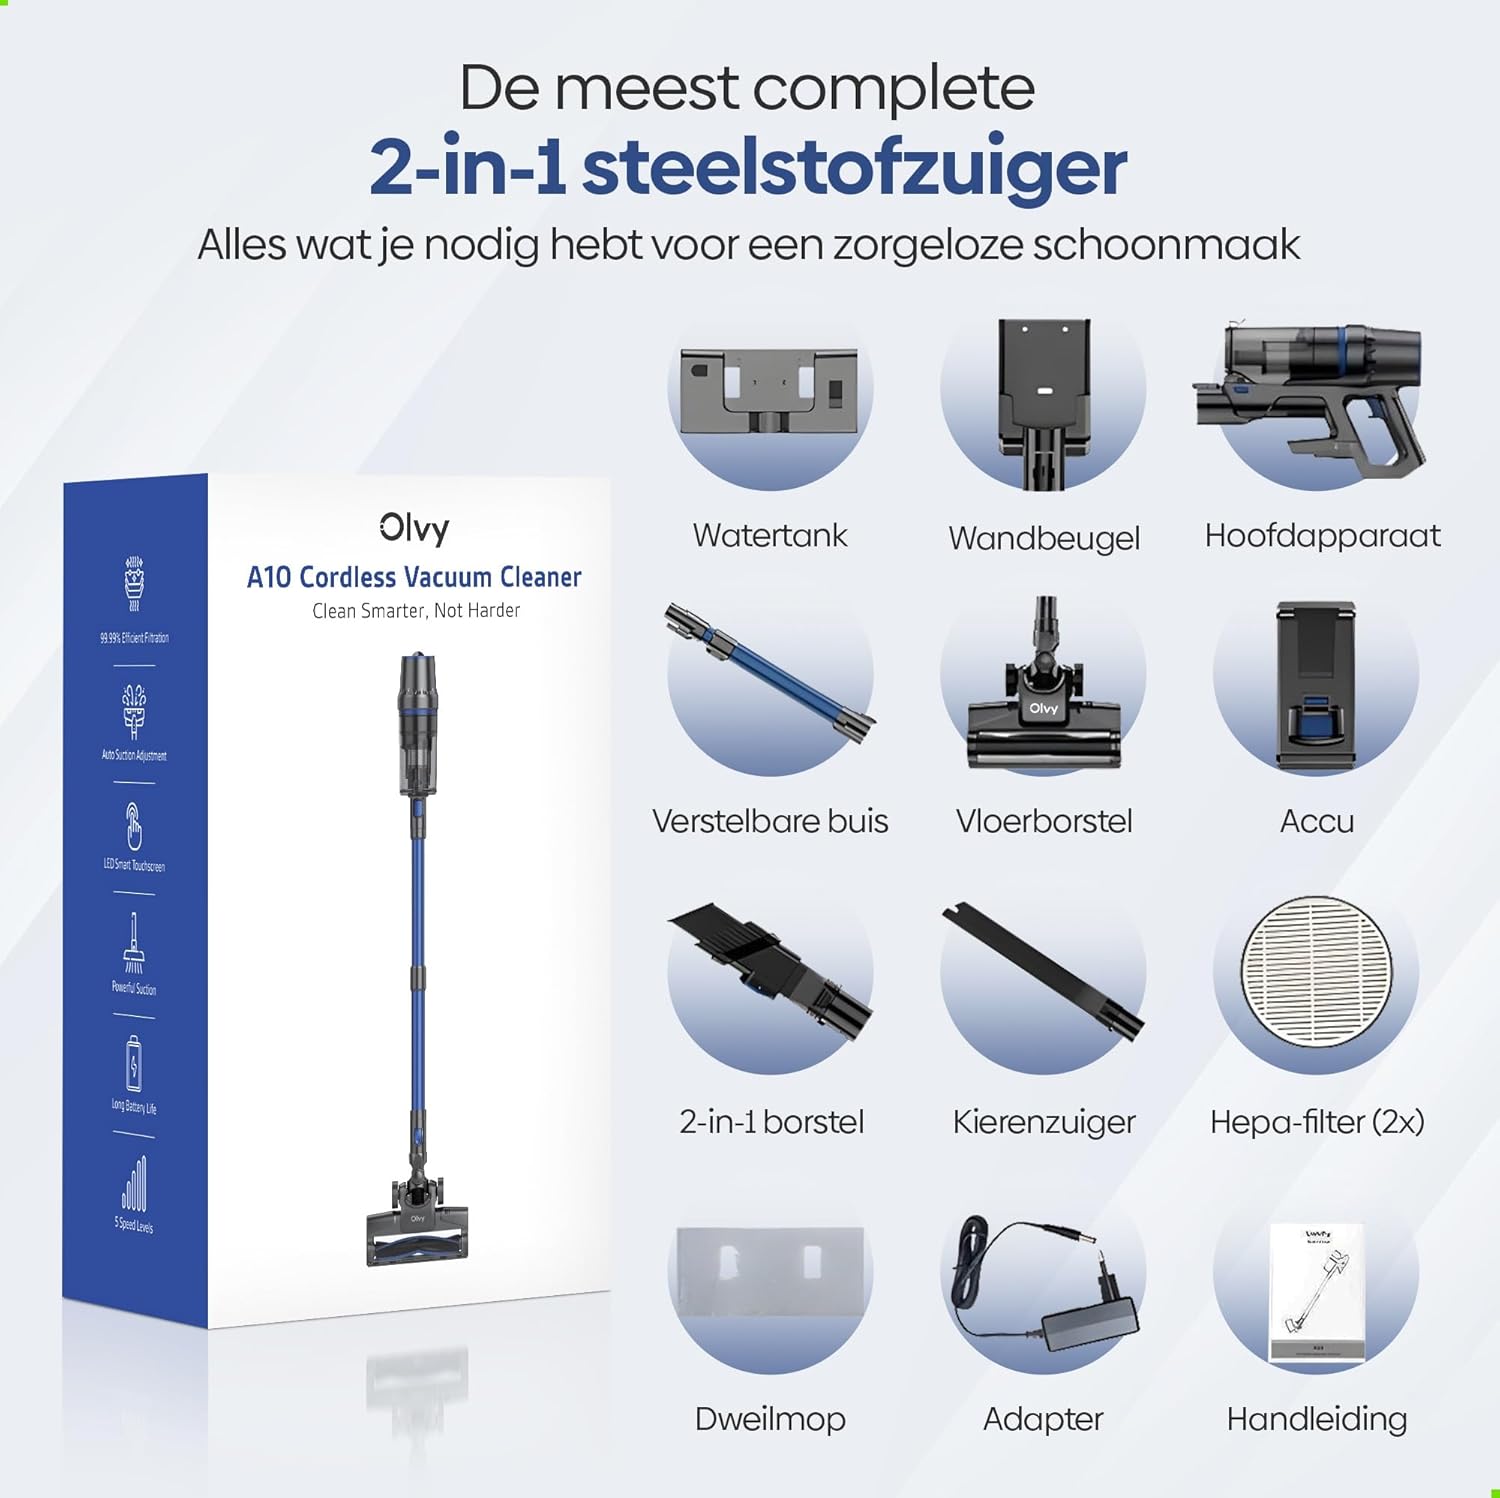
Image: The vacuum cleaner demonstrating its 4 suction levels (Low, Normal, High, Turbo) and intelligent auto mode, which adapts to dirt levels.
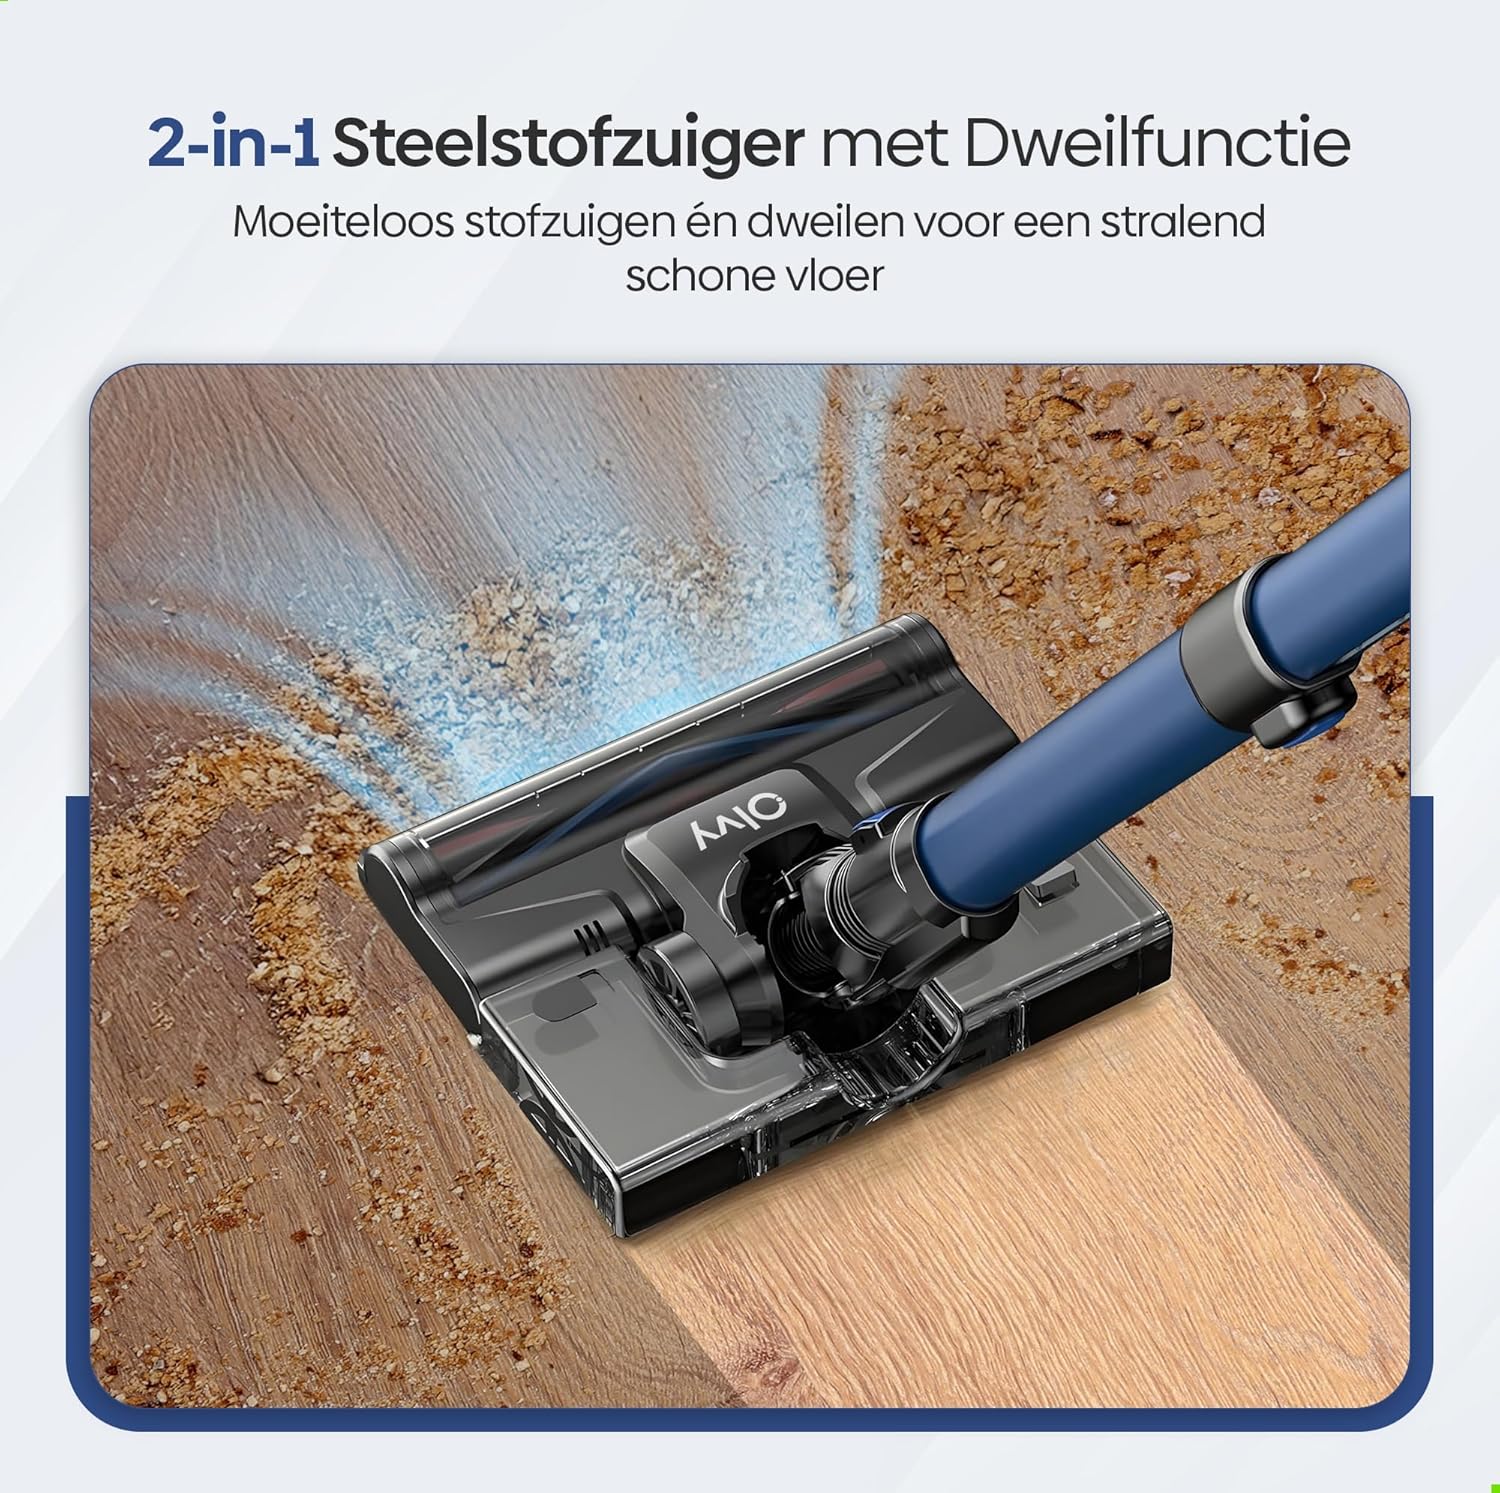
Image: A user operating the Olvy A10, showcasing its powerful 350W motor and 35,000 Pa suction for effective cleaning of various debris like hair, dust, crumbs, and sand.
6.2 Uso da función de fregona
The integrated mop function allows for simultaneous vacuuming and wet cleaning of hard floors.
- Encher o depósito de auga: Detach the water tank from the floor brush head. Fill it with clean water. Do not use corrosive liquids or detergents that may damage the tank or floor.
- Attach Mop Pad: Securely attach the mop pad to the bottom of the water tank.
- Reattach Water Tank: Reinstall the filled water tank onto the floor brush head.
- Begin Mopping: Operate the vacuum cleaner as usual. The mop pad will dampen the floor as you vacuum, providing a streak-free clean.

Imaxe: Unha detallada view of the 2-in-1 stick vacuum with mop function, showing water being dispensed for simultaneous vacuuming and mopping on a hard floor.

Image: The mop function of the Olvy A10 actively cleaning a hard floor, demonstrating its effectiveness in removing dirt and leaving a clean surface.
6.3 Usando anexos
- Ferramenta de pincel 2 en 1: Ideal para limpar tapizaría, cortinas e superficies delicadas.
- Ferramenta de fendas: Perfecto para chegar a espazos estreitos, recunchos e bordos.
- To use, detach the extension tube and connect the desired attachment directly to the main unit.

Image: The Olvy A10 being used in different configurations, including as a stick vacuum for floors, a handheld for high areas, and for cleaning under furniture.

Image: The vacuum's LED lighting revealing hidden dust particles on the floor, and diagrams illustrating its 180° and 90° flexible head rotation for cleaning under furniture.
7. Mantemento
Regular maintenance ensures optimal performance and extends the lifespan of your Olvy A10 vacuum cleaner.
7.1 Baleirar o colector de lixo
Empty the dustbin regularly, especially when the 'Dust Concn' indicator on the LED display shows high concentration.
- Asegúrate de que o aspirador estea apagado.
- Prema o botón de liberación do colector de po para separalo da unidade principal.
- Hold the dustbin over a trash can and press the bottom release latch to open the lid and empty the contents.
- Close the lid and reattach the dustbin to the main unit.

Image: The dustbin being emptied with a single click, demonstrating its large 0.8L capacity.

Image: A user washing the dustbin under running water, illustrating the washable components for easy cleaning.
7.2 Limpeza dos filtros
The Olvy A10 uses a multi-stage filtration system, including an HEPA filter, which should be cleaned regularly.
- Retire o colector de lixo.
- Twist and pull out the filter assembly (HEPA filter, dust filter, stainless steel filter).
- Tap off loose dirt from each filter component.
- Rinse the filters under cold running water. Do not use hot water or detergents.
- Deixa que todos os compoñentes do filtro sequen completamente ao aire durante polo menos 24 horas antes de volvelo montar. Non uses o aspirador con filtros húmidos.
- Reassemble the filters and place them back into the dustbin, then reattach the dustbin to the main unit.

Image: A cutaway diagram illustrating the multi-stage HEPA filtration system, including the dustbin filter, stainless steel filter, dust filter, HEPA air filter, and air outlet filter.
7.3 Limpeza do rolo de cepillo
Comprobe periodicamente o rolo do cepillo para ver se ten cabelo enredado ou residuos.
- Apague a aspiradora.
- Press the release tab on the side of the floor brush head to remove the brush roll cover.
- Levante o rolo da xesta.
- Usa tesoiras ou unha ferramenta de limpeza para cortar e eliminar calquera pelo ou fibras enredadas.
- Volva colocar o rolo de escova e asegure a tapa.
7.4 Limpeza da almofada da mopa
After each use of the mop function, remove and clean the mop pad.
- Separa a almofada da mopa do depósito de auga.
- Rinse the mop pad under running water or machine wash it with mild detergent.
- Allow the mop pad to air dry completely before storing or reusing.
8 Solución de problemas
If you encounter any issues with your Olvy A10, refer to the following common problems and solutions:
| Problema | Causa posible | Solución |
|---|---|---|
| O baleiro non se acende | A batería non está cargada ou non está instalada correctamente. | Charge the battery fully. Ensure the battery is securely clicked into the main unit. |
| Baixo poder de succión | Dustbin is full. Filters are clogged. Brush roll is tangled. Obstruction in the nozzle or tube. | Empty the dustbin. Clean all filters thoroughly and ensure they are dry. Remove any hair or debris from the brush roll. Check for and remove any blockages. |
| O rolo de pincel non xira | Brush roll is tangled or jammed. | Turn off the vacuum. Remove the brush roll and clear any obstructions. |
| A función da fregona non funciona | Water tank is empty or not properly installed. Mop pad is dry. | Fill the water tank. Ensure the water tank is securely attached to the floor brush. Dampen the mop pad slightly before use if needed. |
| Tempo de execución curto | Battery not fully charged. Using high suction mode continuously. Battery degradation. | Ensure battery is fully charged. Use lower suction modes for longer run time. If battery life significantly decreases, consider replacing the battery. |
9. Especificacións
| Característica | Especificación |
|---|---|
| Marca | Olvy |
| Número de modelo | A10 |
| Cor | Negro |
| Dimensións do produto | 32 x 19 x 32 cm |
| Peso | 5 kg |
| Potencia do motor | 350 W |
| Potencia de succión | Ata 35,000 Pa |
| Número de velocidades | 5 (including Auto Mode) |
| Nivel de ruído | 55 decibeis |
| Tempo de execución | Up to 1 hour (60 minutes) |
| Capacidade da batería | 2200 mAh |
| Tempo de carga | 4-5 horas |
| Tipo de filtro | HEPA 13 (Washable) |
| Capacidade do lixo | 0.8L |
| Fonte de enerxía | Batería |
| Superficies recomendadas | All floors (carpets, hard floors) |
| Características especiais | 2-in-1 Vacuum & Mop, LED Display, Auto Mode, Pet-friendly, Lightweight |
10. Garantía e soporte
Olvy products are manufactured to high-quality standards. For warranty information, technical support, or service inquiries, please refer to the contact information provided with your purchase documentation or visit the official Olvy websitio. Garde o comprobante de compra para reclamacións de garantía.


