Introdución e máisview
The ANCEL BR2000 Elite is a professional-grade, one-person brake bleeder kit designed for efficient and precise brake fluid exchange in 4-wheel ABS and hydraulic systems. This portable 12V powered unit simplifies brake maintenance, ensuring thorough fluid replacement and air removal.
Key features include digital precision for complex ABS systems, advanced pulse technology for effective air removal, and a universal fit with 12 adapters for various vehicle types.

Figure 1: The ANCEL BR2000 Elite in operation, highlighting its one-person functionality compared to traditional methods.
Información de seguridade
Always prioritize safety when performing brake fluid exchange. Read and understand all instructions before use. Wear appropriate personal protective equipment (PPE), including safety glasses and gloves.
- Ensure the vehicle is stable and properly supported before beginning any work.
- Use only the recommended brake fluid type for your vehicle. Refer to your vehicle's service manual.
- Brake fluid is corrosive. Avoid contact with skin, eyes, and painted surfaces. In case of contact, rinse immediately with plenty of water.
- Do not mix different types of brake fluid unless specified by the manufacturer.
- This product is for 12V passenger vehicles only. Not compatible with 24V commercial/heavy-duty vehicles.
- Ensure your vehicle's brake system supports pressure exchange. This product uses pressurized pulse technology and is NOT compatible with vehicles requiring manual-only bleeding.
- Inspect the brake system for leaks or damage before and after service. This product is for maintenance, not repair of existing faults.
Contido do paquete
Verifique que todos os elementos que se indican a continuación estean presentes no seu paquete:
- Brake Fluid Exchange Machine *1
- Manual de usuario *1
- Cable de alimentación *1
- 2.5L / 0.66 Gal New Fluid Bottle *1
- 1L / 0.27 Gal Waste Fluid Bottle *4
- Full Pack of Adapters Box *1 (Includes 12 pro adapters for American, European, and Asian vehicles)

Figura 2: detallada view of the ANCEL BR2000 Elite package contents.
Configuración
- Preparar o vehículo:
Lift the vehicle safely using a hoist or jack stands. Remove all four wheels to access the brake calipers. Ensure the vehicle is stable.

Figure 3: The ANCEL BR2000 Elite kit components.
- Conectar enerxía:
Connect the provided power cable to the 12V DC input on the ANCEL BR2000 Elite machine. Attach the alligator clips to your vehicle's 12V battery (red to positive, black to negative).
- Fill New Fluid Bottle:
Pour fresh, compatible brake fluid into the 2.5L new fluid bottle. Ensure the fluid level is sufficient for the entire bleeding process.
Video 1: Demonstrates filling the new fluid bottle and connecting the brake fluid pump. This video is from LUTIFIX and shows the AST603 model, which has similar setup steps.
- Select Master Cylinder Adapter:
Choose the correct adapter from the adapter box that fits your vehicle's brake fluid reservoir. Securely attach it to the reservoir opening.

Figure 4: Adapter set for various vehicle makes and models.
Video 2: Shows the process of selecting and attaching the correct adapter to the brake fluid reservoir. This video is from LINXINO and shows a similar brake bleeder kit.
- Connect Fluid Lines:
Connect the new fluid input hose from the machine to the master cylinder adapter. Connect the waste fluid output hose from the machine to one of the 1L waste fluid bottles.

Figura 5: Máisview of the brake fluid exchange process.
Instrucións de funcionamento
- Power On and Set Pressure:
Turn on the ANCEL BR2000 Elite machine. Use the digital control panel to set the desired pressure (typically 1-1.5 BAR or 15-22 PSI). Refer to your vehicle's service manual for the recommended pressure. The machine features dual pressure monitoring with both a mechanical gauge and digital display.
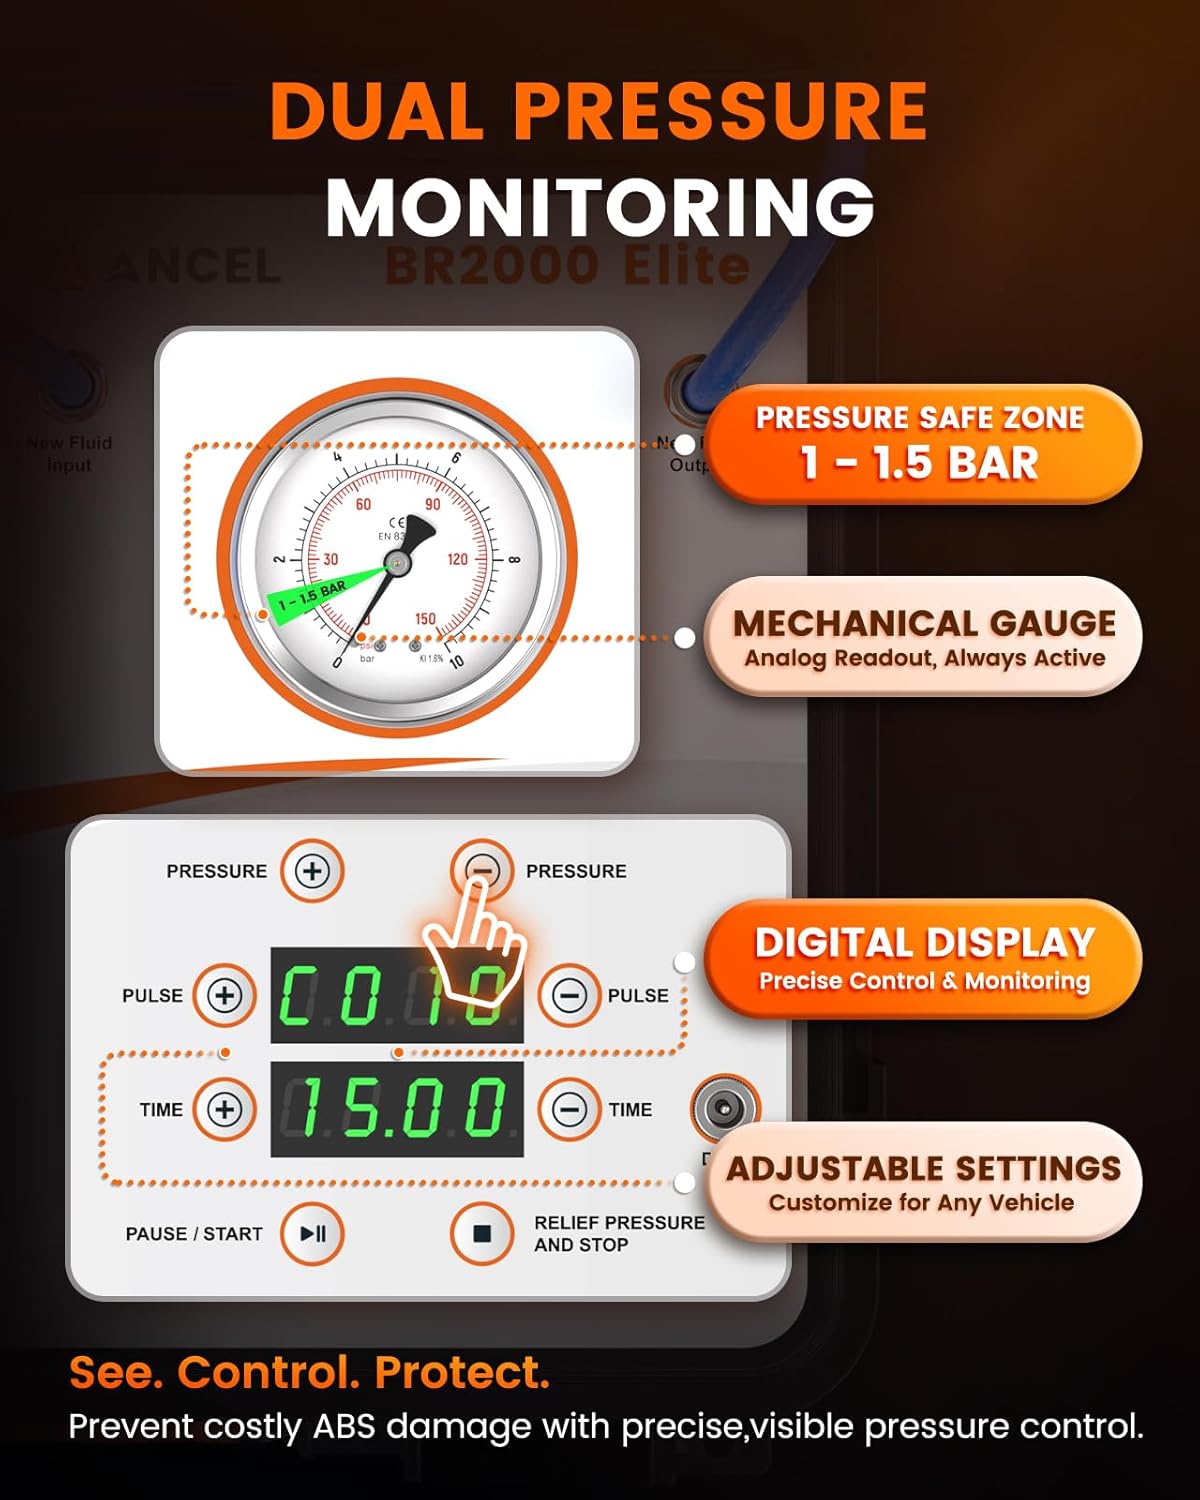
Figure 6: Digital control panel and mechanical gauge for pressure management.
- Connect Waste Bottles to Calipers:
Attach a 1L waste fluid bottle to the bleeder screw of the brake caliper furthest from the master cylinder. Repeat for all four wheels if performing a full 4-wheel flush. The kit includes special bleeder caps that securely fit over the bleeder screws to prevent leaks.

Figure 7: Connecting the waste bottle to the caliper.
- Start Bleeding Process:
Press the START button on the machine. The machine will begin to pressurize the system and push new fluid through, forcing old fluid and air out into the waste bottles. Monitor the fluid coming out of each caliper. The patented pulse technology helps effectively evacuate air bubbles.

Figure 8: Visual representation of air removal and fluid clarity.
Video 3: Demonstrates the easy one-person operation of the ANCEL BR2000 Elite during brake fluid exchange.
- Monitor Fluid and Close Bleeder:
Once clean, bubble-free fluid is observed flowing into the waste bottle from a caliper, close the bleeder screw for that caliper. Proceed to the next caliper, working your way towards the master cylinder (typically furthest to closest). The dual-line isolation system ensures new and old fluids never mix within the machine.

Figure 9: Dual-line isolation system for fluid integrity.
- One-Touch Pressure Release:
After completing the bleeding process for all calipers, press the one-click pressure relief button on the machine to safely depressurize the system. This minimizes mess and risk during disconnection.
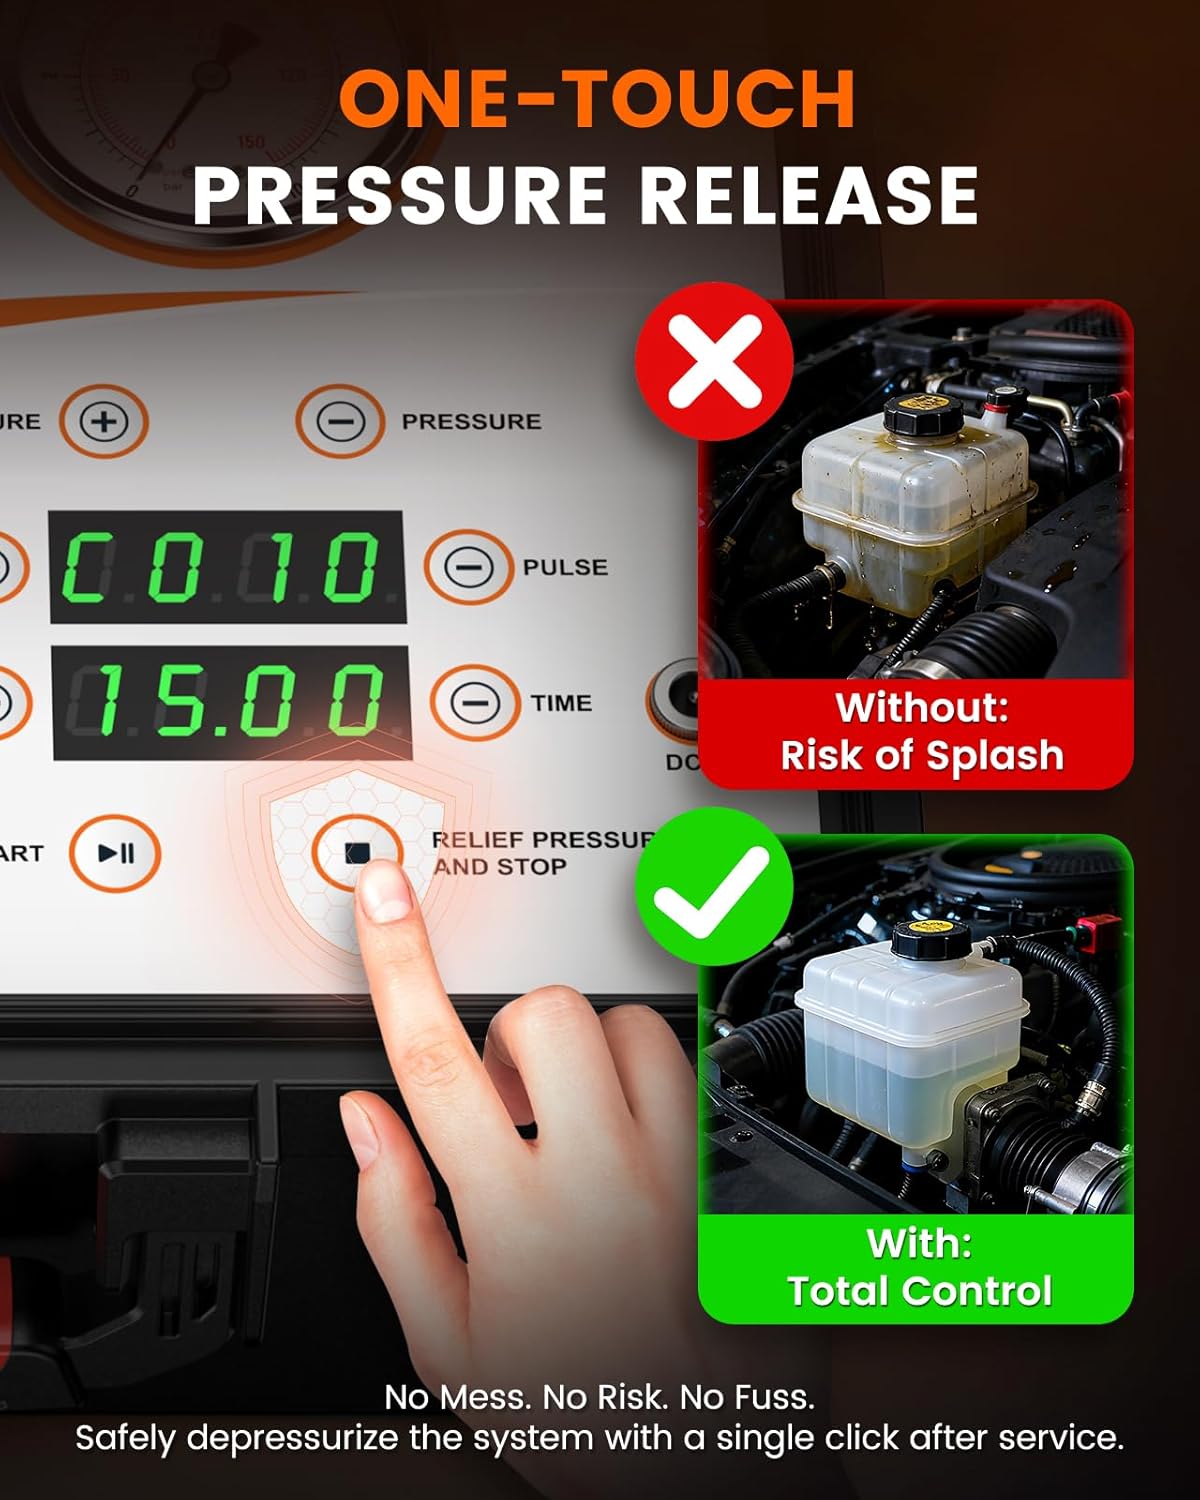
Figure 10: One-touch pressure release for safe disconnection.
- Comprobacións finais:
Remove all adapters and hoses. Replace the master cylinder cap. Check the brake fluid level and top off if necessary. Pump the brake pedal several times to ensure a firm pedal feel. Inspect all connections for any leaks. Lower the vehicle and test brakes in a safe environment.
Mantemento
Proper maintenance of your ANCEL BR2000 Elite will ensure its longevity and optimal performance:
- Limpeza: After each use, purge the pump and lines with air to remove any residual brake fluid. This prevents corrosion and contamination.
- Almacenamento: Store the machine and all accessories in the durable protective case in a clean, dry place.
- Inspección da mangueira: Regularly inspect hoses for kinks, cracks, or wear. Replace if damaged.
- Coidado da botella: Clean waste fluid bottles after use. The reusable design helps reduce plastic waste.

Figure 11: Maintenance features for a clean fluid change.
Resolución de problemas
| Problema | Causa posible | Solución |
|---|---|---|
| Sen acumulación de presión | Loose connections, low fluid in new fluid bottle, power issue. | Check all hose connections and master cylinder adapter. Ensure new fluid bottle has sufficient fluid. Verify 12V power connection. |
| Fluid leaks from connections | Improperly seated adapter, loose hose fitting. | Ensure master cylinder adapter is tightly secured. Check all quick-connect fittings and tighten if necessary. |
| Air bubbles persist | Air in the system, insufficient bleeding time. | Continue bleeding until no more bubbles are observed. Ensure new fluid bottle does not run dry. |
| Spongy brake pedal after bleeding | Air still in the system, improper bleeding sequence. | Re-bleed the system, ensuring proper sequence (furthest caliper first). Check for any leaks in the brake lines. |
Especificacións
- Modelo: BR2000 Elite
- Fabricante: ANCEL
- Peso do artigo: 15.93 libras
- Dimensións do paquete: 15.2 x 13.82 x 11.73 polgadas
- Potencia: 12V DC (vehicle battery powered)
- New Fluid Capacity: 2.5 l / 0.66 gal
- Waste Fluid Capacity: 1L / 0.27 Gal (per bottle, 4 included)
- Adaptadores: 12 professional adapters included for universal vehicle compatibility

Figure 12: Design features for professional use.
Garantía e Soporte
The ANCEL BR2000 Elite Brake Bleeder Kit comes with a one-year warranty. For technical support, troubleshooting assistance, or warranty claims, please contact ANCEL customer service. Refer to the contact information provided in the included User Manual or visit the official ANCEL websitio.


