1. Introdución
The Aurzen Roku TV Smart Projector (Model A02A11) offers a comprehensive home entertainment solution with a built-in Roku streaming experience. This portable projector delivers 1080P Full HD resolution, Dolby Audio, and convenient features like auto-focus and keystone correction. Designed for versatility, it is suitable for various environments, from home theaters to outdoor movie nights, and integrates seamlessly with smart home ecosystems.
2. Que hai na caixa
- Aurzen EAZZE D1R Roku TV Projector x1
- Remote Control x1 (2*AAA Batteries Not Included)
- Cable de alimentación x1
- Warranty Card x1 & Quick Start Guide x1
- Note: No HDMI Cable Included
3. Produto rematadoview
The Aurzen Roku TV Smart Projector combines high-quality projection with the convenience of the Roku streaming platform. Below are its key features and components.
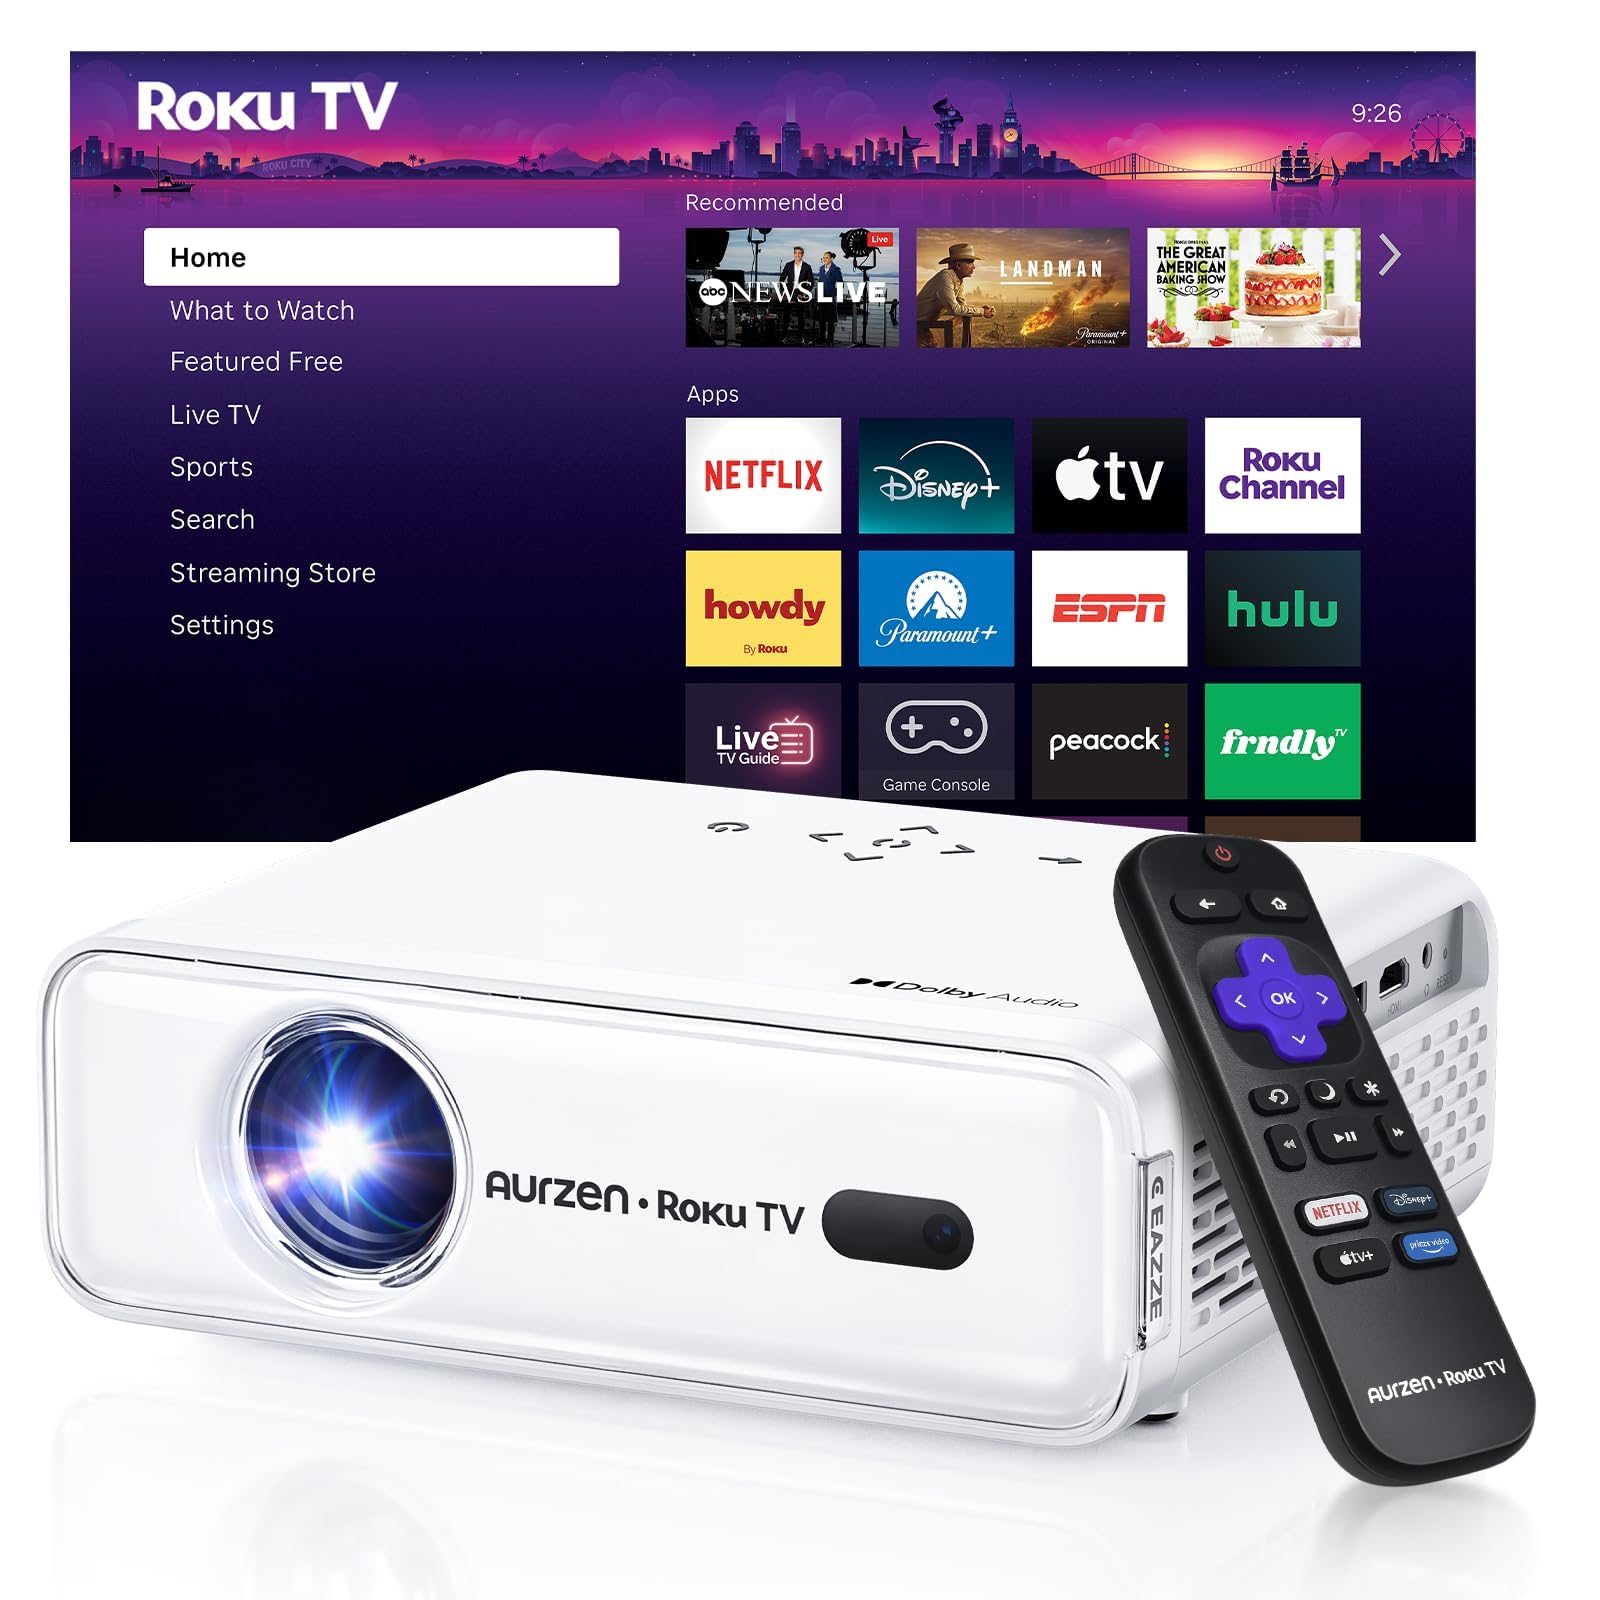
Figura 1: Fronte view of the Aurzen Roku TV Smart Projector.
3.1. Roku TV Streaming Experience
Enjoy America's #1 TV streaming platform built directly into your projector. Access popular apps like Netflix, Prime Video, Disney+, Hulu, YouTube, Roku Channel, and Apple TV. A Roku account and internet connection are required for activation.

Figure 2: The simple and fast Roku TV home screen interface.
3.2. High-Definition Visuals
The projector offers 1080P Full HD resolution, providing enhanced clarity and detail for your favorite movies and TV shows. It can project a massive screen size from 60 to 150 inches, ideal for home theater and outdoor viewing.
3.3. Brightness Levels
Choose from 3 brightness levels to suit your environment:
- Low (LOW POWER): For dim environments like basements.
- Medium (STANDARD): Suitable for cozy bedrooms.
- High (VIVID): For living rooms or outdoor nights, cutting through extra light for sharp visuals.
3.4. Automatic Adjustments
Advanced auto-focus and auto-keystone correction features instantly adjust for a sharp, aligned screen. Simply place the projector, power it on, and enjoy a perfectly adjusted image without manual setup.

Figure 3: Illustration of the automatic focus and keystone correction.
3.5. Immersive Audio
Experience deep, resonant audio with Dolby Audio and built-in Dual 5W speakers. These speakers deliver crisp, powerful sound that fills the room, making you feel part of the action.

Figure 4: Dolby Audio integration for enhanced sound quality.
3.6. Opcións de conectividade
The projector supports dual-band WiFi (2.4G/5G) for smooth, lag-free streaming and Bluetooth 5.2 for connecting to headphones or external speakers. It also includes HDMI and USB ports for wired connections.
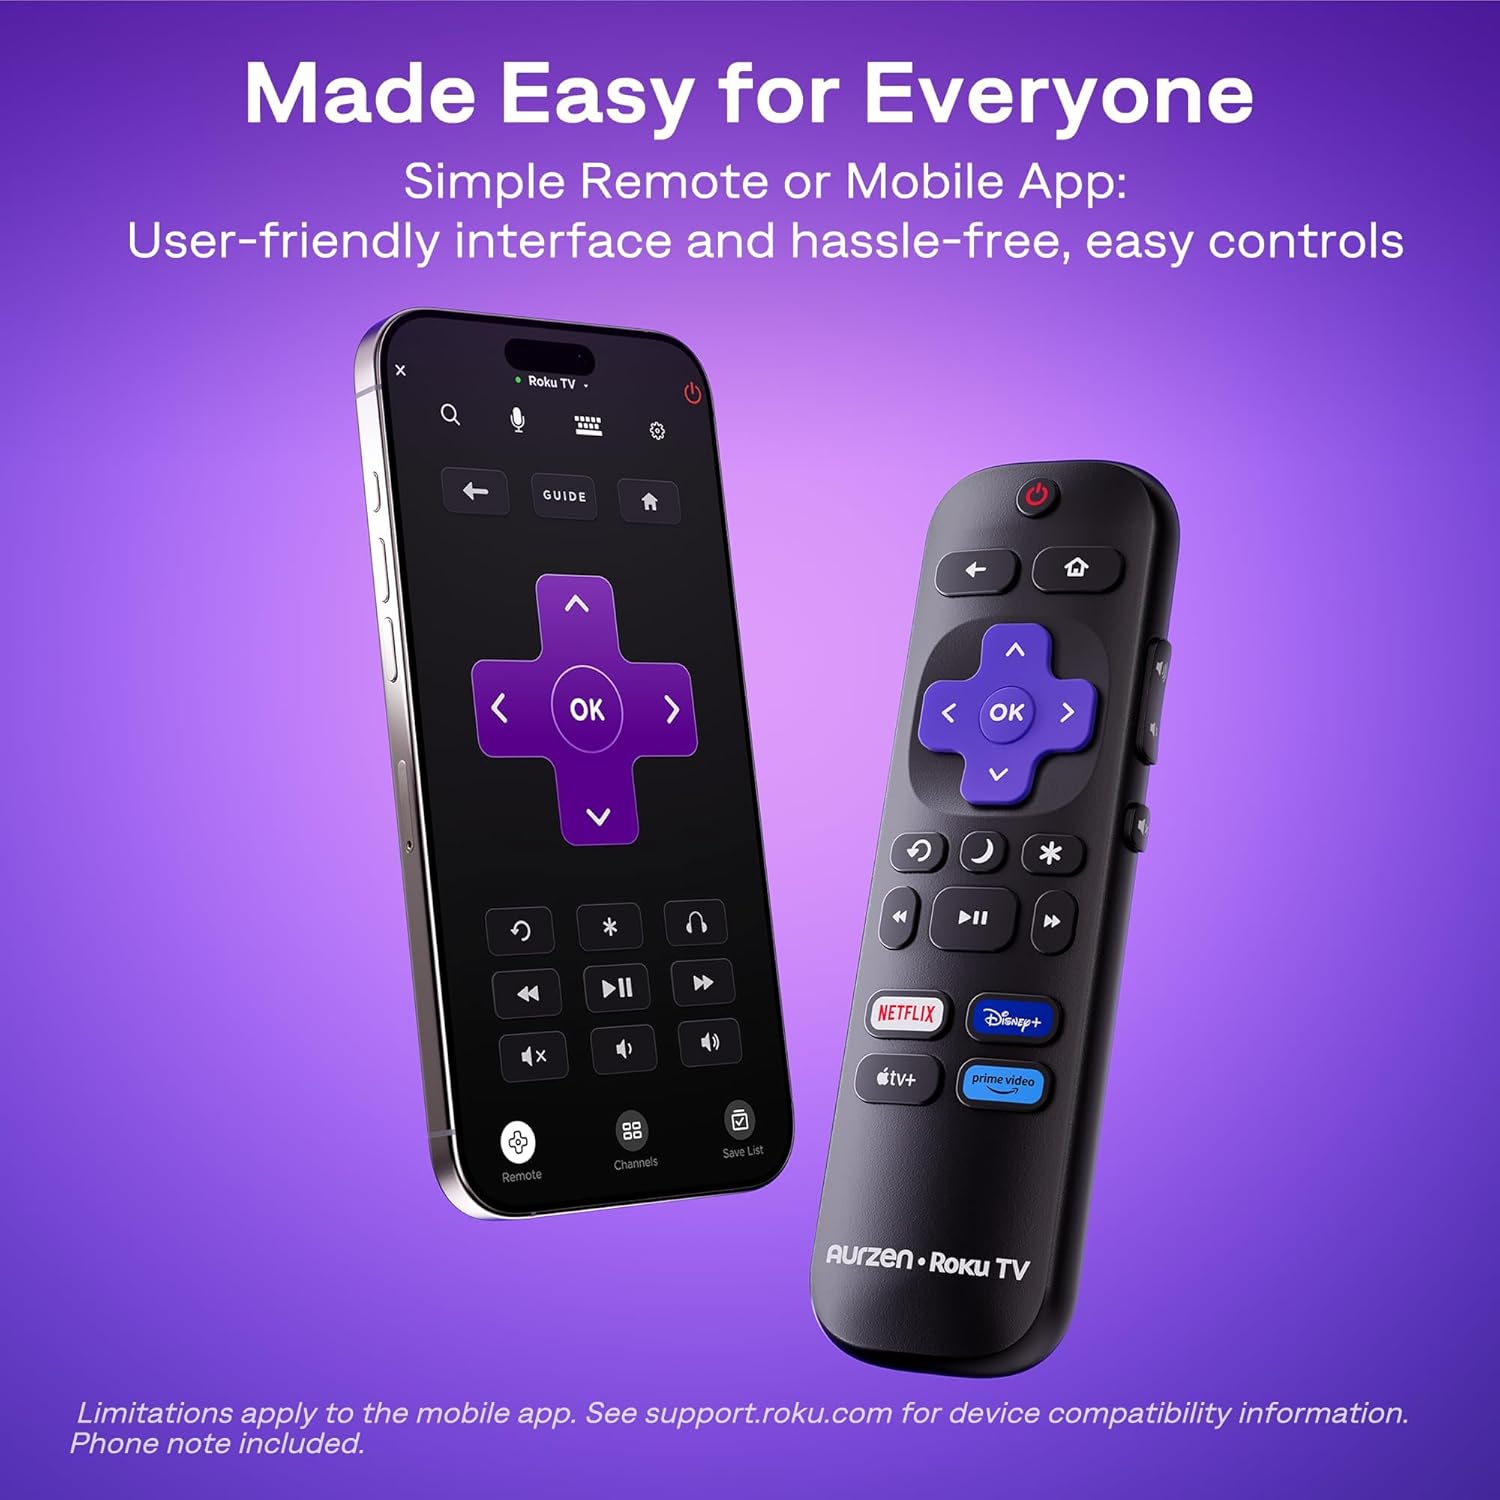
Figura 5: Traseira view of the projector showing USB, HDMI, and audio ports.
3.7. Integración do fogar intelixente
The projector is compatible with Apple HomeKit, Siri, Alexa, and Google Assistant, allowing for easy voice control and seamless integration into your smart home ecosystem.

Figure 6: Projector's compatibility with various smart home voice assistants.
4. Configuración
4.1. Acendido inicial
- Conecte o cable de alimentación ao proxector e a unha toma de corrente.
- Preme o botón de acendido do proxector ou do control remoto para acendelo.
- The projector will automatically perform auto-focus and auto-keystone correction upon startup.
4.2. Roku Account and Internet Connection
A Roku account and an active internet connection are required for full functionality and activation of the Roku streaming platform. Follow the on-screen prompts to connect to your Wi-Fi network and set up or log in to your Roku account.
5. Instrucións de funcionamento
5.1. Navigating the Roku Home Screen
The Roku interface offers intuitive navigation, quick search, and personalized recommendations. Use the included remote control or the Roku mobile app to browse channels, search for content, and access settings.
5.2. Control remoto
The included remote control provides easy access to all Roku functions. For enhanced control, including typing and voice commands, download the Roku mobile app on your smartphone.
5.3. Axuste do brillo
To change the brightness mode, navigate to the projector settings via the Roku menu and select your preferred brightness level (Low, Medium, or High) based on your viewing ambiente.
5.4. Casting and Screen Mirroring
The projector supports Apple AirPlay for seamless streaming of videos, photos, and music from your Apple devices. It also supports other casting features for compatible devices.

Figure 7: Stream content effortlessly using Apple AirPlay.
6. Conectividade
6.1. Conexión Wi-Fi
Connect to your home network using dual-band Wi-Fi (2.4G/5G) for stable and fast streaming. Navigate to the network settings in the Roku menu to set up your Wi-Fi connection.
6.2. Emparellamento Bluetooth
Pair Bluetooth 5.2 compatible headphones or speakers for a private listening experience or enhanced audio. Access Bluetooth settings in the Roku menu to pair your devices.
6.3. HDMI and USB Ports
Use the HDMI port to connect external devices such as gaming consoles, Blu-ray players, or laptops. The USB port allows for playback of media files desde unha unidade USB.
7. Mantemento
7.1. Limpeza da lente
Limpe con coidado a lente do proxector cun pano suave e sen pelusa. Para manchas difíciles, use unha solución de limpeza de lentes deseñada especificamente para superficies ópticas. Evite materiais abrasivos que poidan raiar a lente.
7.2. Cleaning the Vents
Regularly clean the projector's ventilation grilles to prevent dust buildup, which can affect performance and lead to overheating. Use a soft brush or a can of compressed air to remove dust.
7.3. Almacenamento
When not in use, store the projector in a cool, dry place away from direct sunlight and extreme temperatures. If storing for an extended period, consider using the original packaging or a protective case to prevent dust accumulation and damage.
8 Solución de problemas
8.1. Dim Image
Asegurar o viewing environment is sufficiently dark. Adjust the projector's brightness setting to High (VIVID) mode if there is ambient light. For optimal clarity, use the projector in a dark room.
8.2. Blurry or Distorted Image
The projector features automatic focus and keystone correction. If the image appears blurry or distorted, try moving the projector slightly to trigger the automatic adjustment. Alternatively, navigate to 'Projector settings' in the Roku menu to manually adjust focus and keystone.
8.3. Sen son ou mala calidade de son
Check the projector's volume settings. If using external Bluetooth speakers, ensure they are properly paired and charged. For wired connections, verify that audio cables are securely connected. The built-in speakers support Dolby Audio, but for a more immersive experience, consider connecting to a dedicated sound system via Bluetooth or the audio output port.
8.4. Problemas de conectividade
For Wi-Fi problems, ensure your router is working and the projector is within range. Reconnect to the Wi-Fi network via Roku settings. For Bluetooth, ensure the device is in pairing mode. For HDMI/USB, check cable connections and ensure the correct input source is selected.
8.5. Input Lag for Gaming
While the projector offers a large screen, it may not be ideal for fast-paced competitive gaming due to potential input lag. For optimal gaming performance, a dedicated gaming monitor or TV is recommended.
9. Especificacións
| Característica | Detalle |
|---|---|
| Marca | Aurzen |
| Número de modelo | A02A11 |
| Resolución de visualización | 1920 x 1080 (1080p Full HD) |
| Brillo | 280 lúmenes ANSI |
| Tecnoloxía de conectividade | WiFi (2.4G/5G), Bluetooth 5.2, HDMI, USB, Audio |
| Características especiais | Roku Streaming Experience, Dolby Audio, Auto Focus & Keystone, Official Apple AirPlay, Ecosystem Compatible (Apple HomeKit, Siri, Alexa, Google Assistant) |
| Peso do elemento | 4.64 libras |
| Dimensións do paquete | 13.19 x 9.45 x 4.29 polgadas |
| Cor | Branco |
10. Garantía e soporte
Aurzen products are designed for quality and reliability. For warranty information, please refer to the Warranty Card included in your product packaging. For technical support or customer service, please visit the official Aurzen websitio web ou póñase en contacto directamente co seu equipo de atención ao cliente. Garde o recibo de compra para reclamacións de garantía.
11. Información de seguridade
- Non mire directamente á lente do proxector cando estea aceso.amp is on, as this can cause eye damage.
- Ensure proper ventilation around the projector to prevent overheating. Do not block any ventilation openings.
- Manteña o proxector lonxe da auga ou outros líquidos.
- Empregue só o cable de alimentación incluído co proxector.
- Non intente abrir nin reparar o proxector vostede mesmo. Encargue calquera mantemento a persoal de servizo cualificado.
- Manter fóra do alcance dos nenos.


