Introdución
Thank you for choosing the INFIYA K1 2K No Drill Window Camera. This manual provides essential information for the safe and efficient use of your new security camera. Please read it thoroughly before installation and operation, and keep it for future reference.
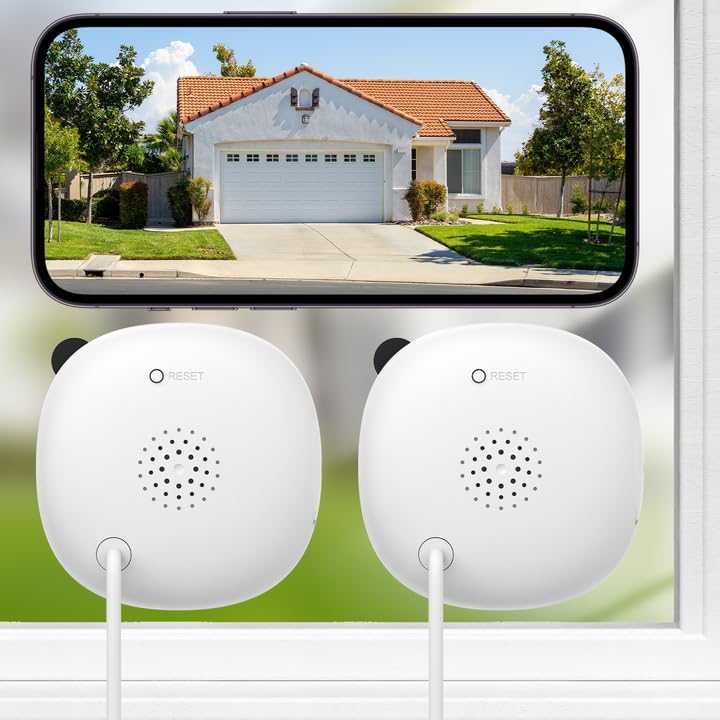
Image: Two INFIYA K1 cameras are shown mounted on an interior window, providing a clear view of a house exterior displayed on a smartphone screen. This illustrates the camera's primary function of outdoor monitoring from indoors.
O que hai na caixa
The INFIYA K1 2K No Drill Window Camera package includes the following items:
- 2 x Cámara
- 2 x adaptador de alimentación
- 2 x USB-C Power Cable (10ft)
- 6 x Magnetic Stickers
- 8 x clips de cable
- 1 x Guía de inicio rápido

Imaxe: Unha detallada view of all components included in the INFIYA K1 camera package, neatly arranged on a white background, showing the cameras, power accessories, mounting stickers, and documentation.
Instrucións de configuración
1. Descarga e conexión da aplicación
- Download the Wansview Cloud App from your phone's app store (iOS or Android).
- Rexistra a túa conta e inicia sesión.
- Plug in the camera and place it near your 2.4GHz Wi-Fi router (within 3 feet). Connect your phone to the 2.4GHz Wi-Fi network.
- Follow the in-app instructions to complete the Wi-Fi configuration and add your K1 camera.

Image: A visual guide demonstrating the four-step process for connecting the INFIYA K1 camera to the Wansview Cloud App, including app download, account registration, Wi-Fi connection, and device pairing.
2. Drill-Free Installation
- Clean the glass surface thoroughly to ensure a clear view and remove any moisture to prevent condensation issues.
- Peel off the protective film from a magnetic sticker.
- Stick the magnetic sticker onto the clean window surface.
- Attach the camera to the magnetic sticker. The camera's magnetic base will securely hold it in place.
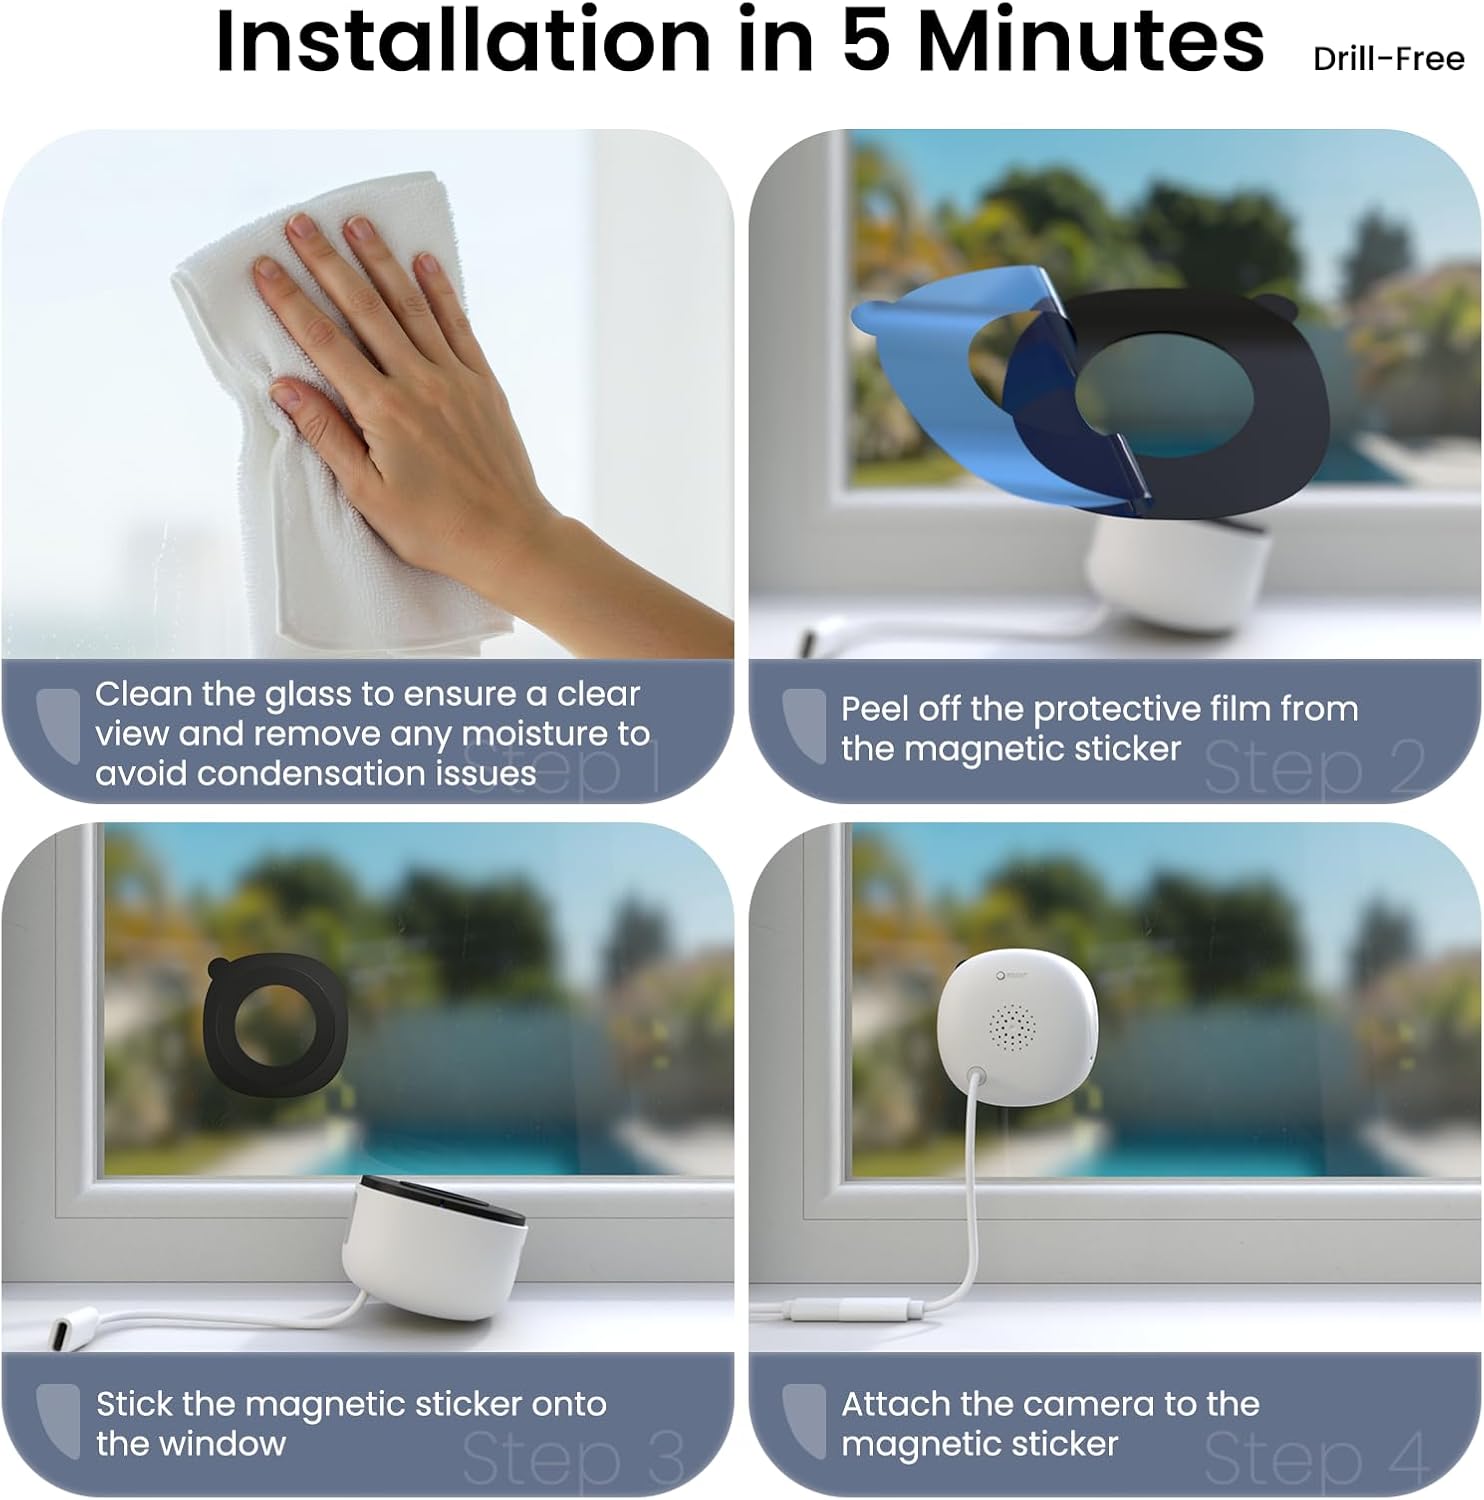
Image: A step-by-step illustration of the drill-free installation process, showing how to clean the window, apply the magnetic sticker, and attach the camera for quick setup.
3. Xestión de cables
Use the provided cable clips to neatly route the USB-C power cable along the window frame or wall, ensuring a tidy and secure setup.
Funcionamento da cámara
1. High 2K Resolution and Wide-Angle Coverage
The INFIYA K1 camera provides sharp 2K image quality through windows, minimizing glare and reflection. Its 105° wide-angle lens captures a broad view of your outdoor area, ensuring fewer blind spots.

Image: The camera is shown mounted on a window, with a smartphone displaying a clear, anti-glare 2K view of the outdoor environment, highlighting its glass-penetrating technology.
2. Full-Color Night Vision
Equipped with advanced Black Light Color Technology, the camera delivers vivid color footage even in low-light conditions (e.g., starlight/moonlight). This allows for clear identification of details at night without the harsh glare of infrared lights.

Image: A comparative display showing the superior true-color night vision of the INFIYA K1 camera through glass, contrasted with traditional indoor camera night vision and standard black & white night vision.
3. AI-Powered Human Detection & Instant Alerts
The camera provides precise human detection, sending real-time alerts to your phone while minimizing false alarms from pets or vehicles (if set to human detection only). Detected human activity triggers immediate app notifications, an optional siren, and automatic video clips.
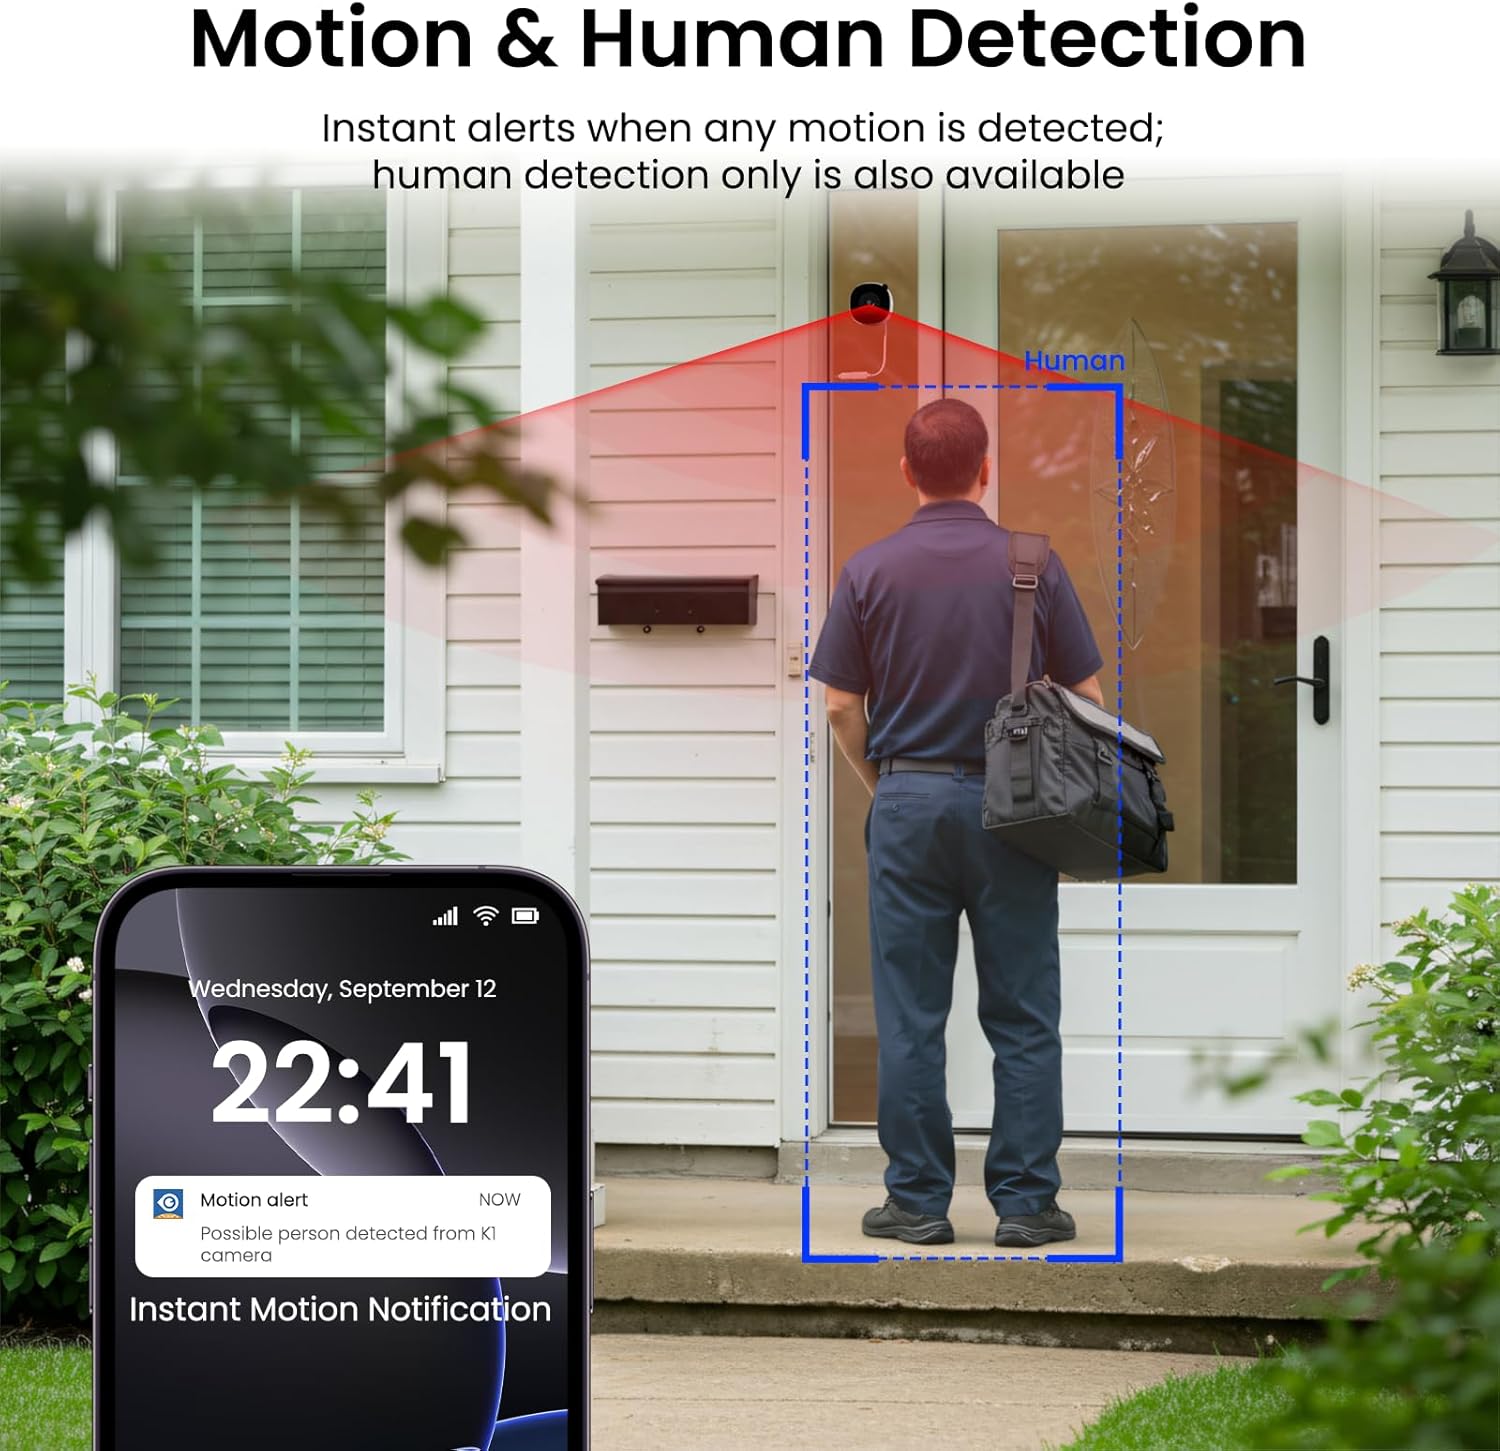
Image: A smartphone screen shows an instant motion alert notification, with the camera's view highlighting a human figure detected at a front door, demonstrating the AI-powered human detection feature.
4. 24/7 Recording & Flexible Storage
The camera supports 24/7 continuous recording. You can choose between local storage (up to 128GB TF card, not included) or secure cloud storage (optional, with a 30-day trial available). The smart overwrite function manages storage space efficiently.

Image: A visual representation of the camera's 24/7 recording capabilities, showing both TF card local storage and optional cloud storage, along with a smartphone interface for playback.
5. Conversa bidireccional
Utilize the two-way talk feature via the app to communicate with individuals outside your home through the camera's built-in speaker and microphone.
6. Multi-User Sharing & Multi-Device Support
Share live camera views with up to 3 app users simultaneously at no cost. Cloud service upgrades support sharing with 5-7 members. The camera also supports integration with multiple devices, including Alexa and Google Assistant.

Image: A smartphone displays the multi-user sharing interface, illustrating how live camera views can be shared with family members or other authorized users.

Image: A woman interacts with an Echo Show device, demonstrating the camera's compatibility with smart home systems like Alexa for multi-device monitoring.
7. Versatile Mounting Options
The drill-free design allows for flexible placement on various surfaces, including windows, cupboards, doors, and glass walls, providing comprehensive security coverage.

Imaxe: Unha colaxe de imaxes que mostranasing the camera's versatility, with examples of it being used on a window, inside a cupboard, on a door, and through a glass wall.
8. Quad Screen Viewing
Monitor multiple camera feeds simultaneously with the quad screen feature, allowing you to view all angles and areas in one consolidated display.

Image: A quad screen layout displays simultaneous feeds from multiple cameras, offering a comprehensive overview of different monitored areas.
Mantemento
- Regularly clean the camera lens with a soft, dry cloth to ensure clear image quality.
- Asegúrese de que o cable de alimentación estea conectado de forma segura e non presente danos.
- Keep the camera and power adapter in a dry environment.
- Periodically check the magnetic sticker's adhesion to the window.
Resolución de problemas
- Sen enerxía: Ensure the power adapter is correctly plugged into a working outlet and the USB-C cable is securely connected to the camera.
- Problemas de conexión wifi: Verify your router is broadcasting a 2.4GHz Wi-Fi signal. Ensure the camera is within range of the router during setup. If issues persist, try resetting the camera using the reset button (refer to Product Details image for location).
- Imaxe pouco clara: Clean the camera lens and the window surface. Check app settings for resolution (HD/Super HD).
- A detección de movemento non funciona: Ensure motion detection is enabled in the app settings. Adjust sensitivity levels and activity zones as needed.
- Problemas de visión nocturna: Check app settings for night vision mode (Full-Color, Smart, Starlight). Ensure there are no strong light sources directly reflecting into the lens from inside.
Especificacións
| Característica | Detalle |
|---|---|
| Nome do modelo | K1 |
| Marca | INFIIA |
| Resolución de captura de vídeo | 3 MP (2 K) |
| Tecnoloxía de conectividade | Sen fíos (Wi-Fi) |
| Protocolo de conectividade | Wi-Fi (2.4GHz Only) |
| Fonte de enerxía | Eléctrico con cable |
| Tipo de montaxe | Montaxe da fiestra |
| Viewángulo ing | 105 graos |
| Range de visión nocturna | 29.5 pés |
| Características especiais | Wired, Corded Electric, Easy to Install, Local 24/7 Recording, Color Night Vision, Anti-Glare View, Two-Way Talk, Motion and Human Detection |
| Dispositivos compatibles | Asistente de Alexa/Google |
| Dimensións do artigo L x W x H | 2.41 x 1.57 x 2.41 polgadas |
| Peso do elemento | 12.6 onzas |
Produto oficial rematadoview
Mira este vídeo para obter unha visión completaview of the INFIYA K1 2K No Drill Window Camera, demonstrating its features and ease of use for home security.
Video: An official product video from GeChangJingHe showcasing the INFIYA K1 2K No Drill Window Camera, highlighting its features for indoor and outdoor monitoring through glass.
Garantía e Soporte
For warranty information, technical support, or any inquiries regarding your INFIYA K1 camera, please refer to the contact details provided in your Quick Start Guide or visit the official INFIYA websitio. Conserve o recibo de compra para reclamacións de garantía.


