Introdución
Thank you for choosing the Klinsmann KRV306 Robotic Vacuum and Mop. This 2-in-1 intelligent cleaning robot is designed to provide efficient and convenient floor cleaning for your home. Please read this manual carefully before use to ensure proper operation, maintenance, and to maximize the lifespan of your device.
Instrucións de seguridade
To reduce the risk of injury or damage, read and follow all safety precautions when setting up, using, and maintaining your robot. Keep this manual in a safe place for future reference.
- Este aparello pode ser usado por nenos a partir de 8 anos e persoas con capacidades físicas, sensoriais ou mentais reducidas ou con falta de experiencia e coñecementos se recibiron supervisión ou instrucións sobre o uso do aparello de forma segura e comprenden os perigos que implica. .
- Os nenos deben ser supervisados para asegurarse de que non xoguen co aparello.
- A limpeza e o mantemento do usuario non deben ser feitos por nenos sen supervisión.
- Empregue só o adaptador de corrente orixinal subministrado polo fabricante.
- Non opere o robot en zonas con chamas abertas ou obxectos fráxiles.
- Asegúrese de retirar todos os cables e obxectos pequenos do chan antes da operación para evitar enredamento.
- Do not immerse the robot or its charging base in water.
- Non empregues o robot para recoller residuos grandes, líquidos ou obxectos ardendo.
Contido do paquete
Verifica que todos os compoñentes estean presentes no paquete:
- Klinsmann KRV306 Robotic Vacuum and Mop
- Adaptador de carga
- Cepillos laterais (2 pares)
- Basura
- Fregando o pano
- Manual de usuario
Configuración
- Desempaquetar o robot: Retire con coidado o robot e todos os accesorios da embalaxe.
- Instalar os cepillos laterais: Attach the side brushes to the designated slots on the bottom of the robot until they click into place.
- Carga o robot:
- Connect the charging adapter to a power outlet and to the charging port on the robot.
- Ensure the robot is fully charged before its first use. A full charge takes approximately 3-4 hours. The indicator light will change to signal a full charge.
- Preparar a área de limpeza: Remove any obstacles, loose cables, or small items from the floor to prevent the robot from getting stuck or damaging items.
Instrucións de funcionamento
Encendido/apagado
- Para acender: Press and hold the power button on the robot until the indicator light illuminates.
- Para apagar: Manteña premido o botón de acendido ata que o indicador luminoso se apague.
Modos de limpeza
The KRV306 offers three cleaning modes:
- Automatic (Zigzag) Mode: Press the power button once to start cleaning in an automatic zigzag pattern. This mode is suitable for general cleaning of open areas.
- Modo de limpeza de puntos: Place the robot in a specific dirty area and press the spot cleaning button (if available, or cycle through modes). The robot will clean in a spiral pattern to concentrate on that area.
- Modo de limpeza de bordos: Activate this mode to have the robot clean along walls and furniture edges.
Función de limpeza
Para usar a función de fregado:
- Fill the water tank (if separate) or attach the damp mopping cloth to the designated area on the robot.
- Inicia un ciclo de limpeza. O robot aspirará e fregará simultaneamente.
- Remove the mopping cloth and empty the water tank after each use.
Navigation and Sensors
The KRV306 is equipped with intelligent navigation features:
- Anti-drop Infrared Sensors: These sensors detect stairs and elevated surfaces, preventing the robot from falling.
- Mechanical Bumper: The bumper allows the robot to gently detect and navigate around obstacles like furniture without causing damage.
- Escalada de limiares: The robot can easily slide over thresholds up to 10mm high, ensuring continuous cleaning across different rooms.
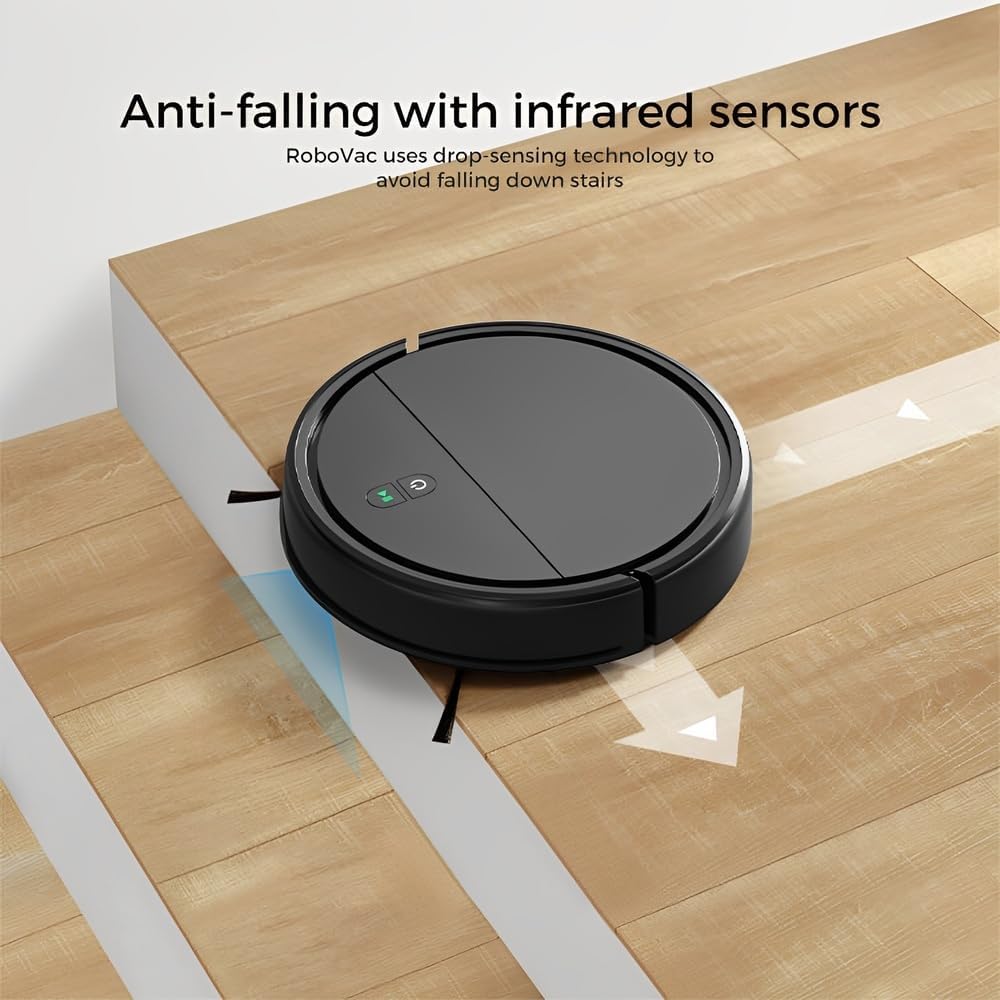
Image: Anti-falling infrared sensors prevent the robot from falling down stairs.

Image: The mechanical bumper allows the robot to navigate around furniture without damage.
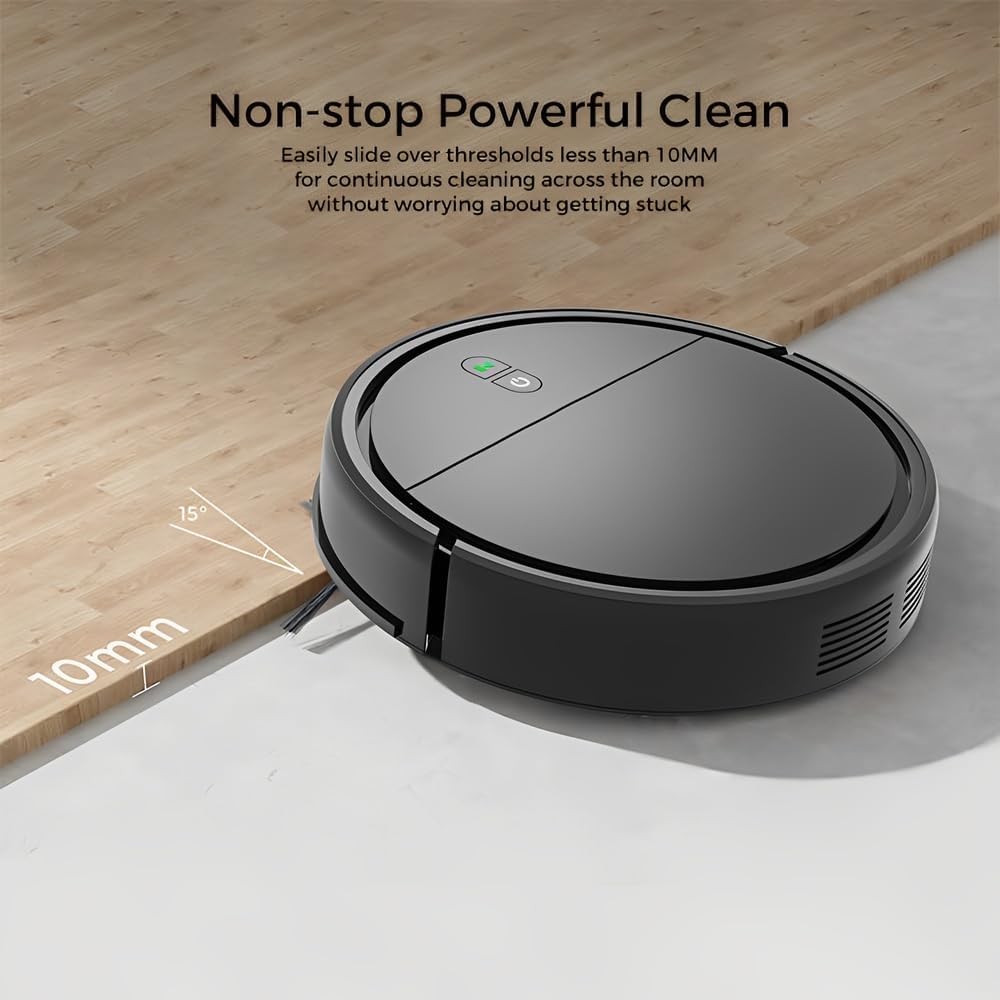
Image: The robot can easily overcome thresholds up to 10mm for continuous cleaning.
Mantemento
Regular maintenance ensures optimal performance and extends the life of your robot.
Baleirando o lixo

Image: The large dustbin collects various types of debris, reducing the frequency of emptying.
- Prema o botón de liberación do depósito do po e tire do depósito para fóra.
- Abra a tapa do colector de lixo e baleire o seu contido nun colector de lixo.
- Clean the filter inside the dustbin with the provided cleaning tool or a soft brush. Replace the filter if necessary.
- Rinse the dustbin with water if needed, ensuring it is completely dry before reinserting.
Limpeza de cepillos laterais
- Regularly check side brushes for tangled hair or debris.
- Carefully remove any tangled material. If brushes are worn, replace them with new ones.
Sensores de limpeza
- Wipe the anti-drop sensors and charging contacts on the bottom of the robot with a clean, dry cloth.
- Ensure the bumper area is free of debris.
Cleaning Mopping Cloth
- Remove the mopping cloth after each use.
- Wash the cloth by hand or machine. Allow it to air dry completely before reattaching.
Resolución de problemas
| Problema | Causa posible | Solución |
|---|---|---|
| O robot non se acende. | Batería baixa; Botón de acendido non premido correctamente. | Carga o robot; mantén premido o botón de acendido durante uns segundos. |
| O robot quédase atascado con frecuencia. | Obstacles (cables, rugs, small items); Dirty sensors. | Clear the cleaning area; Clean the anti-drop and bumper sensors. |
| Mal rendemento de limpeza. | Depósito do po cheo; filtro obstruído; cepillos laterais gastados. | Baleirar o colector de po; Limpar/substituír o filtro; Limpar/substituír as escobillas laterais. |
| O robot cae polas escaleiras. | Dirty anti-drop sensors; Sensors obstructed. | Clean the anti-drop sensors thoroughly. |
| A función de fregar é ineficaz. | Mopping cloth is dry or dirty. | Dampen the mopping cloth; Clean or replace the mopping cloth. |
Especificacións
| Modelo | KRV306 |
| Marca | A vida |
| Funcións | Vacuuming, Mopping |
| Tipo de batería | 1500 mAh de iones de litio |
| Tempo de execución | Ata 80 minutos |
| Tempo de carga | 3-4 horas |
| Potencia de succión | 400PA |
| Nivel de ruído | Máx. 68 dB |
| Capacidade do lixo | Optimized (ample capacity) |
| Dimensións (diámetro x alto) | 29 cm x 7.2 cm |
| Peso | 2.1 kg |
| Threshold Climbing Ability | Ata 10 mm |
| Características especiais | Anti-drop Infrared Sensor, Mechanical Bumper, Low Noise, Compact, Rechargeable |
Información da garantía
The Klinsmann KRV306 Robotic Vacuum and Mop comes with a Garantía de 90 días from the date of purchase, covering manufacturing defects. This warranty does not cover damage caused by misuse, accidents, unauthorized modifications, or normal wear and tear. Please retain your proof of purchase for warranty claims.
Atención ao cliente
If you encounter any issues or have questions regarding your Klinsmann KRV306, please refer to the troubleshooting section of this manual. For further assistance, contact the retailer or manufacturer's customer service department with your product model and purchase details.


