1. Produto rematadoview
The Xiaomi Dust Mite Vacuum Cleaner 2 Pro is designed for effective removal of dust mites and allergens from various fabric surfaces. It features powerful suction, high-frequency beating, UV-C sterilization, warm-air drying, and smart dust-mite detection to ensure a hygienic environment.
Imaxe: Máis deview of the Xiaomi Dust Mite Vacuum Cleaner 2 Pro, showcasino seu deseño compacto e os seus principais compoñentes.

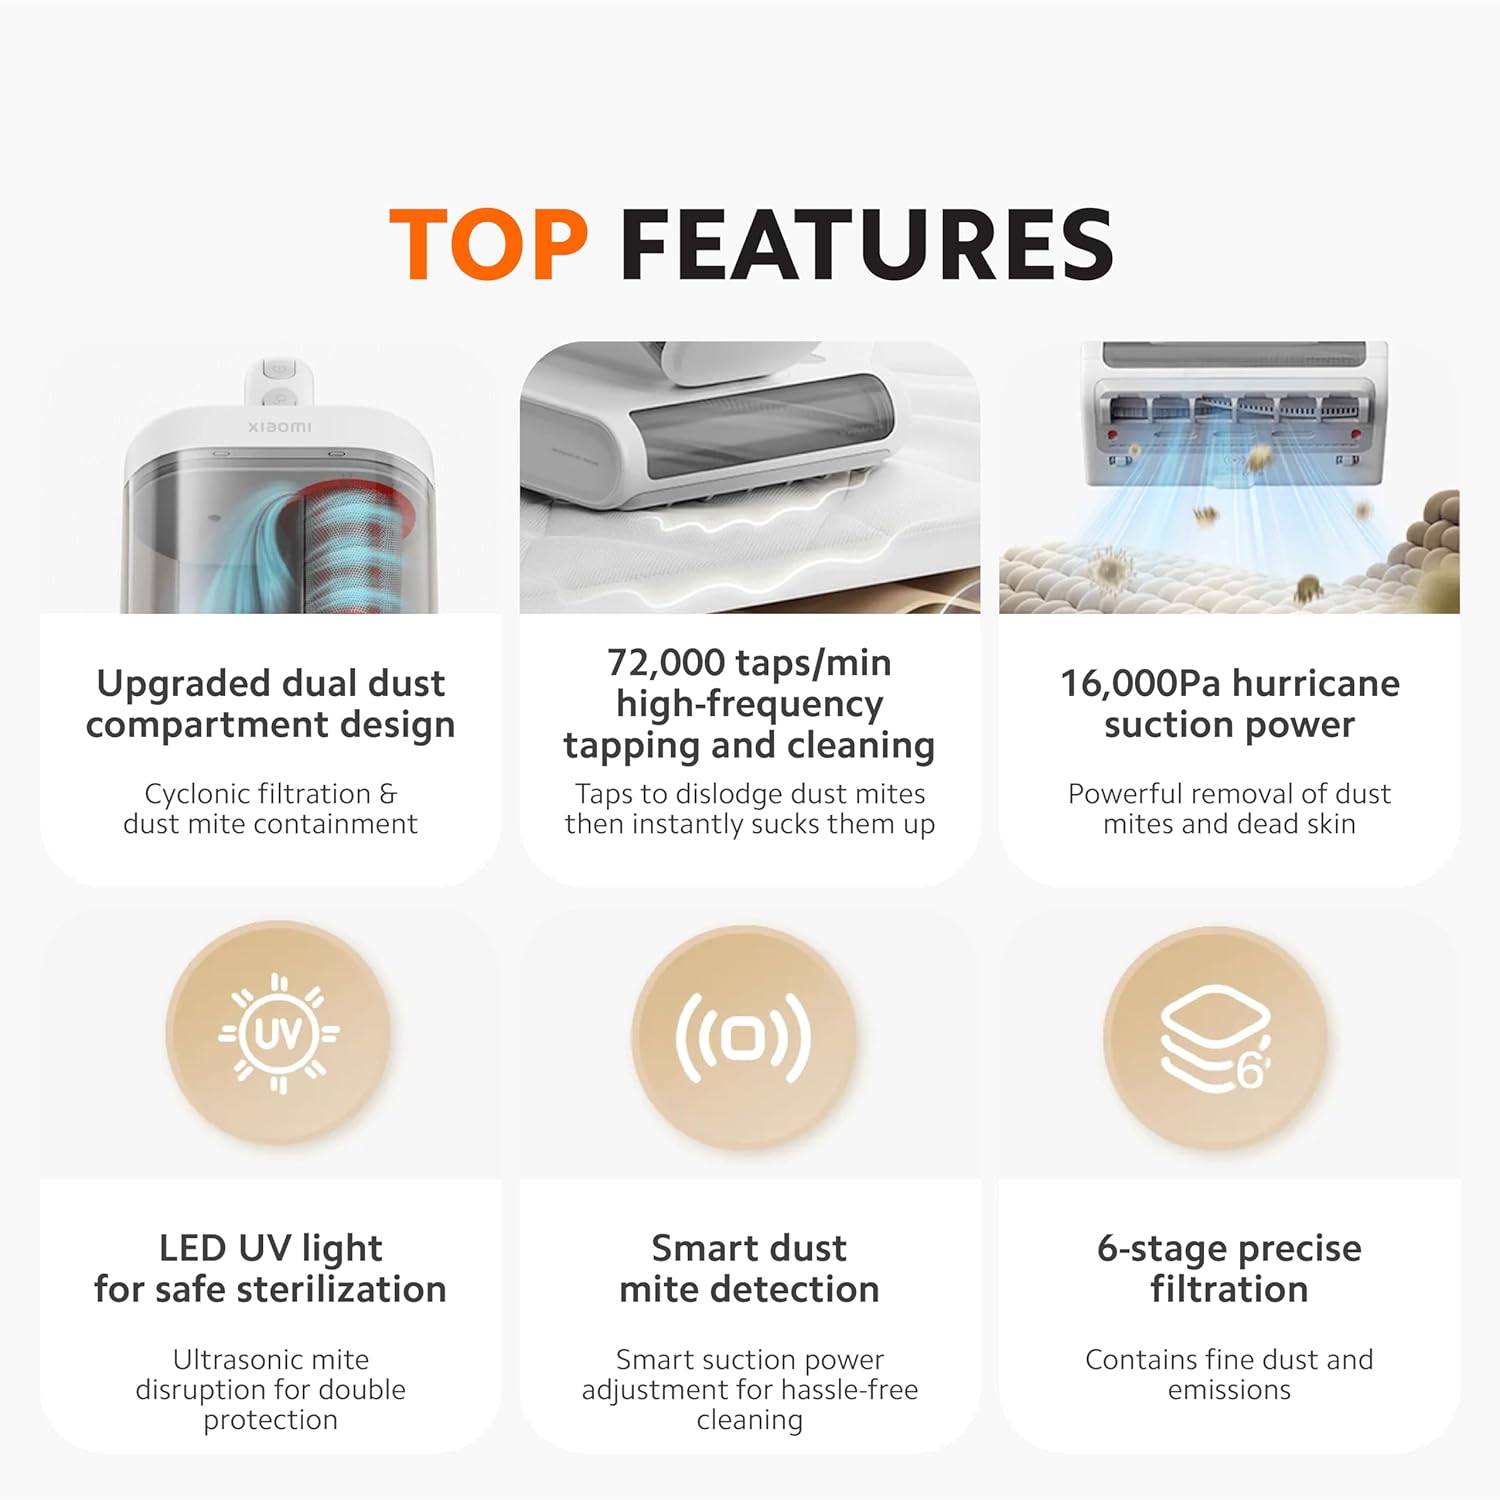
Image: Visual summary of the vacuum cleaner's top features, including dual dust compartment, high-frequency tapping, suction power, UV light, smart mite detection, and 6-stage filtración.
2. Configuración
2.1 Desembalaxe
Carefully remove all components from the packaging. Retain the packaging for future storage or transport. Ensure all parts listed in the packing list are present and undamaged.
2.2 Identificación de compoñentes
- Main Unit (with motor and handle)
- Dust Collection Bin (dual compartment)
- Roller Brush Head
- Cable de alimentación
- Manual de usuario (este documento)
2.3 Montaxe inicial
- Attach the roller brush head to the main unit by aligning the connectors and pushing until it clicks into place.
- Ensure the dust collection bin is securely attached to the main unit.
- Connect the power cord to the vacuum cleaner and then plug it into a suitable power outlet (220V).
3. Instrucións de funcionamento
3.1 Acendido/Apagado
Press the power button located on the handle to turn the vacuum cleaner on. Press it again to turn off the device.
3.2 Potencia de succión
The vacuum cleaner provides 16 kPa of powerful suction to effectively remove dust mites and particles from deep within fabrics.

Image: Illustration of the vacuum cleaner's powerful 16,000Pa suction lifting dust mites and debris from a fabric surface.
3.3 High-Frequency Beating
The roller brush delivers 72,000 taps per minute to dislodge mites and dust embedded in fabrics. This action, combined with the anti-tangle design, ensures thorough cleaning and reduces hair buildup.

Image: Close-up of the vacuum head demonstrating the high-frequency tapping mechanism on a mattress surface.
3.4 UV-C Sterilization and Ultrasonic Mite Disruption
Activate the UV-C sterilization feature to eliminate bacteria. The integrated ultrasonic waves further disrupt dust mite activity. For safety, the UV light automatically turns off when the vacuum is lifted from the surface.

Image: The vacuum cleaner in operation, showing the purple glow of the LED UV light for sterilization and a safety icon indicating automatic shut-off when lifted.
3.5 65°C Warm-Air Drying
The vacuum cleaner can blow 65°C hot air to dry bedding and upholstery, creating an unfavorable environment for dust mites and ensuring constant dryness.
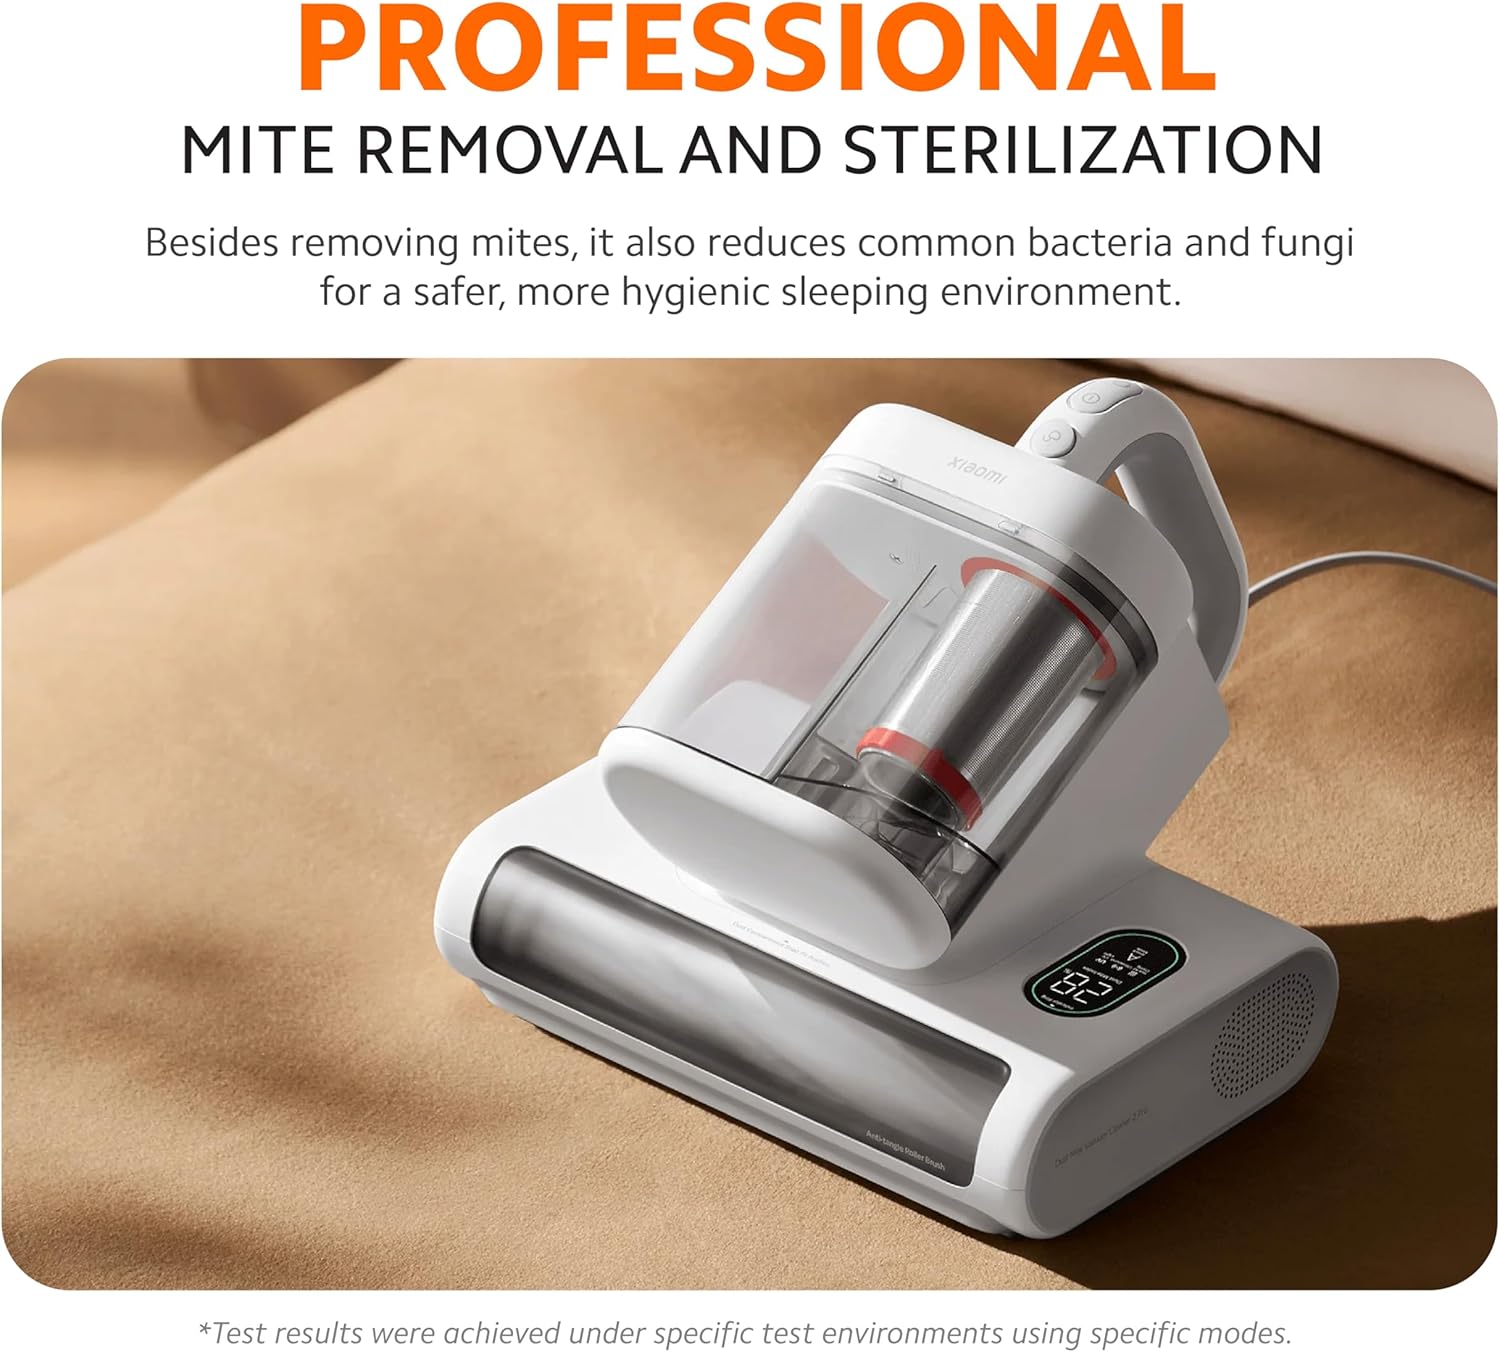
Image: The vacuum cleaner demonstrating its 65°C hot air drying function, with warm air being expelled to dry fabric surfaces.
3.6 Smart Dust-Mite Detection
The integrated mite sensor tracks mite levels in real-time and automatically adjusts suction power. The LED screen displays the mite index, mode, and status. Refer to the indicator lights:
- Luz verde constante: Light Dust Mite Presence
- Luz amarela constante: Moderate Dust Mite Presence
- Steady Orange Light: Heavy Dust Mite Presence

Image: Close-up of the vacuum cleaner's display panel showing the smart dust mite detection system with color-coded indicators for mite presence levels.
4. Mantemento
Regular maintenance ensures optimal performance and extends the lifespan of your vacuum cleaner. Always unplug the device before performing any maintenance.
4.1 Cleaning the Dust Collection Bin
A aspiradora dispón dun upgraded dual dust compartment design. This system separates larger debris from fine dust, preventing clogging and maintaining suction efficiency. The 0.8L clear dust bin allows for easy monitoring of fullness.
- Press the release button to detach the dust collection bin from the main unit.
- Open the bin and empty its contents into a waste receptacle.
- Separate the dust compartment from the filter compartment. Clean both compartments thoroughly.
- Rinse the dust bin and filter components with water if necessary. Ensure they are completely dry before reassembling.
- Reattach the dust bin to the main unit until it clicks securely.
4.2 Mantemento do filtro
O 6-stagSistema de filtración captures particles as small as 0.3 µm. Regular cleaning of the filters is crucial to prevent secondary air pollution and maintain suction power.
- Remove the filters from the dust collection bin.
- Tap the filters gently to dislodge accumulated dust.
- If washable, rinse the filters under running water. Do not use detergents.
- Allow filters to air dry completely for at least 24 hours before reinserting them. Do not use a dryer or direct heat.
- Replace filters if they are visibly damaged or if suction power significantly decreases even after cleaning.
4.3 Roller Brush Cleaning
Periodically check the roller brush for tangled hair or debris. The anti-tangle design minimizes buildup, but occasional cleaning is recommended.
- Detach the roller brush head from the main unit.
- Carefully remove any hair or fibers wrapped around the roller brush using scissors or a cleaning tool.
- Wipe the brush and its housing with a dry cloth.
- Reattach the roller brush head.
5 Solución de problemas
| Problema | Causa posible | Solución |
|---|---|---|
| O dispositivo non se acende. | O cable de alimentación non está conectado correctamente. Non hai corrente na toma de corrente. | Asegúrate de que o cable de alimentación estea conectado correctamente tanto ao dispositivo como a unha toma de corrente que funcione. Proba a toma de corrente con outro electrodoméstico. |
| Baixo poder de succión. | Dust bin full. Filters clogged. Roller brush obstructed. | Empty the dust bin. Clean or replace filters. Remove any obstructions from the roller brush. |
| A luz ultravioleta non funciona. | Device lifted from surface. UV lamp funcionamento defectuoso. | Ensure the vacuum cleaner is in full contact with the surface. If the issue persists, contact customer support. |
| Smart detection light always orange. | High dust mite presence. Sensor dirty. | Continue cleaning the area thoroughly. Clean the mite sensor window with a soft, dry cloth. |
Se o problema persiste despois de intentar estas solucións, póñase en contacto co servizo de atención ao cliente.
6. Especificacións
| Característica | Detalle |
|---|---|
| Modelo | Dust Mite Vacuum Cleaner 2 Pro |
| Marca | XIAOMI |
| Potencia de succión | 16 kPa |
| High-Frequency Beating | 72,000 taps/min |
| Esterilización | UV-C Light, Ultrasonic Mite Disruption |
| Función de secado | 65°C Warm-Air Drying |
| Sistema de filtración | 6-Stage Filtration (captures 0.3 µm particles) |
| Capacidade do colector de po | 0.8 L (Dual Compartment) |
| Fonte de enerxía | Eléctrico con cable |
| Voltage | 220 voltios |
| Wattage | 500 vatios |
| Peso do elemento | 2.4 quilogramos |
| Factor de forma | Portátil |
| Uso recomendado | Mattress, Upholstery, Carpet |
7. Garantía e soporte
7.1 Información da garantía
This product is covered by a manufacturer's warranty. Please refer to the warranty card included in your product packaging for specific terms and conditions, including warranty period and coverage details. Keep your proof of purchase for warranty claims.
7.2 Atención ao cliente
For technical assistance, troubleshooting beyond this manual, or warranty inquiries, please contact XIAOMI customer support. Visit the official XIAOMI websitio web ou consulte a información de contacto que se proporciona na documentación do produto.
Tamén podes visitar o Tenda XIAOMI en Amazon para obter máis información sobre o produto.


